PingOne for Developers Foundations
PingOne is a cloud-based framework that combines no-code identity orchestration with authentication, user management, and multi-factor authentication services to help your business build, test, and optimize seamless and secure customer experiences. PingOne for Developers Foundations introduces you to the PingOne platform APIs. This guide provides overview information about the platform's authorization and authentication capabilities as well as its application and identity management features. It includes numerous deep-dive topics to help you answer the "big picture" questions you might have about the PingOne platform.
If you're new to PingOne, keep reading. If you're familiar with the PingOne API platform, you might want to explore these documents:
-
PingOne for Developers Getting Started
This guide helps you create your first application connection using the PingOne admin console application and get a JSON Web Token for the application you created. With your admin access token, you can make API calls to the Pingone resource server.
-
PingOne Platform API Reference
This guide provides information about the management (admin) APIs to configure applications, users, external identity providers, and many other platform features.
-
This guide provides information about the services to query the PingOne authorization server, run authentication workflows (from sign-on polices or DaVinci flows), and receive access tokens from the authorization server.
-
PingOne for Developers Workflow Library
This guide includes multi-step workflows for common PingOne configurations and sign-on flows. Each workflow includes a Postman collection linked to a Run in Postman button, enabling you to load (and run) the workflow collections into your Postman workspace.
Authorization and authentication
The following section provides additional information about PingOne platform authorization and authentication workflows. It also includes detailed information about access tokens and ID tokens.
-
Authorization and authentication by application type
PingOne supports several application types. When you define a new application, you must specify the
typeproperty value that best describes the application. -
Authorization flow by grant type
Authorization and authentication sign-on flows depend on the application's grant type. When you define a new application, you must specify its grant type.
-
PingOne authentication flow states
An application's sign-on policy determines the flow states and the corresponding actions required to complete the workflow.
-
Access tokens and ID tokens are credential strings that provide authorization to access a protected resource. All tokens in PingOne are signed JSON Web Tokens (JWTs).
-
Postman collection-level authorization
We use Postman to create our PingOne API docs, and have supplied our Postman collections for you to download. There's also an accompanying Postman Environment template already populated with the variables used in the collections. In PingOne collections, the authorization method is defined at the collection level, and this section describes how to use collection-level request authentication in Postman.
Workflows
-
This activity shows you how to create a simple login using only a username and password.
-
Configure a PKCE authorization workflow
This activity uses a Proof Key for Code Exchange (PKCE) authorization flow, which specifies additional parameters in the request to prevent malicious apps from intercepting the authorization code.
-
Create an MFA Transaction Approval using SMS
This activity shows you how to create a transaction approval MFA authentication flow using a
requesttoken to encode the request parameters in a signed JWT. -
Use LOGIN and MFA Actions to Authenticate Users
This activity shows you how to create a sign-on policy with login and mfa actions.
-
Configure a Progressive Profiling Sign-On Action
This activity shows you how to create a sign-on policy with a progressive profiling action.
-
Use LOGIN and AGREEMENT Actions to Authenticate Users
This activity shows you how to create a sign-on policy with login and agreement actions.
-
Configure an MFA Only Flow Using a Login Hint Token
This activity shows you how to create an MFA only authentication flow using a
login_hint_tokento identify and authenticate the end-user without needing to encode the entire authentication request in a signed JWT. -
Test an OAuth Connection using Identifier First Authentication
This activity shows you how to test an OAuth connection using the identifier first login flow. The identifier first login flow will first prompt a user for a username, and then use the identity provider discovery rules defined in the sign-on policy to route the user to the correct external identity provider for authentication.
Authorization and authentication by application type
PingOne supports several application types. When you make a POST {{apiPath}}/environments/{{envID}}/applications request to define a new application, you must specify the type property that best describes the application. PingOne supports the following application types:
-
A browser-based application with a server-side component, such as ASP, CGI, JSP/Java, Node.js, or Ruby on Rails applications.
-
An application that is installed and run directly on the local operating system, like Java, Objective-C, Swift, or React applications. Native applications are typically intended for native devices.
-
A browser-based application that runs on the front-end with no server-side component, such as Sencha Touch, AngularJS, and React applications. A single-page application runs on the client side after it loads, so it cannot keep a client secret.
-
A web application that does not require user interaction through the web browser, like a command line interface, a service, or a daemon.
-
An administrator application that can interact with platform APIs. Access to platform APIs is determined by the user's or application's role assignments.
Authorization flow steps
An authorization grant gives applications the capability to authenticate users and access secure resources. The following steps describe the application authorization flow:
-
The application initiates the authorization flow through a
GETorPOSTrequest to theauthorizeendpoint. -
The authorization service generates the access token for the
implicitgrant. -
For
authorization_codeandclient_credentialsgrants, the application calls the/{{envID}}/as/tokenendpoint to acquire the access token.
For more information about authorization, see OpenID Connect/OAuth 2.
Web applications
For web applications, the typical grant type to request access to protected resources is authorization_code. The /{{envID}}/as/authorize endpoint supports GET and POST methods and returns the authorization code needed to acquire an access token. After an authorization code is returned successfully, the code is used to get the access token.
The following sample shows the GET /{{envID}}/as/authorize operation.
https://auth.pingone.com/{{envID}}/as/authorize?response_type=code&client_id={{appID}}&redirect_uri={{redirect_uri}}&scope=openid%20profile%20email&acr_values=Single_Factor&prompt=login
The request URL contains the following parameter values:
-
response typeSpecifies the response type for the authorization request. If the grant type is
authorization_code, theresponse_typeparameter must have a value ofcode. This parameter is required. -
client_idSpecifies the application's UUID, returned from a
GET /environments/{{envID}}/applications/{{appID}}request. This parameter is required. -
redirect_uriProvides a URL that specifies the return entry point of the application. This parameter is required.
Note: To ensure proper redirect on some iOS and OSX browsers, the
redirect_urivalue must include a trailing slash. For example, a registered URI ofhttps://www.pingidentity.com/redirects properly tohttps://www.pingidentity.com/#access_token=eyJsdf, but a registered URI ofhttps://www.pingidentity.comredirects incorrectly to https://www.pingidentity.com/en.html, and the client application would not receive the access token. -
scopeSpecifies permissions that determine the resources that the application can access. This parameter is not required, but it is needed to specify accessible resources.
-
acr_valuesAn optional parameter that designates whether the authentication request includes specified sign-on policies. Sign-on policy names should be listed in order of preference, and they must be assigned to the application. For more information, see Sign-on policies in the PingOne Platform API Reference.
-
promptAn optional parameter that specifies whether the user is prompted to login for re-authentication. The
promptparameter can be used as a way to check for existing authentication, verifying that the user is still present for the current session.
The authorization request returns a URL to initiate login flow. This authentication flow presents appropriate login forms to an end user and submits data provided by the user for all required sign-on steps. After all login actions in the flow are completed, the GET /{{envID}}/as/resume endpoint continues processing the authorization request.
https://auth.pingone.com/{{envID}}/as/resume?flowId={{flowID}}
After restarting the authorization flow, the authorization code is submitted through a request to the POST /{{envID}}/as/token endpoint to create the access token.
curl --request POST \
  --url 'https://auth.pingone.com/{{envID}}/as/token' \
  --header 'Content-Type: application/x-www-form-urlencoded' \
  --data 'grant_type=authorization_code&code={{authCode}}&redirect_uri={{redirect_uri}}'
The grant_type, code, and redirect_uri parameter values are required in the request body.
Native and single-page applications
For native applications and single-page applications, the default grant type to request access to protected resources is implicit.
For the implicit flow, the application is issued an access token without requiring an authorization code exchange. When the request is made to the /{{envID}}/as/authorize endpoint for an implicit grant type, the value of the response_type parameter is set to token or id_token.
If the request contains the id_token response type and the openid scope, then it is considered an authentication (OpenID Connect) request, and an ID token is issued. The ID token includes the ID of the user; this request can also include the profile, email, address, and phone OIDC scopes to add additional user claims to the ID token.
The following sample shows the GET /{{envID}}/as/authorize operation to return an id_token.
https://auth.pingone.com/{{envID}}/as/authorize?client_id={{appID}}&redirect_uri={{redirect_uri}}&response_type=id_token&scope=openid%20profile%20email&acr_values=Single_Factor&max_age=86400
The request can specify the token or id_token response types individually, or both. The following sample shows the GET /{{envID}}/as/authorize operation to return a token and an id_token:
curl --request GET \
  --url 'https://auth.pingone.com/{{envID}}/as/authorize?client_id={{appID}}&redirect_uri={{redirect_uri}}&response_type=token id_token&nonce=12345&scope=openid profile p1:read:user&acr_values=Single_Factor&max_age=86400'
In this request, the p1:read:user scope is included in the access token but not in the ID token.
The request URL contains the following parameter values:
-
response typeSpecifies the response type for the authorization request. The
implicitgrant type requires aresponse_typeparameter value oftokenorid_token(or both). This parameter is required. -
client_idSpecifies the application's UUID, returned from a
GET /environments/{{envID}}/applications/{{appID}}request. This parameter is required. -
redirect_uriProvides a URL that specifies the return entry point of the application. This parameter is required.
Note: To ensure proper redirect on some iOS and OSX browsers, the
redirect_urivalue must include a trailing slash. For example, a registered URI ofhttps://www.pingidentity.com/redirects properly tohttps://www.pingidentity.com/#access_token=eyJsdf, but a registered URI ofhttps://www.pingidentity.comredirects incorrectly tohttps://www.pingidentity.com/en.html, and the client application would not receive the access token. -
nonceA string that is used to associate a client session with a token to mitigate replay attacks. The value is passed through unmodified from the authentication request to the token. This is a required property for authorization requests that return a
token. It is not required for requests that return only anid_token. -
scopeSpecifies permissions that determine the resources that the application can access. This parameter is not required, but it is needed to specify accessible resources.
-
acr_valuesAn optional parameter that designates whether the authentication request includes specified sign-on policies. Sign-on policy names should be listed in order of preference, and they must be assigned to the application. For more information, see Sign-on policies in the PingOne Platform API Reference.
-
max_ageAn optional parameter that specifies the maximum amount of time allowed since the user last authenticated. If the
max_agevalue is exceeded, the user must re-authenticate.
After all login action steps in the flow are completed successfully, the GET /{{envID}}/as/resume endpoint is called to continue processing the authorization request.
https://auth.pingone.com/{{envID}}/as/resume?flowId={{flowID}}
The authorization service generates the token or id_token for the application after restarting the authorization flow; it does not require a step to call the /{{envID}}/as/token endpoint.
Non-interactive applications
Non-interactive applications support the client_credentials, authorization_code, implicit, and refresh_token grant types to obtain an access token. For information about authentication flows for applications using the authorization_code and implicit grant types.
The following sample shows the POST request to the /{{envID}}/as/token endpoint to acquire the access token. Note that the application must have its tokenEndpointAuthMethod attribute value set to client_secret_post.
curl --request POST \
  --url 'https://auth.pingone.com/{{envID}}/as/token' \
  --header 'Content-Type: application/x-www-form-urlencoded' \
  --data 'grant_type=client_credentials&client_id={{appID}}&client_secret={{secret}}'
The request URL contains the following parameter values:
-
grant_typeSpecifies the grant type for the authorization request, which for non-interactive applications must be a
client_credentialsgrant. This parameter is required. -
client_idSpecifies the application's UUID, returned from a
GET /environments/{{envID}}/applications/{{appID}}request. This parameter is required. -
client_secretSpecifies the application's client secret, returned from a
GET /environments/{{envID}}/applications/{{appID}}/secretrequest. This parameter is required.
For client_credentials requests in which the application's tokenEndpointAuthMethod attribute value is set to client_secret_basic, the client_id and client_secret attributes cannot be part of the request body. In these cases, the client_id and client_secret are passed in as a Base64 encoded authorization header in the request:
curl --request POST \
 --url 'https://auth.pingone.com/{{envID}}/as/token' \
 --header 'Content-Type: application/x-www-form-urlencoded' \
 --user 'client_id:client_secret' \
 --data 'grant_type=client_credentials'
The --user 'client_id:client_secret' option tells curl to use a BASIC authentication header with the specified credentials in the request, which is similar to this:
Authorization: Basic <base64 encoded "client_id:client_secret">
Worker applications
Worker applications are administrator applications that interact with platform APIs. This application type supports only the OPENID_CONNECT protocol.
We strongly recommend that when you create your new PingOne tenant (the first time you login to your PingOne account), you create a Worker app in the intial PingOne environment (an administrator environment). Use this Worker app to create new environments, and perform other organization level administration tasks.
Each new environment you create should have its own Worker app that's used to perform environment level administration tasks (such as, create populations and users). This is in accord with the general PingOne recommendation to apply the principle of least privilege for all applications and permissions.
When creating a new Worker application, by default the application inherits the same role assignments as the actor that created the application. This is another case where the principle of least privilege should be applied. As a best practice, disable this inheritance using the assignActorRoles parameter when creating the Worker app. This is for security purposes, to ensure you assign only the minimal set of permissions necessary for the Worker app. See Applications OIDC settings data model in the PingOne Platform API Reference for more information.
When getting a token using the client_credentials grant type, the application's role assignments are used.
Worker applications that use a user-based grant type such as implicit or authorization_code let you assign only OIDC scopes to the application. When getting a token using a user-based grant type, the user's role assignments are used.
The following sample shows the /{{envID}}/as/token request with a client_credentials grant to return an access token with no platform scopes.
curl --request POST \
 --url 'https://auth.pingone.com/{{envID}}/as/token' \
 --header 'Content-Type: application/x-www-form-urlencoded' \
 --data 'grant_type=client_credentials&client_id={{appID}}&client_secret={{secret}}'
The response returns the access_token, the token_type, and the expires_in property values. It does not list any scopes.
{
  "access_token": "eyJhbGciOiJSUzI1NiIsImtpZCI6InRlc3QifQ.eyJzY29wZSI6IiIsImNsaWVudF9pZCI6ImlkZW50aXR5LW...",
  "token_type": "Bearer",
  "expires_in" : 3600
}
Authorization flow by grant type
The authorization request flow depends on the grant type you have selected for the application.
-
If the application's grant type is
authorization_code, PingOne returns an authorization code in the response to the application's authorization request. The authorization code is used by the/as/tokenendpoint to get an ID token, an access token, or both. -
If the application's grant type is
implicit, the response to the authorization request is anid_token, atoken(access token), or both, depending on the value of theresponse_typeparameter in the authorization request. -
In a hybrid authorize flow, an authorization code is returned from the authorization endpoint, some tokens are returned from the authorization endpoint, and others are returned from the token endpoint. The authorization endpoint's
response_typeproperty specifies thecodetype and it also specifiesid_token, ortoken, or both. -
For added security, you can also include Proof Key for Code Exchange (PKCE) parameters in the authorization request for the code and hybrid grant types. PKCE for OAuth uses either plain text or a cryptographic hash of a random string that is included in the authorization request (
code_challenge) along with the encoding method used (code_challenge_method). When the authorization code is issued in the response, the original plain text or random string (code_verifier) is included in the token request. -
If the grant type is
device_code, PingOne returns an activation code in the response to thePOST /{{envID}}/as/device_authorizationrequest. It starts a flow that gives OAuth-enabled devices, such as smart TVs, the ability to complete user authorization and access protected resources.
Authorization code grant type
If the grant type is authorization_code, PingOne returns an authorization code in the response to the application's authorization request. The Location HTTP header returned by the /as/resume endpoint contains the authorization code. The authorization code returned in the resume endpoint response is used by the /as/token endpoint to get an ID token, an access token, or both.
PingOne supports GET and POST HTTP methods for initiating the authorize request.
Authorization code authorize request using GET
Step 1: Send an authorize request to the PingOne authorization server using GET.
curl --location --request GET '{{authPath}}/{{envID}}/as/authorize?response_type=code&client_id={{appID}}&redirect_uri={{redirect_uri}}&scope=openid'
The request requires the following properties in the request URL:
-
response_type: For an authorization_code grant the response type iscode. -
client_id: The application's ID. -
redirect_uri: The URL to redirect the browser after sign on. -
scope: The permissions that specify accessible resources.
The response returns a Location HTTP header that specifies the URL for the sign-on screen and the flow ID for the sign-on workflow. For information about additional optional query parameters that can be set on the request, see Authorize (authorization_code) in the PingOne Platform API Reference.
Step 2: After the sign-on flow completes, call the resume endpoint.
curl --location --request GET '{{authPath}}/{{envID}}/as/resume?flowId={{flowID}}' \
--header 'Cookie: {{sessionToken}}'
The request requires the following properties in the request URL:
flowID: The ID for the authentication flow.
The Location HTTP header returned by the resume endpoint contains the code. Note that the PingOne API uses session token cookies to establish the user's authentication session and maintain the session throughout the workflow, allowing the flow to redirect back to the authorization server to get the token.
Step 3: Call the token endpoint to exchange the authorization code for a token.
curl --location --request POST '{{authPath}}/{{envID}}/as/token' \
--header 'Content-Type: application/x-www-form-urlencoded' \
--data-urlencode 'grant_type=authorization_code' \
--data-urlencode 'code={{authCode}}' \
--data-urlencode 'redirect_uri={{redirect_uri}}'
The request requires the following properties in the request URL:
-
grant_type: The grant type of the token request. In this example, the value isauthorization_code. -
code: The authorization code value returned by the resume endpoint. -
redirect_uri: The URL that specifies the return entry point of the application.
The token endpoint response returns the access token, ID token, or both. For information about the authorization code token request based on the application's tokenEndpointAuthMethod, see Token in the PingOne Platform API Reference.
Authorization code authorize request using POST
The authorize request using POST is essentially the same as GET. The POST request accepts all the same parameters as the GET request. For the POST request, parameters and their values are Form Serialized by adding the parameter names and values to the entity body of the HTTP request and specifying the Content-Type: application/x-www-form-urlencoded request header.
Step 1: Send an authorize request to the PingOne authorization server using POST.
curl --location --request POST '{{authPath}}/{{envID}}/as/authorize' \
--header 'Content-Type: application/x-www-form-urlencoded' \
--data-urlencode 'response_type=code' \
--data-urlencode 'client_id={{appID}}' \
--data-urlencode 'redirect_uri={{redirect_uri}}' \
--data-urlencode 'scope=openid'
The request requires the following properties in the request URL:
-
response_type: For an authorization_code grant the response type iscode. -
client_id: The application's ID. -
redirect_uri: The URL to redirect the browser after sign on. -
scope: The permissions that specify accessible resources.
The response returns a Location HTTP header that specifies the URL for the sign-on screen and the flow ID for the sign-on workflow. For information about additional optional query parameters that can be set on the request, see Authorize (authorization_code) in the PingOne Platform API Reference.
Step 2: After the sign-on flow completes, call the resume endpoint.
curl --location --request GET '{{authPath}}/{{envID}}/as/resume?flowId={{flowID}}' \
--header 'Cookie: {{sessionToken}}'
Step 3: Call the token endpoint to exchange the authorization code for a token.
curl --location --request POST '{{authPath}}/{{envID}}/as/token' \
--header 'Content-Type: application/x-www-form-urlencoded' \
--data-urlencode 'grant_type=authorization_code' \
--data-urlencode 'code={{authCode}}' \
--data-urlencode 'redirect_uri={{redirect_uri}}'
Implicit grant type
For an implicit grant type, the response to the authorization request is an id_token, a token (access token), or both, depending on the value of the response_type parameter in the authorization request. The implicit workflow does not need to call the token endpoint. The response from the resume endpoint includes the token (or tokens) in the Location header.
PingOne supports GET and POST HTTP methods for initiating the implicit authorize request.
Implicit authorize request using GET
Step 1: Send an authorize request to the PingOne authorization server using GET.
curl --location --request GET '{{authPath}}/{{envID}}/as/authorize?response_type=token id_token&client_id={{appID}}&redirect_uri={{redirect_uri}}&scope=openid'
The request requires the following properties in the request URL:
-
response_type: For an implicit grant the response type istoken,id_token, or both. -
client_id: The application's ID. -
redirect_uri: The URL to redirect the browser after sign on. -
scope: The permissions that specify accessible resources.
The response returns a Location HTTP header that specifies the URL for the sign-on screen and the flow ID for the sign-on workflow. For information about additional optional query parameters that can be set on the request, see Authorize (implicit) in the PingOne Platform API Reference.
Step 2: After the sign-on flow completes, call the resume endpoint.
curl --location --request GET '{{authPath}}/{{envID}}/as/resume?flowId={{flowID}}' \
--header 'Cookie: {{sessionToken}}'
The request requires the following properties in the request URL:
flowID: The ID for the authentication flow.
The Location HTTP header returned by the resume endpoint contains the token, ID token, or both. Note that the PingOne API uses session token cookies to establish the user's authentication session and maintain the session throughout the workflow, allowing the flow to redirect back to the authorization server to get the token.
Implicit authorize request using POST
The POST request accepts all the same parameters as the GET request. For the POST request, parameters and their values are Form Serialized by adding the parameter names and values to the entity body of the HTTP request and specifying theContent-Type: application/x-www-form-urlencoded` request header.
Step 1: Send an authorize request to the PingOne authorization server using POST.
curl --location --request POST '{{authPath}}/{{envID}}/as/authorize' \
--header 'Content-Type: application/x-www-form-urlencoded' \
--data-urlencode 'response_type=token id_token' \
--data-urlencode 'client_id={{appID}}' \
--data-urlencode 'redirect_uri={{redirect_uri}}' \
--data-urlencode 'scope=openid'
The request requires the following properties in the request URL:
-
response_type: For an implicit grant the response type istoken,id_token, or both. -
client_id: The application's ID. -
redirect_uri: The URL to redirect the browser after sign on. -
scope: The permissions that specify accessible resources.
The response returns a Location HTTP header that specifies the URL for the sign-on screen and the flow ID for the sign-on workflow. For information about additional optional query parameters that can be set on the request, see Authorize (implicit) in the PingOne Platform API Reference.
Step 2: After the sign-on flow completes, call the resume endpoint.
curl --location --request GET '{{authPath}}/{{envID}}/as/resume?flowId={{flowID}}' \
--header 'Cookie: {{sessionToken}}'
Hybrid grant type
In a hybrid authorize flow, an authorization code is returned from the authorization endpoint, some tokens are returned from the authorization endpoint, and others are returned from the token endpoint. The authorization endpoint's response_type property specifies the code type and it also specifies id_token, or token, or both. An authorization code (specified by the code response type) is always returned in a hybrid flow.
PingOne supports GET and POST HTTP methods for initiating the authorize request.
Hybrid authorize request using GET
Step 1: Send an authorize request to the PingOne authorization server using GET.
curl --location --request GET '{{authPath}}/{{envID}}/as/authorize?response_type=code token&client_id={{appID}}&redirect_uri={{redirect_uri}}&scope=openid'
The request requires the following properties in the request URL:
-
response_type: For a hybrid grant the response type always includescode, and it also specifiesid_token, ortoken, or both. -
client_id: The application's ID. -
redirect_uri: The URL to redirect the browser after sign on. -
scope: The permissions that specify accessible resources.
The response returns a Location HTTP header that specifies the URL for the sign-on screen and the flow ID for the sign-on workflow. For information about additional optional query parameters that can be set on the request, see Authorize (hybrid) in the PingOne Platform API Reference.
Step 2: After the sign-on flow completes, call the resume endpoint.
curl --location --request GET '{{authPath}}/{{envID}}/as/resume?flowId={{flowID}}' \
--header 'Cookie: {{sessionToken}}'
The request requires the following properties in the request URL:
flowID: The ID for the authentication flow.
The Location HTTP header returned by the resume endpoint contains the code. In addition, the Location header for a hybrid authorization flow also returns the token or ID token (or both) if specified in the response_type property.
Step 3: Call the token endpoint to exchange the authorization code for a token.
curl --location --request POST '{{authPath}}/{{envID}}/as/token' \
--header 'Content-Type: application/x-www-form-urlencoded' \
--data-urlencode 'grant_type=authorization_code' \
--data-urlencode 'code={{authCode}}' \
--data-urlencode 'redirect_uri={{redirect_uri}}'
The request requires the following properties in the request URL:
-
grant_type: The grant type of the token request. In this example, the value isauthorization_code. -
code: The authorization code value returned by the resume endpoint. -
redirect_uri: The URL that specifies the return entry point of the application.
The token endpoint exchanges the code for an access token, ID token, or both. For information about the authorization code token request based on the application's tokenEndpointAuthMethod, see Token in the PingOne Platform API Reference.
Hybrid authorize request using POST
The authorize request using POST is essentially the same as GET. The POST request accepts all the same parameters as the GET request. For the POST request, parameters and their values are Form Serialized by adding the parameter names and values to the entity body of the HTTP request and specifying the Content-Type: application/x-www-form-urlencoded request header.
Step 1: Send an authorize request to the PingOne authorization server using POST.
curl --location --request POST '{{authPath}}/{{envID}}/as/authorize' \
--header 'Content-Type: application/x-www-form-urlencoded' \
--data-urlencode 'response_type=code id_token' \
--data-urlencode 'client_id={{appID}}' \
--data-urlencode 'redirect_uri={{redirect_uri}}' \
--data-urlencode 'scope=openid'
The request requires the following properties in the request URL:
-
response_type: For a hybrid grant the response type always includescode, and it also specifiesid_token, ortoken, or both. -
client_id: The application's ID. -
redirect_uri: The URL to redirect the browser after sign on. -
scope: The permissions that specify accessible resources.
The response returns a Location HTTP header that specifies the URL for the sign-on screen and the flow ID for the sign-on workflow. For information about additional optional query parameters that can be set on the request, see Authorize (hybrid) in the PingOne Platform API Reference.
Step 2: After the sign-on flow completes, call the resume endpoint. The Location HTTP header returned by the resume endpoint contains the code. In addition, the Location header for a hybrid authorization flow also returns the token or ID token (or both) if specified in the response_type property.
curl --location --request GET '{{authPath}}/{{envID}}/as/resume?flowId={{flowID}}' \
--header 'Cookie: {{sessionToken}}'
Step 3: Call the token endpoint to exchange the authorization code for a token.
curl --location --request POST '{{authPath}}/{{envID}}/as/token' \
--header 'Content-Type: application/x-www-form-urlencoded' \
--data-urlencode 'grant_type=authorization_code' \
--data-urlencode 'code={{authCode}}' \
--data-urlencode 'redirect_uri={{redirect_uri}}'
PKCE parameters
For added security, you can also include Proof Key for Code Exchange (PKCE) parameters in the authorization request for the code and hybrid grant types. PKCE for OAuth uses either plain text or a cryptographic hash of a random string that is included in the authorization request (code_challenge) along with the encoding method used (code_challenge_method). When the authorization code is issued in the response, the original plain text or random string (code_verifier) is included in the token request. For PKCE authentication flows, the tokenEndpointAuthMethod property on the application must be set to NONE.
Step 1: Send an authorize request to the PingOne authorization server.
curl --location --request GET '{{authPath}}/{{envID}}/as/authorize?response_type=code&client_id={{appID}}&redirect_uri={{redirect_uri}}&scope=openid&code_challenge={{codeChallenge}}&code_challenge_method=S256'
The request requires the following properties in the request URL:
-
response_type: For an authorization_code grant the response type iscode. -
client_id: The application's ID. -
redirect_uri: The URL to redirect the browser after sign on. -
scope: The permissions that specify accessible resources. -
code_challenge: A string that is computed from the code_verifier that is used in a Proof Key for Code Exchange (PKCE) authorization request. -
code_challenge_method: A string that specifies the computation logic used to generate the code_challenge string.
For more information about the PKCE query parameters that can be set on the request, see Authorize (authorization_code) in the PingOne Platform API Reference.
Step 2: After the sign-on flow completes, call the resume endpoint.
curl --location --request GET '{{authPath}}/{{envID}}/as/resume?flowId={{flowID}}' \
--header 'Cookie: {{sessionToken}}'
The request requires the following properties in the request URL:
flowID: The ID for the authentication flow.
The Location HTTP header returned by the resume endpoint contains the code. Note that the PingOne API uses session token cookies to establish the user's authentication session and maintain the session throughout the workflow, allowing the flow to redirect back to the authorization server to get the token.
Step 3: Call the token endpoint to exchange the authorization code for a token.
curl --location --request POST '{{authPath}}/{{envID}}/as/token' \
--header 'Content-Type: application/x-www-form-urlencoded' \
--data-urlencode 'grant_type=authorization_code' \
--data-urlencode 'code={{authCode}}' \
--data-urlencode 'redirect_uri={{redirect_uri}}' \
--data-urlencode 'client_id={{appID}}' \
--data-urlencode 'code_verifier={{codeVerifier}}'
The request requires the following properties in the request URL:
-
grant_type: The grant type of the token request. In this example, the value isauthorization_code. -
code: The authorization code value returned by the resume endpoint. -
redirect_uri: The URL that specifies the return entry point of the application. -
client_id: The application's ID. -
code_verifier: A string used to verify thecode_challengevalue submitted in the authorization request.
The token request transforms the code_verifier property value using the code_challenge_method specified in the authorize request. If the transformed code_verifier value is equal to the code_challenge value submitted in the authorize request, then the authorization server issues the token.
For information about additional parameters supported by the authorization code token request, see Token in the PingOne Platform API Reference.
Device code grant type
If the grant type is device_code, PingOne returns an activation code in the response to the POST /{{envID}}/as/device_authorization request. This authorize endpoint is used only with device authorization grant flows. It starts a flow that gives OAuth enabled devices such as smart TVs the ability to complete user authorization and access protected resources.
Unlike the PingOne as/authorize request, which returns a 302 Location header in the response, the /as/device_authorization endpoint returns a 200 OK successful operation message. The response body returns the user_code property value (the activation code) as well as the verification URI (a short web address) that end users visit on another device to enter (or confirm) the activation code.
The steps below outline the device authorization grant flow.
Authorization for a device authorize grant request
The POST /{{envID}}/as/device_authorization request takes all configuration paramaters in the endpoint's request body. Parameters and their values are Form Serialized by adding the parameter names and values to the entity body of the HTTP request and specifying the Content-Type: application/x-www-form-urlencoded request header.
Step 1: Send an authorize request to the PingOne authorization server using POST.
curl --location --request POST '{{authPath}}/{{envID}}/as/device_authorization' \
--header 'Content-Type: application/x-www-form-urlencoded' \
--data-urlencode 'client_id={{deviceAppID}}' \
--data-urlencode 'scope=openid'
The request requires the following properties:
-
client_id: The application ID for an application that specifies thedevice_codegrant type. -
scope: The permissions that specify accessible resources.
The response returns a 200 OK message with the following properties:
{
    "device_code": "96624b82-1469-46a9-a4f8-544970b62c37",
    "user_code": "GKHF-JQBC",
    "verification_uri": "https://auth.pingone.com/abfba8f6-49eb-49f5-a5d9-80ad5c98f9f6/device",
    "verification_uri_complete": "https://auth.pingone.com/abfba8f6-49eb-49f5-a5d9-80ad5c98f9f6/device?user_code=GKHF-JQBC",
    "expires_in": 600,
    "interval": 5
}
Step 2: Start the flow using GET {{authPath}}/{{envID}}/device/{{appIdentifier}} or GET {{authPath}}/{{envID}}/device.
The response returns a Location HTTP header that specifies the URL for the sign-on screen and the flow ID.
Step 3: The sign-on flow calls the POST /{{envID}}/flows/{{flowID}} flow orchestration endpoints to prompt the end user to complete the actions required by the sign-on policy, and perform the following two device code actions: (1) confirm the device activation code, and (2) accept device authorization grant consent.
This flow action confirms the activation code:
curl --location --request POST '{{authPath}}/{{envID}}/flows/{{flowID}}' \
--header 'Content-Type: application/vnd.pingidentity.deviceAuthGrant.userCode.verify+json' \
--data-raw '{
    "userCode": "{{userCode}}"
}'
This flow action accepts consent:
curl --location --request POST '{{authPath}}/{{envID}}/flows/{{flowID}}' \
--header 'Content-Type: application/vnd.pingidentity.deviceAuthGrant.consent+json' \
--data-raw '{
	"accept": true
}'
Step 4: Call the token endpoint to exchange the device code for a token. Note that the grant_type parameter in the request body uses the IETF-specified syntax to identify the device code grant type (urn:ietf:params:oauth:grant-type:device_code).
curl --location --request POST '{{authPath}}/{{envID}}/as/token' \
--header 'Content-Type: application/x-www-form-urlencoded' \
--data-urlencode 'grant_type=urn:ietf:params:oauth:grant-type:device_code' \
--data-urlencode 'device_code={{deviceCode}}' \
--data-urlencode 'client_id={{deviceAppID}}'
For more information about the endpoints used in a device authorization grant flow, see Device Authorization Grant and Device Authorization Grant Flows in the PingOne Platform API Reference.
Authentication flow states
An application's sign-on policy determines the flow states and the corresponding actions required to complete an authentication workflow. When the authentication workflow begins, the flow gets the list of sign-on policies assigned to the application and evaluates the policy conditions that must be met to complete sign on. The sign-on policy evaluation logic is shown in the diagram below:

For more information about sign-on policies, see Sign-on policies, Sign-on policy actions, and Sign-on policy assignments in the PingOne Platform API Reference.
Common authentication actions
The PingOne flow API supports single-factor and multi-factor actions to complete an authentication workflow. For a single-factor login flow, there are four branches that allow the user to submit a username and password (or create a new account). PingOne also supports an identity first discovery action that identifies the user and determines the user's applicable identity provider and authentication methods. For a multi-factor authentication action, there are two branches in which either a one-time password (OTP) or a push confirmation is used as the second factor in the authentication workflow.
PingOne supports a progressive profiling action that prompts users to provide additional data at sign on. This action type does not authenticate users. It is used only to obtain additional profile data.
-
-
Sign on with username and password
-
Forgot password
-
Register user
-
Sign on with identity provider
-
-
- Push authentication
Workflows
- Use LOGIN and MFA Actions to Authenticate Users
- Add a user through a registration flow
- Configure a PKCE authorization workflow
- Configure a Progressive Profiling Sign-On Action
- Use LOGIN and AGREEMENT Actions to Authenticate Users
- Configure an MFA Only Flow Using a Login Hint Token
- Create an MFA Transaction Approval using SMS
Login action
Login action authentication flows start with a call to the /{{envID}}/as/authorize endpoint. The response to an authorize request returns a Location HTTP header that specifies the URL for the sign-on screen and the flow ID for the authentication workflow. For a new session, the user's browser is redirected to the sign-on screen that prompts for a PingOne username and password (or, based on the sign-on policy configuration, provides access to an external identity provider's sign-on URL).
For an existing session, the user's browser is redirected to a sign-on screen that prompts for a password only. The following diagram shows the flow options for the USERNAME_PASSWORD_REQUIRED and PASSWORD_REQUIRED flow states:

The login flow consists of the following four branches, which can be chosen to submit the username and password, recover a forgotten password, or create account credentials to complete the sign-on flow:
-
Sign on with username/password
This flow verifies the username and password submitted by the user through the sign-on screen.
-
Forgot password
If enabled, the recover password flow initiates actions to recover the account and set a new password.
-
Register user
If enabled, the register user flow initiates actions to create an account for a user. The flow calls the
user.registeraction to create the new user. -
Sign on with identity provider
If enabled, the social sign-on flow initiates actions to authenticate the user through an external identity provider.
Sign on with username and password
The username/password branch of the login flow uses the usernamePassword.check action to verify the user's password. If the user's password status is OK, the flow transitions to the next action required by the sign-on policy. If the user's password has expired, the flow transitions to the PASSWORD_EXPIRED flow state. The response from the usernamePassword.check action includes a link to initiate the password.reset action to update the password. If the user is using a temporary password, the flow transitions to the MUST_CHANGE_PASSWORD flow state. The user can initiate the password.reset action to change the temporary password.

Forgot password
The recover password branch of the login flow uses the user.lookup action to verify the user. After user look-up, the flow transitions to the RECOVERY_CODE_REQUIRED flow state. The flow uses the password.recover action to issue a recovery code to the user. After the recovery code is issued and the user submits the correct code, the flow transitions to the MUST_CHANGE_PASSWORD flow state and uses the password.reset action to update the user's password.

Register user
The register user branch of the login flow initiates the user.register action to create a new user account and set a password. The sign-on screen prompts the user to submit a username, an email address, and a password. If this action executes successfully, the flow transitions to the next action required by the sign-on policy.

Sign on with identity provider
The external identity provider (social sign-on) branch of the login flow initiates actions to authenticate the user through an external identity provider. It also links the external identity provider to the PingOne user account.
The flow diagram shows a flow path to update a user who already has an existing link to an external identity provider account, bypassing the ACCOUNT_LINKING_REQUIRED flow state. It also shows a flow path if the external identity provider account is not linked to an existing PingOne user. In this case, the flow transitions to the ACCOUNT_LINKING_REQUIRED flow state and calls the user.register action to find a matching user and initiate account linking to the external provider.

From the ACCOUNT_LINKING_REQUIRED flow state, a user can either register as a new user or link to an existing PingOne user. In cases where the user does not exist in PingOne, the external identity provider login flow calls the user.register action to register the external identity account user as a new PingOne user. Consequently, when the social sign-on branch is implemented as a sign-on option, the sign-on policy should also include the register user sign-on branch with the registration.enabled policy action attribute set to true.
If registration is enabled and the user exists in PingOne but no external account link is defined, PingOne tries to find a matching user (usually by email address). If PingOne does not find a matching user, then registration is required. If PingOne finds one or more matching users (more than one user in the system with a matching email address), then the flow prompts for a username and password to verify the user's identity and complete the account link.
If the registration login flow branch is disabled in the sign-on policy, then the user who tries to log in with external identity provider credentials can only link to an already existing user in PingOne.
Identifier first action
The identity provider discovery login flow initiates actions to identify the user and determine the applicable authentication methods for this user. It is designed to be used as an alternative to the standard login flow. It differs from the username/password login flow in that it first prompts the user for a username, and then it uses the identity provider discovery rules defined in the sign-on policy to route the user to the correct external identity provider for authentication.
A condition in the sign-on policy specifies the external identity providers that are evaluated to verify whether one of them is the authoritative source of identity. If one is found, the user is directed to authenticate using the external identity provider's authentication flow. The flow transitions to the EXTERNAL_AUTHENTICATION_REQUIRED flow state and redirects the browser to the external identity provider's login URL.

Identifier first with login_hint
If the authorize request uses the login_hint property to identify the user, then the identity provider discovery login flow no longer prompts the user for a username in the sign-on flow. It uses the identity provider discovery rules defined in the sign-on policy to route the user directly to the correct external identity provider for authentication. The flow transitions to the EXTERNAL_AUTHENTICATION_REQUIRED flow state and redirects the browser to the external identity provider's login URL.

Identity provider account confirmation
Identity provider account confirmation occurs when the confirmIdentityProviderAttributes property in the login sign-on action is set to true. If the flow does not find a linked user with PingOne authorization authority linked to the external account, the flow transitions to the ACCOUNT_CONFIRMATION_REQUIRED flow state and redirects the browser to a form to confirm or update values for attributes mapped from the identity provider. After confirmation or update, the flow calls the user.confirm action to search for users with PingOne authentication authority based on mapped unique attributes. If matches are found, the flow transitions to the ACCOUNT_LINKING_REQUIRED flow state and redirects the browser to a form to select the matching user account. The flow updates the user account and completes.

Multi-factor (MFA) action
The MFA (multi-factor authentication) flow adds an MFA action to the authentication flow. When an MFA flow is initiated, the flow evaluates information about the requesting device and initiates appropriate MFA actions:
-
If the MFA flow begins on a paired MOBILE device, it transitions directly to the device authorization flow (with or without extra verification specified in the sign-on policy).
-
If the device authorization flow was not initiated, the flow checks the device to determine if it is a paired FIDO2 biometric device (by looking for an existing session token ST cookie). If the user has a session token cookie for this user on the browser (or if a FIDO2 biometrics device is selected during the device selection flow), the flow transitions to the FIDO2 biometrics flow. If no session token cookie exists, the flow will complete with the default device or with device selection, but not through bypass.
-
If the FIDO2 biometrics flow is not started, the flow transitions to the device selection flow or to another flow using the default device.
-
If the selected (or default) device is a MOBILE device with PUSH enabled, the flow transitions to the native PUSH flow.
-
If the selected (or default) device is of type MOBILE, SMS, VOICE, EMAIL, TOTP, or SECURITY_KEY, the flow transitions to the offline flow (for MOBILE, SMS, VOICE, EMAIL, TOTP types) or the security key flow.

These MFA flow paths are described in the following sections.
Device authorization flow
If the user is authenticating from a paired MOBILE device and device authorization with extra verification is enabled (in the sign-on policy), the MFA flow transitions to PUSH_CONFIRMATION_REQUIRED. If extra verification is not enabled, the flow completes immediately. If the user does not have a default device, the flow transitions to the DEVICE_SELECTION_REQUIRED flow state and calls the device.select action to specify the device used for the MFA action. For more information about extra verification, see the "MULTI_FACTOR_AUTHENTICATION action data model" table in the Sign-On Policy Actions topic in the PingOne Platform API Reference.

FIDO2 device flow
If the user is authenticating from a registered platform device and has a session token (ST) cookie on a compatible browser, the FIDO2 biometric flow uses this device, bypassing the default device. The flow transitions to the ASSERTION_REQUIRED flow state and calls the assertion.check action to complete the flow. If there is no session token cookie on the browser, or the FIDO2 device type is SECURITY_KEY, the default device is selected automatically. The flow transitions to the ASSERTION_REQUIRED flow state and calls the assertion.check action to complete the flow. For more information about FIDO2 platform devices, see MFA Devices in the PingOne Platform API Reference.

Native PUSH device flow
If the default device is a MOBILE application with PUSH enabled, a PUSH notification is sent to the application, and the flow transitions to the PUSH_CONFIRMATION_REQUIRED flow state. The flow transitions to one of the following states:
-
COMPLETEDif the user approves the authentication action on the native device. -
FAILEDif the user denies the authentication action on the native device. -
PUSH_CONFIRMATION_TIMED_OUTif the user does not respond to the authentication action on the native device.
If pushless is enabled, the flow transitions to the OTP_REQUIRED flow state and calls the otp.check action to send a one-time passcode (OTP) to the user's specified device. After the OTP is issued and the user submits the correct OTP, the flow completes.

Offline device and security key flows
If the default device is an email, SMS, voice, authenticator device (TOTP) or a MOBILE device in PUSHLESS mode, the flow transitions to the OTP_REQUIRED flow state and calls the otp.check action to send a one-time passcode (OTP) to the user's specified device. After the OTP is issued and the user submits the correct OTP, the flow completes.
If the default device (or selcted device) is SECURITY_KEY, the flow transitions to the ASSERTION_REQUIRED flow state and calls the assertion.check action to send a FIDO2 assertion retrieved by the WebAuthn browser API for the specified device. After the client submits the correct assertion, the flow completes. For more information about FIDO2 security key devices, see MFA Devices in the PingOne Platform API Reference.

Device selection flow
If the user does not have a default device, and the conditions to trigger the device authorization or FIDO2 platform flows are not met, the flow transitions to the DEVICE_SELECTION_REQUIRED flow state. The client calls the device.select action to specify an MFA device to use for performing the MFA action. After device selection, the flow transitions to either the offline flow, the FIDO2 biometrics flow, or the native flow with PUSH enabled, depending on the selected device. For more information, see MFA Devices in the PingOne Platform API Reference.
If pushless is enabled, and the flow is in the PUSH_CONFIRMATION_TIMED_OUT state, the flow can also transition to the OTP_REQUIRED flow state and calls the otp.check action to send a one-time passcode (OTP) to the user's specified device. After the OTP is issued and the user submits the correct OTP, the flow completes.

Progressive profiling action
The progressive profiling login flow prompts users to provide additional data at sign on. The attribute data provided is added to the user's profile. For example, this flow can be configured to follow the user.register action to add more user data to the newly created account. The sign-on screen prompts the user to submit data for the specified user attributes. If this action executes successfully, the flow transitions to the next action required by the sign-on policy.

Access tokens and ID tokens
All tokens in PingOne are JSON Web Tokens (JWTs) signed using the RS256 signing algorithm. Access tokens are credential strings that represent authorization to access a protected resource. Client applications obtain access tokens by making OAuth 2 or OpenID Connect requests to an authorization server; resource servers require clients to authenticate using access tokens.
Access tokens are obtained from the token endpoint (when using the client credentials or authorization code grant types) or from the authorization endpoint (when using the implicit grant type). Access tokens are typically granted on behalf of a specific authenticated user. (Tokens granted directly to applications are called application tokens.)
Clients present access tokens when making requests to a resource server (for example, the PingOne API endpoints) using bearer token authentication as described by RFC 6750. Here is a sample request using an access token:
curl -X GET "https://api.pingone.com/v1/environments" \
-H "Content-type: application/json" \
-H "Authorization: Bearer eyJhbGciOiJSUzI1NiIsImtpZCI6InRlc3QifQ.eyJzY29wZSI6IiIsImNsaWVudF9pZCI6ImlkZW50aXR5LWRpcmVjdG9yeS1zeW50aGV0aWMtdGVzdGluZyIsImlzcyI6ImF1dGgtc3RhZ2luZy5waW5nb25lLmNvbSIsImF1ZCI6ImFwaS1zdGFnaW5nLnBpbmdvbmUuY29tIiwiYWNjIjoiMDAwMDAwMDAtMDAwMC0wMDAwLTAwMDAtMDAwMDAwMDAwMDAwIiwiZW52aXJvbm1lbnRfaWQiOiIiLCJvcmciOiIwMDAwMDAwMC0wMDAwLTAwMDAtMDAwMC0wMDAwMDAwMDAwMDAiLCJvcmdhbml6YXRpb25faWQiOiIwMDAwMDAwMC0wMDAwLTAwMDAtMDAwMC0wMDAwMDAwMDAwMDAiLCJlbnYiOiIiLCJleHAiOjE1MzAxMTc1Nzl9.OTGQethw-flgnf0oslpQOmW9YdExf6ZpsqpmRtBTeD5gpKGFmaSeHguFMVpR94GSjb27OEPzCY8qpU_OkoaQGH9FiysdgvFFVNVzHOb80e0MgP47ean1Rtk3lHmIWHg1ihp3Kt7vq9fO0OwekmfshejyaLYLX2g4seWFZKbs7ICIaSufYuGTsLLQFixiK7b0tM-lcjZUmLglPlzdGEYQgg13ZWho02rFVjwRrfOVkQRCLuhkk2Pz2eeblQgWBlzMi_zbHnRhqRnrHyX2PwoPZ9qHh3aqz6yNgGinUwSrE3J1slnx8uPeP88obYcX4QXTXOCf7su2rinbexOsNu4Puw"
Grant types
OAuth 2 and OpenID Connect define the authorization grant types by which a client application obtains an authorization grant in the form of an access token. PingOne supports the following grant types:
Authorization code
This grant type is used by web applications. The authorization request generates an authorization code that is exchanged for an access token. For more information, see Authorization request with a code grant in the PingOne Platform API Reference.
Implicit
This grant type is intended for use by native applications or client-side web applications with no server-side component. The implicit grant type is for applications that cannot guarantee the confidentiality of the client secret.
In this flow, the client makes a request to the server's authorization endpoint. If the request contains the id_token response type and the openid scope, then it is considered an authentication (OpenID Connect) request, and an ID token is issued. For more information, see Native and single-page applications.
Client credentials
This grant type is made directly to the token endpoint and is used to request an access token for either:
- Resources owned by the client rather than any specific end user.
- Resources belonging to multiple end users.
The client uses HTTP basic authentication with its client ID and client secret to authenticate itself to the token endpoint and must specify a Content-Type of application/x-www-form-urlencoded. For more information, see Obtain an access token in the PingOne Platform API Reference.
Refresh token
This grant type is used by applications to exchange the refresh token for a new access token. It gives applications the ability to acquire a valid access token without additional interaction. For more information, see Obtain an access token in the PingOne Platform API Reference.
Device code
This grant type is used by applications to return an activation code in the response to the POST /{{envID}}/as/device_authorization request. It gives OAuth enabled devices such as smart TVs the ability to complete user authorization and access protected resources. For more information, see Device Authorization Grant in the PingOne Platform API Reference.
Response types
The authorization request must specify a response_type attribute, which determines whether an access token, an authorization code, or an ID token is returned by the authorization server. The following is the list of the OAuth 2.0 response types supported by the PingOne authorization server:
-
codeReturns an authorization code. If the grant type is
authorization_code, theresponse_typeattribute must have thecodevalue. The authorization code returned by the request is exchanged for an access token to complete the authorization flow. -
tokenReturns an access token. If the grant type is
implicitorclient_credentials, theresponse_typeattribute can specify thetokenvalue to return an access token. -
id_tokenReturns an ID token. If the grant type is
implicit, theresponse_typeattribute can specify theid_tokenvalue to return a JWT containing a set of claims that represent the authentication state of an end user. -
id_token(OpenID Connect ID token)If the request contains the
id_tokenresponse type and theopenidscope, then it is considered an authentication (OpenID Connect) request, and an ID token is issued. The ID token includes the ID of the user; this request can also include theprofilescope to add additional user claims to the ID token.
Token claims
All tokens in PingOne are JSON Web Tokens (JWTs) signed using the RS256 signing algorithm. The following section lists the supported claims for each token type.
Access token claims
For access tokens, the JWT header must contain the ID of the signing key as the kid claim and can optionally include the x5t claim.
| Claim | Description |
|---|---|
auth_time |
A string that specifies the time when the user authentication occurred. Its value is a JSON number representing the number of seconds from 1970-01-01T0:0:0Z as measured in UTC until the current date and time. This claim is not present for client_credentials tokens. |
acr |
A string that identifies the authentication policy that was completed when the original authentication was performed. If the authentication policy is a sign-on policy, then this string will be the name of the sign-on policy. If the authentication policy is a flow policy, then this string will be the ID of the flow policy. This claim is not present for client_credentials tokens. |
sub |
A string that specifies the identifier for the authenticated user. This claim is not present for client_credentials tokens. |
client_id |
A string that specifies the application that requested this token. |
aud |
A string that lists the names of resources that this token is intended for. The resource of an application's resource access grant is included if one or more scopes from the grant is requested and granted. |
scope |
A string that specifies the space-separated list of scope names associated with this token in the format described in Section 3.3 of OAuth 2.0 RFC6749. |
iss |
A string that specifies the per-environment issue URI: For example, https://auth.pingone.com/<environmentId>/as. |
iat |
An integer that specifies the timestamp, measured in the number of seconds since January 1, 1970, UTC, indicating when this token was originally issued, as defined in JWT RFC7519. |
exp |
An integer that specifies the timestamp, measured in the number of seconds since January 1, 1970, UTC, indicating when this token will expire, as defined in JWT RFC7519. |
sid |
A string that specifies the identifier for the user session. This claim is not present for client_credentials tokens. |
jti |
A string that specifies the JWT identifier. |
env |
A string that specifies the environment ID of the authenticated user or application. This claim is not present when the resource's audience property does not include the PingOne platform API resource. |
org |
A string that specifies the organization ID of the authenticated user or application. This claim is not present when resource's audience property does not include the PingOne platform API resource. |
x5t |
A string that specifies the base64url-encoded SHA-1 thumbprint of the DER encoding of the X.509 certificate corresponding to the key used to digitally sign the JWS. |
Access token sample for an authorization request (JWT) with response_type=code token id_token (and offline_access not added to the app):
{
  "kid": "4bb6d480-8ce4-11ef-bb5f-6d67555e3c65",
  "alg": "RS256"
}.{
  "client_id": "6ab85b77-ff75-42af-9fe9-cb7f83a2ede4",
  "iss": "https://auth.pingone.com/6991589d-87eb-47f4-9131-284cebe106b3/as",
  "jti": "ef62d8f0-e84b-4579-9b08-5734c5ae496b",
  "iat": 1738356020,
  "exp": 1738361420,
  "aud": [
    "https://iam-x.com"
  ],
  "scope": "openid x1",
  "sub": "1fc88a5e-a677-4df7-81ae-75df4f7839d2",
  "sid": "44d69428-b3ad-442f-8101-5c136bd67d8f",
  "auth_time": 1738356019,
  "acr": "Single_Factor",
  "env": "6991589d-87eb-47f4-9131-284cebe106b3",
  "org": "d4229c38-0f5e-4bf7-9292-9d3b0df7294c"
}.[Signature]
ID Token claims
ID tokens are signed with the same key as the access token. The JWT header must contain the ID of the signing key as the kid claim and can optionally include the x5t claim.
| Claim | Description |
|---|---|
sub |
A string that specifies the identifier for the authenticated user. |
aud |
A string that lists the names of resources that this token is intended for. The resource of an application's resource access grant is included if one or more scopes from the grant is requested and granted. |
iss |
A string that specifies the per-environment issuer URI: https://auth.pingone.com/<environmentId>/as or https://<customDomain>/as. |
iat |
An integer that specifies the timestamp, measured in the number of seconds since January 1, 1970, UTC, indicating when this token was originally issued, as defined in JWT RFC7519. |
exp |
An integer that specifies the timestamp, measured in the number of seconds since January 1, 1970, UTC, indicating when this token will expire, as defined in JWT RFC7519. |
sid |
A string that specifies the identifier for the user session. |
auth_time |
A string that specifies the time when the user authentication occurred. Its value is a JSON number representing the number of seconds from 1970-01-01T0:0:0Z as measured in UTC until the current date and time. |
nonce |
A string that specifies the value used to associate a client session with an id_token, and to mitigate replay attacks. The value is passed through unmodified from the authentication request to the ID token. |
at_hash |
A case-sensitive string that specifies the access token hash value, which is the base64url encoding of the left-most half of the hash of the octets of the ASCII representation of the access token value. For more information, see OpenID Connect Core 1.0. |
c_hash |
A case-sensitive string that specifies the code hash value, which is the base64url encoding of the left-most half of the hash of the octets of the ASCII representation of the code value. For more information, see OpenID Connect Core 1.0. |
acr |
A string that specifies the name of the sign-on policy that was completed when the original authentication was performed. This claim is present only if an ID token was minted. |
amr |
A string array that specifies the methods associated with the authenticators used when the original authentication was performed. This claim is present only if an ID token was minted. |
p1.userId |
The PingOne user identifier. |
p1.region |
The PingOne geographic region. |
p1.mfa_device_id |
ID of the device that was used to authenticate. |
x5t |
A string that specifies the base64url-encoded SHA-1 thumbprint of the DER encoding of the X.509 certificate corresponding to the key used to digitally sign the JWS. |
ID token sample for an authorization request (JWT) with response_type=code token id_token (and offline_access not added to the app):
{
  "kid": "4bb6d480-8ce4-11ef-bb5f-6d67555e3c65",
  "alg": "RS256"
}.{
  "iss": "https://auth.pingone.com/6991589d-87eb-47f4-9131-284cebe106b3/as",
  "sub": "1fc88a5e-a677-4df7-81ae-75df4f7839d2",
  "aud": "6ab85b77-ff75-42af-9fe9-cb7f83a2ede4",
  "iat": 1738356020,
  "exp": 1738356320,
  "acr": "Single_Factor",
  "amr": [
    "pwd"
  ],
  "auth_time": 1738356019,
  "at_hash": "4nTgewkCcK9EPa5P2y5EaA",
  "nonce": "abc",
  "sid": "44d69428-b3ad-442f-8101-5c136bd67d8f",
  "c_hash": "sZ8YIIB90mDqqO4-8wOvhg",
  "p1.userId": "1fc88a5e-a677-4df7-81ae-75df4f7839d2",
  "env": "6991589d-87eb-47f4-9131-284cebe106b3",
  "org": "d4229c38-0f5e-4bf7-9292-9d3b0df7294c",
  "p1.region": "NA"
}.[Signature]
Refresh tokens
Refresh tokens are JWTs signed with the same key as the access token. They are not intended to be read by the client. For more information about refresh token usage, see POST Token (refresh_token) (CLIENT_SECRET_BASIC).
| Claim | Description |
|---|---|
sub |
A string that specifies the identifier for the authenticated user. |
aud |
A string that lists the names of resources that this token is intended for. The resource of an application's resource access grant is included if one or more scopes from the grant is requested and granted. |
iss |
A string that specifies the per-environment issuer URI: https://auth.pingone.com/<environmentId>/as or https://<customDomain>/as. |
iat |
An integer that specifies the timestamp, measured in the number of seconds since January 1, 1970, UTC, indicating when this token was originally issued, as defined in JWT RFC7519. |
exp |
An integer that specifies the timestamp, measured in the number of seconds since January 1, 1970, UTC, indicating when this token will expire, as defined in JWT RFC7519. |
sid |
A string that specifies the identifier for the user session. |
scope |
A string that specifies the space-separated list of scope names associated with this token in the format described in Section 3.3 of OAuth 2.0 RFC6749. |
jti |
A string that specifies the JWT identifier. |
auth_time |
A string that specifies the time when the user authentication occurred. Its value is a JSON number representing the number of seconds from 1970-01-01T0:0:0Z as measured in UTC until the current date and time. |
acr |
A string that specifies the name of the sign-on policy that was completed when the original authentication was performed. This claim is present only if an ID token was minted. |
amr |
A string array that specifies the methods associated with the authenticators used when the original authentication was performed. This claim is present only if an ID token was minted. |
Refresh token sample from the token request when the authorization request has response_type=code token id_token (and offline_access not added to the app):
{
  "alg": "RS256",
  "kid": "default"
}.{
  "sub": "1fc88a5e-a677-4df7-81ae-75df4f7839d2",
  "jti": "8b819739-1e66-4a10-ba11-998b50ce35c0",
  "exp": 1738361432,
  "sid": "44d69428-b3ad-442f-8101-5c136bd67d8f",
  "scope": "openid x1",
  "auth_time": 1738356019,
  "acr": "Single_Factor",
  "amr": [
    "pwd"
  ],
  "iss": "https://auth.pingone.com/6991589d-87eb-47f4-9131-284cebe106b3/as"
}.[Signature]
Token customization and introspection
PingOne lets you customize the content of access tokens by adding custom resource attributes and their values to the token. You can use the access token customization APIs to convey additional information about the user to applications. For more information, see Resource attributes in the PingOne Platform API Reference.
ID token customization
You can also customize the content of OIDC ID tokens by adding custom user claims to the token. For more information, see Attribute mappings in the PingOne Platform API Reference.
Token analysis
The PingOne platform supports endpoints to returns the active state of an OAuth 2.0 token and all of the claims in the token. The request takes a token parameter, which is the token string. For more information, see Token introspection in the PingOne Platform API Reference.
Token storage
To ensure the security of your application and its resilience to malicious attacks, it is important to understand the best practices for storing JSON Web Tokens (JWTs). This will vary by client and application type, and the specific threat model and risks pertinent to your organization.
General recommendations
For more detailed information on token storage best practices, see the following:
Single-page application
For a single-page application, the most secure way to store tokens is to use web workers. This method stores tokens in a separate thread from the main runtime, which isolates tokens from any malicious code.
Where the client uses implicit flows to acquire access tokens, tokens should be kept within the client's runtime (e.g. JavaScript) memory. However, using implicit flows is not recommended as of OAuth 2.1.
In rare cases where the client needs to store the JWT, using sessionStorage is generally preferable to localStorage, which persists across browser restarts. When transmitting tokens, only do so in the Authorization header or in POST request bodies over HTTPS. Never include tokens in query parameters.
Web application
For a web application, where a backend server acquires access tokens on behalf of the client, tokens should be kept in the backend and only associated indirectly with the client through its authentication session. Tokens can also be associated with the client's authentication session with a session cookie.
The tokens themselves should not be included in the session cookie unless the client requires the ability to make direct API requests to the resource server protected by the tokens, or the server is unable to maintain a session on the backend. In the former situation, the the tokens would be returned to the client in the response body instead of by cookies.
In many cases, storing JWTs in a session cookie is the recommended approach. Depending on the security requirements of your application, you may want to consider other approaches.
You can customize the behavior of cookies using the following flags:
-
The
Domainflag defines the domain where the cookie is sent. If left unspecified, the cookie is only sent to the origin server by default, which is the most secure option. -
The
Pathflag defines the directory and subdirectories where the cookie is sent. Set this flag as specific as possible to the path that uses the session ID. -
The
HttpOnlyflag ensures that it's only sent in HTTP requests to the server, thus it's never revealed to JavaScript running in the browser. -
The
Secureflag ensures the cookie can only be used with secure, encrypted connections. -
The
SameSiteflag ensures that cookies cannot be sent cross-site, which prevents cross-site request forgery (CSRF) attacks. -
The
MaxAgeandExpiresflags set the expiration time of the cookie. If left unspecified, the cookie will expire when the browser is closed, which is the most secure option.
The following is an example of setting a cookie in the HTTP response header:
Set-Cookie: <cookie-name>=<cookie-value
Set-Cookie: <cookie-name>=<cookie-value>; Path=<path-value>
Set-Cookie: <cookie-name>=<cookie-value>; HttpOnly
Set-Cookie: <cookie-name>=<cookie-value>; Secure
Set-Cookie: <cookie-name>=<cookie-value>; SameSite=Strict
OIDC session management
You can manage user sessions per spec with OpenID Connect Session Management 1.0. This solution allows applications in background tabs to detect a change due to inactivity or a sign-off from a foreground tab and react accordingly.
After a successful authentication, a PingOne OpenID Provider (OP) session is created. The session state changes because of one of the following:
- The user signs off as a result of a
/as/signoffrequest or a SAML SLO request - The session times out
Applications in the same browser context can check user sessions regularly, and PingOne returns unchanged, changed, or error.
Requirements
- The environment must be configured with a custom domain with applications accessible under the same main domain. For example, if the custom domain in PingOne is
sso.example.local, applications must be in an accessible subdomain such asapps.example.localorwww.example.com/app1. - Because the default idle timeout for a PingOne user session is 30 days, a DaVinci flow is required for a shorter timeout period.
- A session that's purged by the system or deleted as a result of a PingOne session API request will not trigger a changed response.
Application configuration
To enable OIDC session management, set the opSessionCheckEnabled property of an OIDC application to true. When enabled, PingOne includes the session_state parameter in the authorization response, which is an opaque value PingOne returns to the application to represent the user's login state. For example, when using the authorization code grant type with query response mode, the authorization response contains <redirect_uri>?session_state=<sessionState>&code=<code>.
To return the session state, the application invokes the https://<customDomain>/as/checksession endpoint as the src property of the OP iframe.
<iframe id="op" src="https://auth.mydomain.com/as/checksession" width="0" height="0" frameborder="0"></iframe>.
The iframe returns changed if the value doesn't match what's passed from the relying party (RP), otherwise it returns unchanged. If no ST or OPUAS cookies are found, the iframe returns error.
DaVinci flow
To implement this capability, build a DaVinci flow and assign it to the relevant applications. Use the Return Success Response (Redirect Flows) node from the PingOne Authentication connector to return to PingOne. The following image demonstrates a sample flow.
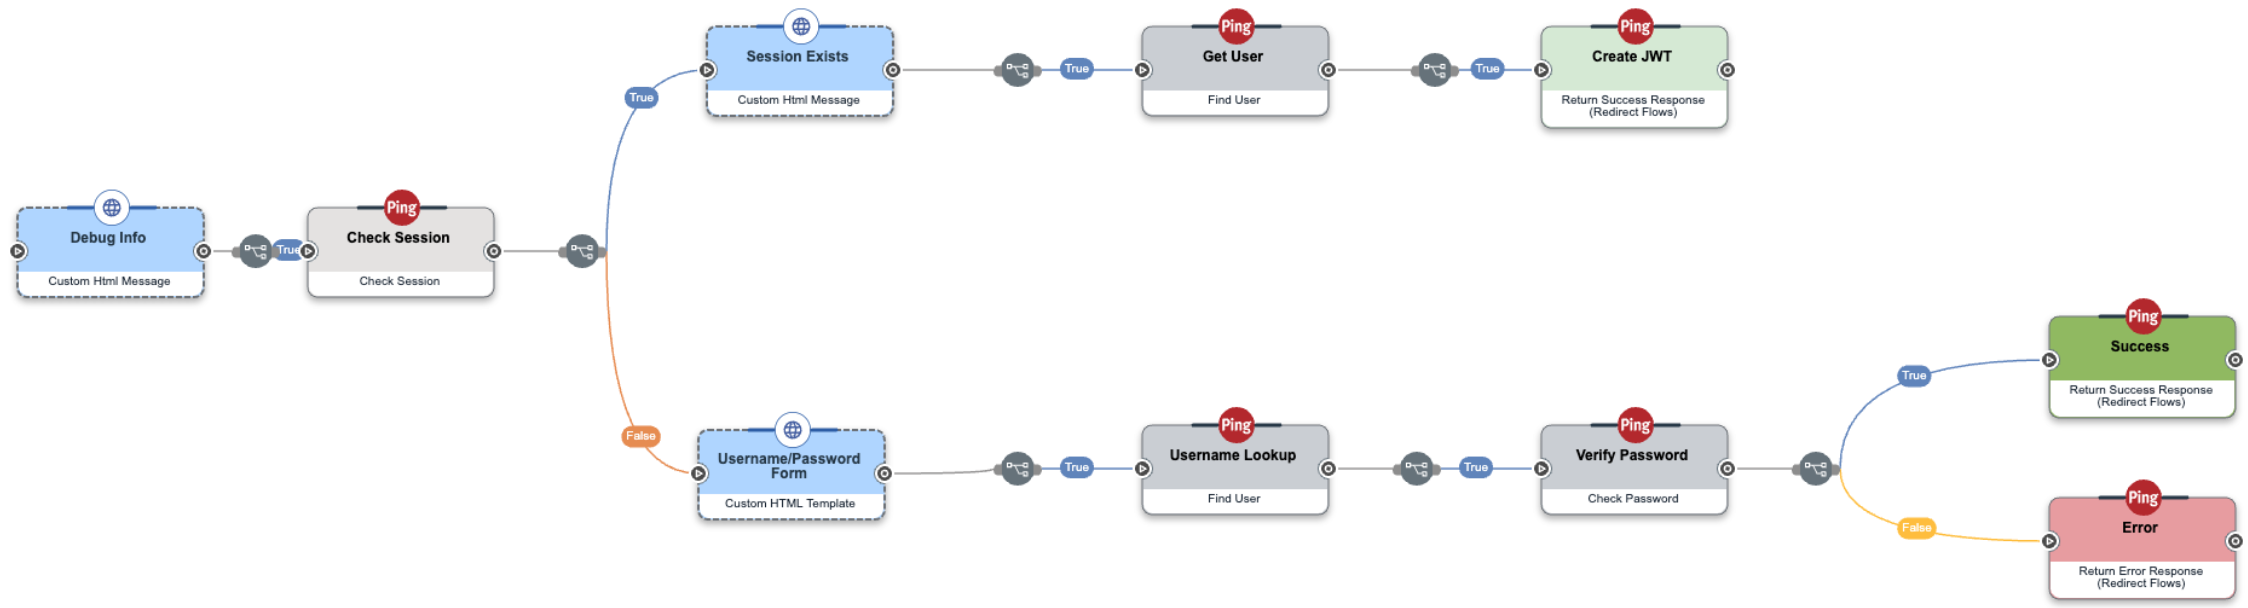
This flow checks whether a session exists. If so, it returns to PingOne. Otherwise, it prompts the user for authentication and returns to PingOne.
Typically, all Return Success Response nodes in the flow should use the same Idle Timeout value so that end users experience consistent sign-on and session behavior.
Postman collection-level authorization
Most APIs require authorization to ensure that client requests access data securely. Postman can pass along whatever authorization details necessary for the method demanded by the endpoint. You can manually include authorization data in the header, body, or as parameters to a request. However, the easiest way is to use the Authorization tab in Postman. Select an authorization Type on that tab and Postman offers a dialog to gather the information required by that Type. When you run a request, Postman uses the information from the Authorization tab to automatically add the necessary authorization header, body, or parameters to the request.
Postman offers the Authorization tab on requests, folders, and collections. When you select an authorization method on a request, that method is used. But Postman does not require that you set a method on every request. Postman offers an additional choice: Inherit auth from parent. When this is selected on a request, Postman ascends the hierarchy of folders until it finds a folder, or the collection, where an authorization method is selected and uses that method for the request.
In PingOne collections, the authorization method is defined at the collection level. Only those requests that require a specific authorization method have authorization defined on the request (roughly 10% of PingOne requests). This allows you to easily change the authorization used for most requests.
Unexpected authorization failure
The default Authorization tab Type for a collection in Postman is No Auth. If you copy a request from a PingOne collection into your own collection and the request fails with an authorization error, check the Authorization tab of your collection. If Type is No Auth, you have two choices:
-
Change the Authorization tab in Postman for your collection to your choice of Type, such as Bearer Token or OAuth 2.0.
-
Change the Authorization tab in Postman for the request you copied to your choice of Type.
Obtain a Bearer Token before running requests
Before you can run requests in this documentation that use Bearer Token using a selected coding framework (available in the drop-down list), you must retrieve an access token. To retrieve an access token:
-
Copy
access_tokenfrom the response. -
Use the access token in subsequent requests until it expires.
-
Repeat these steps.
Bearer Token
Bearer tokens enable requests to authenticate using an access key, such as a JSON Web Token (JWT) used by PingOne. The token is three base64url strings separated by periods, and specified in the variable used by the Authorization header.
To configure a PingOne collection to use Bearer Token for authorization:
-
Click on the collection.
-
Click the Authorization tab.
-
Select
Bearer Tokenfrom Type. -
In Token, type
{{accessToken}}, the variable from the environment variable template.
You should always place your API key value in the variable. Authorization requests in PingOne collections that return an access token automatically set the {{accessToken}} variable to the returned access token.
Postman appends the Token value to the text Bearer in the required format to the request Authorization header: Authorization: Bearer <access token>.
Before you can run Postman requests that use Bearer Token, you must retrieve an access token. To retrieve an access token manually in Postman:
-
Run Token Admin App (client_credentials).
The script on the Tests tab sets the
{{accessToken}}environment variable toaccess_tokenfrom the response. -
Postman applies
{{accessToken}}to requests with AuthorizationInherit auth from parentuntil it expires. -
Repeat these steps.
OAuth 2.0
OAuth (short for "Open Authorization") is an open standard that grants websites or applications access to users' information on other websites without giving them their passwords.
When authorization is set to OAuth 2.0, instead of the default Bearer Token, you use Postman's automatic OAuth features to retrieve and refresh tokens. You also use your browser to authenticate your session, which improves platform operational security and developer experience.
To configure a PingOne collection to use OAuth 2.0 for authorization:
-
Click on the collection.
-
Click the Authorization tab.
-
Select
OAuth 2.0from Type. -
Select
Request Headersfrom Add auth data to. -
In Token, select any unexpired token previously generated.
-
In Header Prefix, type
Bearer.You must Configure New Token, if none are available in Token.
-
In Token Name, type any name. If you generate more than one token, this appears in Token to select a valid token.
-
Select
Client Credentialsfrom Grant Type. -
In Access Token URL, type
{{authPath}}/{{adminEnvID}}/as/token. -
In Client ID, type
{{adminAppID}}. -
In Client Secret, type
{{adminAppSecret}}. -
Scope is not required in this use case, leave blank.
-
Select
Send as Basic Auth Headerfrom Client Authentication. -
In Refresh Token URL, type
{{authPath}}/{{adminEnvID}}/as/token.
To generate a new access token:
-
Click Get New Access Token.
The Get new access token dialog appears.
-
Click Proceed. If you do nothing, the dialog proceeds after 5 seconds.
The Manage Access Tokens dialog appears.
-
Click Use Token. Postman applies the access token to requests with Authorization
Inherit auth from parentuntil it expires. -
If Postman does not automatically refresh the access token, repeat these steps.
Authorization and authentication APIs
The PingOne Authorization and Authentication APIs provide services to query the authorization server, run authentication workflows, and receive access tokens from the authorization server. An authentication workflow can include local authentication actions (login), multi-factor authentication actions, and other external actions. The Authentication API includes the flow orchestration and action services needed to configure an authentication workflow.
-
OpenID Connect is an authentication protocol that PingOne-connected applications can use to authenticate users and get user data through claims. The OAuth 2 framework defines several methods by which a client can obtain authorization to access protected resources using an access token.
-
The SAML service provides support for the SAML protocol to authorize clients and allow clients to obtain a requestor's authentication state. The SAML service implements functions to initiate SAML 2.0 single sign-on and single logout authentication flows.
-
The external authentication API provides endpoints for performing end user authentication with PingOne-supported external identity providers. End users are redirected immediately to the authentication initialization endpoint at the external authentication service. After sign-on, they are redirected back to Pingone, where the external authentication API validates the token or assertion returned from the external identity provider.
-
The PingOne flow orchestration service configures the steps required to authenticate the actor that initiates the authentication request. The service is responsible for the authentication session and making calls to specific actions required by the authentication workflow.
OpenID Connect/OAuth 2 APIs
PingOne integrates with applications that use standards-compliant protocols by taking on the role of an OpenID Connect provider and OAuth 2 authorization server. In this capacity, PingOne provides the framework for connected applications to access protected HTTP resources. For more information about OpenID Connect and OAuth 2, see the OpenID Connect 1.0 spec and the OAuth 2.0 Authorization Framework RFC6749.
Authorize endpoints
The authorize endpoints support the following actions:
-
The authorize endpoint
/{{envID}}/as/authorizeis used to interact with the end user and obtain an authorization grant. Note that PingOne supports bothGETandPOSToperations for authorize requests. The supported parameters for an authorize request vary depending on the value of theresponse_typeparameter (code,token,id_tokenor combinations of these three options). -
For non-redirect flows, such as with native mobile apps in which the app renders the end user interface,
response_modeproperty value is set topi.flow. This setting allows the app to authenticate using the PingOne flows API without needing to handle HTTP redirections. Thepi.flowvalue is also used with transaction approval use cases in which strong authentication is required for elevated security for a high-value transaction, or high-risk resource or service.
For detailed information about OAuth endpoints from the PingOne API Reference, see OpenID Connect/OAuth 2.
Token endpoints
The token endpoints support the following actions:
-
The token endpoint
/{{envID}}/as/tokenis used by the client to obtain an access token by presenting its authorization grant. -
The token introspection endpoint
/{{envID}}/as/introspectreturns the active state of an OAuth 2.0 token and the claims specified in RFC 7662 Section 2.2. -
The token revocation endpoint
{{envID}}/as/revokerevokes the token specified in the request. This operation does not apply to the tokens issued for the PingOne API resource.
For detailed information about the token endpoints from the PingOne API Reference, see Token.
Pushed Authorization Request (PAR) endpoints
Applications can use a pushed authorization request (PAR) to send their authorization requests directly to PingOne without going through the browser, which safeguards sensitive data from end-user devices. With a PAR, an application can push an authorization request payload to PingOne with a direct back-channel request, which is a more secure method of sending sensitive data, such as personally identifiable information, than sending it with a browser on the front channel.
The PAR endpoint accepts the same request parameters as /{{envID}}/as/authorize, as well as any additional parameters needed for client authentication.
For detailed information about the PAR endpoints from the PingOne API Reference, see Pushed Authorization Request.
SAML 2.0 APIs
The SAML endpoints are used by SAML applications to initiate sign-on and sign-off operations. The SAML service implements functions to initiate SAML 2.0 single sign-on and single logout authentication flows.
SAML single sign-on (SSO) authentication requests
A SAML SSO authentication request uses the following authentication flow:
-
The client (browser) initiates a login action to access a protected resource.
-
The identity provider issues an
<AuthnRequest>message to be delivered by the user agent to the SAML service endpoint using eitherHTTP RedirectorHTTP POST. -
The SAML service validates the request and creates an authentication flow with the flow orchestration service.
-
The SAML service indicates user interaction is required to perform the authentication flow.
-
The browser is redirected to the PingOne hosted authentication UI or the per application configured URL of a custom UI, passing in the
environmentIdandflowSessionIdquery parameters. The authentication UI uses flow orchestration and action services endpoints to complete the authentication flow. The authentication API checks on every call to ensure that the session token cookie contains the current token for the session associated with the flow. On successful completion of the flow, a new session token is generated for the session and set in the cookie. -
The browser is redirected to the
resumeendpoint of the SAML service. -
The SAML service retrieves and deletes the authentication flow from the flow orchestration service.
-
The SAML service generates the appropriate tokens and issues a
<Response>message delivered by the user agent to the identity provider usingHTTP POST.
SAML single logout (SLO) requests
A SAML single logout (SLO) operation uses the following flow:
-
The user initiates logout.
-
The session participant initiates single logout by sending a
<LogoutRequest>message to the identity provider that sent the corresponding<AuthnRequest>authentication assertion. -
The SAML service validates the request. It then calls the end session endpoint of the flow orchestration service and passes through the cookie header. The flow orchestration service deletes the session identified by the session cookie and includes a
Set-Cookiein the response to immediately expire the session cookie. -
The identity provider uses the contents of the
<LogoutRequest>message to determine the session(s) being terminated. -
The identity provider issues a
<LogoutResponse>message to the original requesting session participant.
For detailed information about the SAML 2.0 endpoints from the PingOne API Reference, see SAML 2.0.
External authentication APIs
The external authentication API provides a framework for PingOne to pass the authentication steps to an external identity provider, track that external flow, and then resume the PingOne flow to complete the authorization request and return an access token.
The steps to complete an external authentication flow often include the following PingOne auth flow and the external auth flow.
-
Initiate a PingOne authorization request.
-
Initiate an external authorization request using the PingOne external authentication APIs. This action starts the sign-on flow on the external identity provider's authorization server.
-
Complete the sign on actions on the external identity provider's server.
-
Use the PingOne external authentication callback API to process the information returned by the identity provider and return the sign-on flow to PingOne.
-
Complete the PingOne sign-on actions and call the PingOne token endpoint to get the access token.
For detailed information about the External Authentication endpoints from the PingOne API Reference, see External Authentication.
Flows APIs
The Flows endpoint is used to interact with the user in a sign-on workflow. Flow endpoint operations are used only to implement custom authentication UIs. OIDC/OAuth 2 and SAML requests initiate the flow and redirect the browser to the custom authentication UI.
Flow status
In a sign-on workflow, the flow's status property value returned by the last action identifies the appropriate next action in the authentication process. For example, if an action returns a USERNAME_PASSWORD_REQUIRED value in the status property, then the user is prompted to enter a username and password to continue the sign-on flow.
For more information about flow actions and flow status, see PingOne authentication flow states.
For detailed information about the Flows endpoints from the PingOne API Reference, see Flows.
Resource management
The PingOne Management APIs provide the interfaces to configure and manage your PingOne organization.
-
Organizations and environments
PingOne uses an organization-based model to define tenant accounts and their related entities. The organization is the top-level identifier. It defines your entire enterprise within the PingOne platform.
An organization contains one or more environments. Environments define separate working domains within an organization. Environments are used to model regions within a large global enterprise such as NA (North America) or EU (European Union). They are also used as the defining entity to segregate enterprise operations by functionality, staging environments, or configurations.
-
PingOne applications define the connection between PingOne and a client application.
-
An identity is a unique user resource within PingOne that interacts with the applications and services in the environment to which the user is assigned. The PingOne platform includes numerous services that define and configure a user identity.
Applications
Application resources define the connection between PingOne and the actual application (also known as a client connection). PingOne supports several application types. When you make a request to define a new application, you must specify the type property that specifies one of the following application types:
-
Web application
A browser-based application with a server-side component, such as ASP, CGI, JSP/Java, Node.js, or Ruby on Rails applications.
-
Native application
An application that is installed and run directly on the local operating system, like Java, Objective-C, Swift, or React applications. Native applications are typically intended for native devices.
-
Single-page application
A browser-based application that runs on the front-end with no server-side component, such as Sencha Touch, AngularJS, and React applications. A single-page application runs on the client side after it loads, so it cannot keep a client secret.
-
Non-interactive
A web application that does not require user interaction through the web browser, like a command line interface, a service, or a daemon.
-
Worker
An administrator application that can interact with platform APIs. Access to platform APIs is determined by the user's or application's role assignments.
-
Platform applications
PingOne creates platform applications (PingOne Admin Console, PingOne Application Portal, PingOne Self-Service - MyAccount, and PingFederate-SSO) when the environment is created. The PingFederate-SSO platform application is created only if the PingOne environment includes PingFederate, and unlike the other platform applications, PingFederate-SSO application information is not returned through a GET request.
Managing applications
The base endpoint, /environment/{{envID}}/applications, provides endpoint operations to create, read, update, and delete OIDC and SAML application connections. There are POST request examples to show the required properties to create each type of application connection. For more information, see Application Operations in the PingOne Platform API Reference.
The secret endpoint, /environments/{{envID}}/applications/{{appID}}/secret, provides endpoint operations to read and update the application's secret, if the requesting actor has a superset of the application's role assignments. For more information, see Application Secret in the PingOne Platform API Reference.
Applications support the following additional configuration properties:
-
Application resource grants
The application resource grants endpoint,
/environments/{{envID}}/applications/{{appID}}/grants, provides endpoint operations to create, read, update, and delete the resource grant associated with the application connection. For more information, see Application Resource Grants in the PingOne Platform API Reference. -
Application sign-on policy assignments
The application sign-on policy assignments endpoint,
/environments/{{envID}}/applications/{{appID}}/signOnPolicyAssignments, provides endpoint operations to create, read, update, and delete the sign-on policies associated with the application connection. For more information, see Application Sign-On Policy Assignments in the PingOne Platform API Reference. -
Application role assignments
The application role assignments endpoint,
/environments/{{envID}}/applications/{{appID}}/roleAssignments, provides endpoint operations to create, read, update, and delete the role assignments associated with the application connection. For more information, see Application Role Assignments in the PingOne Platform API Reference. -
Application attribute mapping
The application attribute mapping endpoint,
/environments/{{envID}}/applications/{{appID}}/roleAssignments, lets you customize the content of an ID token or a SAML assertion by adding custom attributes and their values. For more information, see Application Attribute Mapping in the PingOne Platform API Reference. -
Application MFA push credentials
Push credentials are required for sending push notifications to a native application. The endpoint,
/environments/{{envID}}/applications/{{appID}}/pushCredentials, provides endpoint operations to create, read, update, and delete the push credentials associated with the application connection. This section provides examples for bothAPNSandFCMpush credential types. For more information, see Application MFA Push Credentials in the PingOne Platform API Reference.
Workflows
Related topics
Environments
Environments define separate working domains within an organization. Environments are used to model regions within a large global enterprise such as NA (North America) or EU (European Union).
Every organization contains at least one environment resource. In large global enterprises, there can be several environments. These environments are often based on region, or they serve as the defining entity to segregate enterprise operations by functionality, staging environments, or configurations.
An environment also identifies the products and services that are enabled to address the requirements of the deployment. For example, an environment can identify enabled PingOne services that are hosted on the PingOne platform, such as PingOne MFA and PingOne Protect. The environment can also identify supported non-PingOne products, such as PingFederate and PingAccess.
Environment resources
Environments contain many of the core resources on which all identity services are built. Environments encompass:
-
Populations
In PingOne, a population defines a set of users, similar to an organizational unit (OU). In a given environment, you can use populations to simplify the management of users. For example, you can create a population for similar types of users and apply a password policy to that population. You must create at least one population before you can create users. An individual user cannot belong to more than one population simultaneously, but users can be moved to a different populations.
For more information, see Populations in the PingOne Platform API Reference.
-
Users
Users are unique entities that interact with the applications and services within the environment to which the they are assigned. User resources in PingOne are the full representation of a user profile, including the user's relationships, roles, devices, and attributes. Users are associated with populations rather than defined within a population. The user's association with a population is established as a property on the user resource.
For more information, see Users, User password management, User role assignments, and Enable user devices in the PingOne Platform API Reference.
-
Applications and resources
Applications in PingOne define the connection between the PingOne platform and the actual application (also thought of as the client configuration). Resources represent the connections to external services, enabling secure access to PingOne resources and other defined external resources.
For more information, see Application Management, Application role assignments, Application sign-on policy assignments, Resources, Resource scopes, and Resource attributes in the PingOne Platform API Reference.
-
Activities
Activities are collections of user activity information such as login attempts, password reset attempts, and total active user counts. This audit data can be exported, reported on, or streamed out to customer security information and event management (SIEM) solutions.
For more information, see User activities in the PingOne Platform API Reference.
-
Branding and images
Branding can be configured for elements of the PingOne interface. All end user interfaces are branded according to the theme defined in the associated branding resource. Image resources can be configured to upload custom branding image files to the content delivery network (CDN) and manage the lifecycle of those images.
For more information, see Branding and Images in the PingOne Platform API Reference.
-
Password policies
These resources represent the password management actions and password policies that can be applied to users within an environment.
For more information, see Passwords in the PingOne Platform API Reference.
-
Sign-on policies
These resources represent the sign-on workflow policies to establish an authentication flow during login, re-authentication, or registration actions that identify and verify users. The authentication workflows are part of the authentication API. The
signOnPolicyresource is a proxy back to other APIs to perform authentication actions.For more information, see Sign-on policies and Sign-on policy actions in the PingOne Platform API Reference.
-
Notifications templates
These endpoints manage notification templates resources and notifications content.
For more information, see Notifications templates and Notifications settings in the PingOne Platform API Reference.
-
Certificates and keys
The certificate management endpoints provide an implementation that supports FIPS 140-2 Level 1 compliant security algorithms to generate key pairs. They manage customer-provided certificates, customer-provided signing/encryption keys, Ping-generated certificates (PKI), and Ping-generated signing/encryption keys.
For more information, see Certificate management in the PingOne Platform API Reference.
-
Identity providers
The identity provider endpoints manage external identity provider configurations to enable social login and inbound SAML login features in PingOne. An external identity provider configuration allows linked users to authenticate and gain access to PingOne resources using the login flow and credentials provided by the external identity provider.
For more information, see Identity providers and Linked accounts in the PingOne Platform API Reference.
-
Roles, entitlements, and permissions
Roles, permissions, and entitlements are defined at the root of the platform, and are scoped to an environment. Roles are assigned to users, and these user roles include a
scopeproperty to grant the user permissions corresponding to the role. For example, a role of Identity Admin contains permissions allowing the subject to read and edit user data. When this role is assigned to a user, it can be assigned with the scope property that identifies a population or an environment to which the permissions apply.Self-service application permissions are described using scopes rather than roles. Scopes are more narrowly defined roles in that a scope cannot cross an environment boundary, and it is restricted to a specific task. For example, the
p1:read:userscope grants permission to read the user resource's data only; it does not grant permission to read another user's data or perform create, update, or delete operations on user resources.For more information, see Roles and Resource scopes in the PingOne Platform API Reference.
-
Licenses
The license resource identifies the organization that owns the license, the licensing package type, and the expiration date for the license.
For more information, see Licensing in the PingOne Platform API Reference.
Environment types
There are two supported environment types:
-
PRODUCTIONThese environments contain the actual identities managed by your business. Production environments cannot be deleted (unless they are first demoted to a
SANDBOXtype), which offers additional protection against unintentional removal. You must have a non-Trial license to create or promote an environment to thePRODUCTIONtype. Any long-standing environments, even those used for testing and staging, should be configured asPRODUCTIONto minimize the risk of data loss. -
SANDBOXThese environments are temporary configurations used primarily for configuration testing. Sandbox environments can be deleted using the
DELETE {{apiPath}}/environments/{{envID}}endpoint operation.
PingOne products
These PingOne products can be included in the Bill of Materials:
PING_ONE_MFAPING_ONE_RISKPING_ONE_VERIFYPING_ONE_CREDENTIALSPING_ONE_AUTHORIZEPING_ONE_PROVISIONINGPING_ONE_BASESpecifies the PingOne platform API, which includes all PingOne capabilities.
Non-PingOne products
These non-PingOne products can be included in the Bill of Materials:
- PING_FEDERATE
- PING_ACCESS
- PING_DIRECTORY
- PING_DATA_SYNC
- PING_DATA_GOVERNANCE
- PING_ONE_FOR_ENTERPRISE
- PING_ID
- PING_ID_SDK
- PING_CENTRAL
- PING_INTELLIGENCE
- PING_ONE_FOR_SAAS
- PING_AUTHORIZE
Identities
An identity is a unique user resource within PingOne that interacts with the applications and services in the environment to which the user is assigned. The primary services that define and configure a user identity are:
-
Users and the user schema
The users endpoints enable directory operations to create and manage user accounts, including assigning the user to a population, assigning user roles, managing passwords, managing MFA devices, unlocking a user account, managing user consents, and managing ID verification transaction records. It also supports an import capability that gives privileged applications the ability to create a new user and set the user's password.
For more information, see Users in the PingOne Platform API Reference.
For information about user core attributes and about adding custom attributes to the user schema, see Schemas in the PingOne Platform API Reference.
-
Groups
The groups API provides endpoints to create collections of users with the same access to applications. For more information, see Groups in the PingOne Platform API Reference.
-
Credential Issuance
The Credentials Issuance API provides endpoints to create custom verifiable credentials for users. The resulting credentials can then be shared with native applications. For more information, see PingOne Credentials in the PingOne Platform API Reference.
-
Identity providers
The identity provider endpoints manage external identity provider configurations. It enables the social login, authoritative login, and inbound SAML login features in PingOne. For more information, see Identity Provider Management in the PingOne Platform API Reference.
-
Identity propagation
The identity propagation API provides for configurable and audit-capable propagation of identities and their attributes between identity stores owned or managed by a customer. For more information, see Identity Propagation (Provisioning) in the PingOne Platform API Reference.
-
Identity counts
Active identity counts use authentication and password-evaluation user events to determine whether an identity is active within a specified sampling period. Total identity counts provide the number of unique identities associated with a specified environment per day.
For more information, see Active identity counts and Total identities in the PingOne Platform API Reference.
Roles, scopes, and permissions
In Pingone, user applications rely on self-management scopes to grant users access to a subset of PingOne resources. The self-management scopes control PingOne platform actions that users can execute on their accounts, such as updating their account details or changing their passwords.
For detailed information about scopes, see the following topics:
Conversely, administrator applications use role assignments to determine the actions an actor can perform. Roles are a collection of permissions that determine the API calls an administrator can execute. For example, an actor with the Environment Admin role has hundreds of permissions, giving the admin far greater access to PingOne resources than a user with only a few self-management scopes.
For detailed information about roles in PingOne, see the following topics:
For more information about roles and their associated permissions, see Roles in the PingOne Platform API Reference.
Access services through scopes and roles
User applications rely on self-management scopes to grant users access to a subset of PingOne resources. For more information about scopes, see Resource scopes. Conversely, administrator applications use role assignments to determine the actions a user or client can perform. For more information about roles, see Roles in the PingOne Platform API Reference.
For detailed information about scopes, see the following topics:
PingOne self-management scopes
Self-management scopes are applicable to users only. They are granted on authorization_code and implicit authorization flows. PingOne self-management scopes cannot be granted on a client_credentials flow.
The self-management scopes specified in an authorization request identify the resources that end users can access to perform self-management actions. These scopes use the following naming format to represent a self-management permission:
p1:<permission-action>:<permission-classifier>
For example, the self-management scope to read user information is p1:read:user.
The PingOne platform includes the following self-management scopes:
| Scope | Description |
|---|---|
p1:read:user |
Users can retrieve their own user identity and all attributes. If the user authenticates with an authoritative identity provider (user.identityProvider.id is not null), their password state will not be returned with a self-service GET READ One User request. |
p1:update:user |
Users can modify the attributes of their own user identity. This scope is not granted if the user authenticates with an authoritative identityProvider (user.identityProvider.id is not null). |
p1:update:userMfaEnabled |
Users can enable and disable multi-factor authentication for their own user identity. |
p1:create:device |
Users can create multi-factor authentication devices for their own user identity. |
p1:read:device |
Users can retrieve multi-factor authentication devices for their own user identity. |
p1:update:device |
Users can update multi-factor authentication devices for their own user identity. |
p1:delete:device |
Users can delete multi-factor authentication devices for their own user identity. |
p1:read:userPassword |
Users can read the password state for their own user identity. This scope is not granted if the user authenticates with an authoritative identityProvider (user.identityProvider.id is not null). |
p1:reset:userPassword |
Users can reset the password for their own user identity. This scope is not granted if the user authenticates with an authoritative identityProvider (user.identityProvider.id is not null). |
p1:validate:userPassword |
Users can validate the password for their own user identity. This scope is not granted if the user authenticates with an authoritative identityProvider (user.identityProvider.id is not null). |
p1:read:userLinkedAccounts |
Users can read linked accounts for their own user identity. This scope is not granted if the user authenticates with an authoritative identityProvider (user.identityProvider.id is not null). |
p1:delete:userLinkedAccounts |
Users can delete linked accounts for their own user identity. This scope is not granted if the user authenticates with an authoritative identityProvider (user.identityProvider.id is not null). |
p1:create:pairingKey |
Users can create a pairing key for their own user identity. |
p1:delete:pairingKey |
Users can delete a pairing key for their own user identity. |
p1:read:pairingKey |
Users can read a pairing key for their own user identity. |
p1:read:sessions |
Users can read sessions for their own user identity. |
p1:delete:sessions |
Users can delete sessions for their own user identity. |
p1:read:userConsent |
Users can read consents for their own user identity. |
p1:verify:user |
Users can verify their own user identity. |
p1:read:oauthConsent |
Users can read oauth scope consents for their own user identity. |
p1:update:oauthConsent |
Users can update oauth scope consents for their own user identity. |
User scopes enable self-service actions
User scopes provide privileges to specific actions, giving end users the ability to interact with their own profile data. An example of a commonly used user scope is p1:reset:userPassword. This scope, when included in an authorization request, generates access tokens that give users permission to run the self-service password reset action.
The following sample shows an authorization_code request that includes the reset password scope.
curl --request GET \
  --url 'https://auth.pingone.com/{{envID}}/as/authorize?response_type=code&client_id={{appID}}&redirect_uri={{redirect_uri}}&scope=p1:reset:userPassword'
For more information about authorization requests, see OpenID Connect/OAuth 2 in the PingOne Platform API Reference.
Access control self scopes
Some PingOne platform self-management scopes allow organizations to specify which user profile attributes are accessible to end users. An administrator might want to prevent end users with access to their profiles from seeing or modifying particular attributes that should remain private, such as custom attributes for entitlements, internal foreign keys, account status information, or any profile data that should not be exposed to an individual user. With access control scopes, organizations can store additional private data in the user profile without risk that the end user can see the data.
The following scopes allow access control:
| Scope | Description |
|---|---|
p1:read:user and p1:read:user:{{suffix}} |
Users can read any of the user schema attributes defined in the scope's schemaAttributes property for their own user identity. The p1:read:user scope can be modified using PUT to change the list of user schema attributes. The p1:read:user:{{suffix}} scope is created using POST and must specify at least one user schema attribute in the schemaAttributes property. |
p1:update:user and p1:update:user:{{suffix}} |
Users can modify any of the user schema attributes defined in the scope's schemaAttributes property for their own user identity. The p1:update:user scope can be modified using PUT to change the list of user schema attributes. The p1:update:user:{{suffix}} scope is created using POST and must specify at least one user schema attribute in the schemaAttributes property. These scopes are not granted if the user authenticates with an authoritative identityProvider (user.identityProvider.id is not null). |
For example, an access control scope based off of p1:update:user (such as p1:update:user:name that specifies only the ['name.family', 'name.given'] user attribute in the scope's schemaAttributes property) allows self updates of the first and last name attributes only. For more information about self-scope properties, see Resource scopes.
When the actor is self, the following behaviors apply to the p1:read:user and p1:read:user:{{suffix}} access control scopes for a GET /environments/{{envID}}/users/{{userID}} request:
-
Attributes that are not included in any provided read scope are excluded from output, except for the
idattribute, which is always included in the response if any other user schema attributes are returned. -
An attribute that is included in a read scope and present in the user record is included in the response body.
-
An attribute that is not included in a read scope and present in the user record is excluded from the response body.
If no attributes are included in the provided read scopes (if self has no access), then an HTTP Status 403 error is returned.
Likewise, the following behaviors apply to the p1:update:user and p1:update:user:{{suffix}} access control scopes for a PUT {{apiPath}}/environments/{{envID}}/users/{{userID}} request:
-
Attributes that are not included in any provided updates scope are not accessible to end users for update.
-
Immutable attributes such as
ideven if included, are not updated. Attempts to update immutable user attributes are ignored. -
An attribute that is included in an update scope and present in the user record is accessible to update, unless it is immutable.
-
An attribute that is not included in an update scope and present in the user record is not accessible to update.
-
Multi-value attribute updates replace the entire attribute. It is not possible to merge data into an existing set of values.
-
The
multiValuedproperty of an attribute can only be changed from false or null to true, never from true to false.
These scopes are not granted if the user authenticates with an authoritative identityProvider (user.identityProvider.id is not null).
If the user does not have update access to an attribute, a 403 Forbidden error is returned if an update is attempted for that attribute.
Restricted access scopes
License capabilities and access scopes
License capabilities control access to some PingOne self-service scopes. Your PingOne license can disable access to specific scopes (and their associated permissions) based on the capabilities enabled by the license package. For example, if your PingOne license supports only MFA capabilities, then other self-service capabilities such as canUsePasswordManagement, canUseIdentityProviders, and canUsersUpdateSelf are set to false in the license. With these capabilities set to false, access to the scopes controlled by these capabilities are restricted.
The following capabilities control access to these associated scopes:
| Capability | Associated scopes |
|---|---|
canUsePasswordManagement |
p1:reset:userPassword, p1:read:userPassword |
canUseIdentityProviders |
p1:read:userLinkedAccounts, p1:delete:userLinkedAccounts |
canUsersUpdateSelf |
p1:update:user |
If the controlling capability is set to false, authorization requests that specify restricted scopes will not grant a token that includes the restricted scopes. However, if the authorization request also specifies a non-restricted platform scope, such as p1:read:user, the request returns a token that includes only the p1:read:user scope.
Authoritative identity providers and access scopes
The following self-service scopes are not granted if the user authenticates with an authoritative identityProvider (user.identityProvider.id is not null).
p1:update:userp1:update:user:{{suffix}}p1:read:userPasswordp1:reset:userPasswordp1:validate:userPasswordp1:read:userLinkedAccountsp1:delete:userLinkedAccounts
OpenID Connect (OIDC) scopes
Standard OpenID Connect scopes control which user claims are included in an id_token or in a userinfo response. Unlike other resources, scopes from this resource can be included in an access token along with scopes from another resource.
PingOne supports the following OIDC scopes:
| Scope | Description |
|---|---|
profile |
This scope value requests access to the end-user's profile claims, which are: name, family_name, given_name, middle_name, preferred_username, nickname, picture, zoneinfo, locale, profile, website, gender, birthdate, and updated_at. |
email |
This scope value requests access to the email and email_verified claims. |
address |
This scope value requests access to the following claims: address.street_address, address.locality, address.region, address.postal_code, address.country, address.formatted. |
phone |
This scope value requests access to the phone_number and phone_number_verified claims. |
OIDC scopes for user information
The following sample shows an implicit authorization request with an id_token response type. The scope parameter specifies the required openid scope. It also specifies the optional profile scope to provide access to the end-user's default profile claims.
curl -X GET \
  'https://auth.pingone.com/{{envID}}/as/authorize?client_id={{appID}}&redirect_uri={{redirect_uri}}&response_type=id_token&scope=openid%20profile'
For more information about retrieving scopes for a specified resource, see Get scopes for a resource in the PingOne Platform API Reference.
Custom scopes
Resources are the protected endpoints that applications request access to using OAuth 2 authorization services. The PingOne platform includes two predefined resources, PingOne API, which is a defined resource that represents the PingOne APIs, and openid, which represents OpenID Connect scopes. These resources have self scopes that grant an actor permission to perform CRUD operations on the actor's data (such as p1:create:device, p1:read:device, p1:update:device, and p1:delete:device).
In addition, the platform lets you configure additional resources and their associated self scopes. For example, a custom resource such as https://api.acme-photo.com might have upload:photos, read:photos, edit:photos, and delete:photos scopes that give users permission to manage their photo libraries.
PingOne supports the following two types of resource scopes.
Custom resource scopes
Custom resource scopes are associated with protected endpoints on a non-PingOne resource server. Custom resources can be associated with an application either exclusively, or in addition to the platform's predefined resources. When an application is associated with both the PingOne platform resource and a custom resource, an authorization request cannot include scopes from both PingOne and the custom resource.
If you do specify scopes from both PingOne and the custom resource in the authorize request, the request returns the following error:
The request could not be completed. One or more validation errors were in the request.: May not request scopes for multiple resources (Correlation ID: 8E7B23B8-6761-4532-8AFC-4B723D52FF5D).
OIDC-based applications in PingOne can now request an access token that accesses scopes from multiple custom resources in a single request. This capability simplifies the application authentication and authorization process and reduces the number of requests an application must make. By default, if more than one resource is associated with the application, actors need to make separate authorization requests to get a token for the desired resource scopes. However, if the requestScopesForMultipleResourcesEnabled OIDC property on the application is set to true, then the application accepts scopes from multiple custom resources, eliminating the need to make multiple authorize requests.
For more information, see Applications OIDC settings data model, Resource Scopes, and Create scope in the PingOne Platform API Reference.
Custom PingOne API scopes
Custom PingOne API scopes control access to specific user schema attributes. As described above, a PingOne platform custom scope is based on an existing platform scope and uses the schemaAttributes property in the scope's definition to list the specific user attributes that the end user has permission to read or update. For example, a scope that grants permission to update only the user's email address would list only the email attribute in the schemaAttributes property. This PingOne custom scope is named by adding a descriptive suffix to the base PingOne scope name: p1:update:user:email-only.
For more information about defining custom PingOne API scopes, see Create PingOne access control scope in the PingOne Platform API Reference.
Administrator permissions and role assignments
Unlike user self-service applications, administrator applications use role assignments to determine the actions a user or client can perform. For external API client applications, the access tokens do not use scopes to control access to resources. Instead, the actor's role assignments determine resource access.
Worker application permissions
Administrator applications that interact with non-self Platform APIs are classified as a WORKER application type. This application type supports only the OPENID_CONNECT protocol. A worker application that uses the client_credentials grant type inherits the same role assignments as the user or application that created the application. These role assignments can be cross-environment, which allows access to APIs for other environments.
Role assignments determine access to APIs (see Application role assignments and User role assignments in the PingOne Platform API Reference. Users and clients cannot create or use clients that have more privileges than the worker application itself. For example, an actor with only the Identity Data Admin role cannot create a worker application that has Environment Admin privileges. Likewise, access to an application's client secret is restricted based on the accessing user's or application's role assignments. If an actor has only the Identity Data Admin role, it is not able to see the client secret. Similar roles can have different privileges, or restrictions, based on the role's scope. For example, an actor with an Environment Admin role over a single environment cannot access the client secret of an application with Environment Admin privileges over the entire organization.
PingOne roles include a set of permissions that allow access to PingOne resources. For example, the Identity Data Admin role grants access to PingOne resources for these user management actions:
- Read, create, update, and delete user resources
- Read, create, update, and delete device management resources
- Assign identity resources
- Bulk user import
- Read, create, update and delete population resources
- Update user password resources
- Read user password state resources
- Read password policy resources
- Read audit reporting activities resources
- Read schema resources
The actor (user or client) assigning roles to the application must have the permissions that they are trying to assign. In other words, the requesting user or client must have the same (or broader) role assignments as the target application's role assignments. This prevents a lesser privileged user (such as a Client Application Developer) from creating a more privileged client_credentials application (such as an Environment Admin).
When retrieving access tokens for WORKER applications, the authorization service checks to make sure the user or client has at least one role assignment. If not, the token request is rejected. If at least one role assignment exists, the authorization service creates a token with no scopes except for the requested OIDC scopes. When accessing platform APIs with this token, it retrieves the actor's entitlements, which ensures that clients and users can access only the resources that their role assignments allow.
Worker applications and environments
When a worker application with Environment Admin privileges creates a new environment, that application is given Identity Data Admin and Client Application developer role assignments for the new environment. Only the worker application can perform Identity Data Admin operations in that environment (see the list of Identity Data Admin actions above). However, the worker application can give the same role assignment to another user or worker application.
Control access to applications through roles and groups
The applications data model includes optional accessControl properties that, when set, specify the conditions that must be met by an authenticating actor to access the application. The application properties that control application access are:
-
accessControl.role.typeThis property specifies that an administrator role is required to access the application. When set, the only option for this property is
ADMIN_USERS_ONLY, which means that the actor must be assigned at least one or more of the following administrator roles: Organization Admin, Environment Admin, Identity Data Admin, or Client Application Developer. For more information about roles, see Roles in the PingOne Platform API Reference. If this property is not set, access to the application is not restricted by administrator roles. -
accessControl.group.typeThis property specifies that the actor must be associated with a particular group (or groups) to access the application. When set, this property can be set to
ANY_GROUP, which means that the actor must be a member of at least one group specified in theaccessControl.group.groupsproperty. This property can also be set toALL_GROUPS, which means that the actor must belong to all groups specified in theaccessControl.group.groupsproperty. If this property is not set, access to the application is not restricted by groups. -
accessControl.group.groupsThis property specifies a list of one or more groups that control access to the application. If there is more than one group, then the actor must belong to at least one group (if
ANY_GROUPis the value ofaccessControl.group.type) or all groups (ifALL_GROUPSis the value ofaccessControl.group.type). If this property is not set, access to the application is not restricted by groups.
Application access control for OpenID Connect applications
When accessControl properties are set for an application, the authenticating actor must meet the requirements specified in the application's accessControl properties to get a token.
To implement role-based application access control:
-
Set the
accessControl.role.typeproperty value toADMIN_USERS_ONLY. -
Ensure that the authenticating actor has at least one assigned administrator role.
If the actor has an assigned administrator role, a token is issued that allows access to the application.
To implement group-based application access control:
-
Set the
accessControl.group.typeandaccessControl.group.groupsproperties. (If you set one of the application's access control group properties, you must set the other.) -
Set the property value for the
accessControl.group.type. The options areANY_GROUPandALL_GROUPS. -
Set the
accessControl.group.groupsproperty value to list the group IDs to which an actor must belong. For information about obtaining group IDs, see Groups in the PingOne Platform API Reference.
If the actor belongs to at least one group (for the ANY_GROUP type), or all groups (for the ALL_GROUPS type), a token is issued that allows access to the application.
Application access control for SAML applications
When accessControl properties are set for a SAML application, the authenticating actor must meet the requirements specified in the application's accessControl properties to get an assertion. The steps to define the accessControl properties for role-based and group-based conditions are the same as for OIDC applications. If the authenticating actor meets the the application's access control conditions, an assertion is created. If the conditions are not met, a sign-on attempt returns an authorization failed error.
Platform security
You'll find here the measures we take to ensure the continued resiliency and security of the PingOne platform, as well as measures you can take in this regard for your deployment and applications.
API attacks
What PingOne does to prevent against API attacks
-
API access is secured using OAuth 2.0, which provides token-based authentication. This ensures that APIs are only accessible by authorized users or systems. Using short-duration tokens, rather than static API keys, PingOne significantly reduces the risk of stolen credentials being misused. For more information see OpenID Connect/OAuth 2 APIs and OpenID Connect/OAuth 2.
-
User authentication is secured using OpenID Connect (OIDC) on top of OAuth 2.0, reducing the risk of API abuse by verifying user identities before granting access. For more information see Authentication flow states.
-
API authentication is secured using JSON Web Tokens (JWTs). JWTs are compact, encrypted tokens containing JSON content (claims) that are signed to ensure their integrity. PingOne verifies the signature of each JWT before granting access to APIs. For more information see Introduction to JSON Web Tokens (JWT), Access tokens and ID tokens,Token, and Configuration options.
-
An API gateway is used for centralized management of API requests, and adherence to PingOne security protocols. The API gateway acts as an intermediary between clients and backend services, managing API traffic going through endpoints that require API authentication. The API gateway applies security policies, enforces rate limits, and handles authentication for API requests.
-
Token expiration is enforced, ensuring that tokens expire after a predefined period. In case of suspicious activity or compromised tokens, tokens can be immediately revoked, rendering them useless to attackers. For more information see Access tokens and ID tokens.
-
Rate limiting is enforced to control the volume of API requests that a user or system can make within a certain time frame. This prevents API abuse, such as brute-force attacks, credential stuffing, or excessive traffic that could degrade performance or lead to service outages. For more information see PingOne standard platform limits.
-
Transport Layer Security (TLS) is used to encrypt all API communications between clients, services, and PingOne. This ensures that data transmitted via APIs is protected from interception and tampering during transit, preventing Man-in-the-Middle (MitM) attacks. For more information see TLS and cipher suite requirements.
What you can do to prevent API attacks for your PingOne deployment
-
Ensure that PingOne API credentials are securely stored and managed. Avoid hardcoding client secrets in applications or exposing them in public repositories. For more information see Configuration options and PingOne Neo.
-
Implement Role-Based Access Control (RBAC) by defining OAuth scopes for your API users and applications, ensuring that they only have access to the resources they need. This limits the attack surface by preventing over-privileged access to sensitive data or services. For more information see Roles, scopes, and permissions.
-
Use a Web Application Firewall (WAF) in front of your applications to protect against common API attacks like SQL injection, XSS, and DDoS attacks. A WAF inspects incoming API traffic and blocks malicious requests before they reach your application, ensuring that only legitimate traffic passes through.
Code injection
What PingOne does to prevent against code injection
-
Strict input validation (such as for form inputs, query parameters, and API requests) is enforced to ensure user-provided data is checked against expected formats. By validating inputs against defined rules (such as, acceptable characters, data types, and length), PingOne prevents attackers from injecting malicious code into application fields.
-
Content Security Policy (CSP) headers are used to control the resources (such as, scripts, styles, images) that can be loaded and executed by the browser. This prevents cross-site scripting (XSS) attacks, a common form of code injection, by ensuring that only trusted and pre-approved scripts can be executed, and inline scripts are blocked.
-
Parameterized queries and prepared statements are used to protect against SQL injection attacks. These methods separate user inputs from the actual SQL query, ensuring that even if an attacker tries to inject SQL commands, this will be treated as plain data, preventing them from executing unauthorized database queries. For more information see Parameterized ACIs, Optimized page searches using caching, and Searching entries.
-
Regular code reviews and static analysis tools are used to detect potential injection vulnerabilities during our development process. By identifying and addressing vulnerabilities early, PingOne reduces the likelihood of code injection issues in production environments.
-
Automated dynamic application security scans are used to identify vulnerabilities, such as SQL injection and XSS, in web applications. These scans help detect injection vulnerabilities before attackers can exploit them.
-
Regular third-party penetration testing is conducted on the PingOne platform to simulate real-world attacks, including code injection attempts. These tests help ensure that the platform’s defenses are strong enough to withstand sophisticated injection attacks.
What you can do to prevent code injection for your PingOne deployment and applications
-
Implement Intrusion Detection Systems (IDS) for your applications to monitor network traffic for suspicious behavior or abnormal requests that may indicate a code injection attempt. Real-time monitoring ensures administrators are alerted to unusual activity, and can respond quickly.
-
Use secure server configurations for your applications to reduce your attack surface and limit potential vulnerabilities. For instance, disable unnecessary ports and services, and keep software updated with the latest security patches.
-
Follow the least privilege principle, ensuring that both users and applications have only the minimum permissions necessary to perform their tasks. This limits the damage that can be done if an attacker successfully executes code. For more information see Roles, scopes, and permissions.
Insecure traffic
What PingOne does to prevent against insecure traffic and connections (inbound and outbound)
-
Forward Secrecy (FS) is used within TLS connections, ensuring that even if encryption keys are compromised in the future, past communications remain secure and cannot be decrypted retrospectively.
-
API communications are secured with OAuth 2.0 and OpenID Connect (OIDC) protocols. Using short-duration, encrypted tokens for API access, rather than static credentials ensures inbound and outbound API traffic is authenticated and secure. For more information see OpenID Connect/OAuth 2 APIs and OpenID Connect/OAuth 2.
-
Web Application Firewalls (WAF) are used to protect PingOne infrastructure by filtering and blocking unauthorized inbound traffic.
-
Intrusion Detection and Prevention Systems (IDPS) are used to monitor both inbound and outbound traffic for unusual or suspicious activity. The IDPS detects and blocks threats, such as unauthorized access attempts, malicious traffic patterns, or attempts to exfiltrate data.
What you can do to prevent insecure traffic and connections
-
Ensure clients connecting to PingOne are using TLS 1.3 (in preference to TLS 1.2). For more information see TLS and cipher suite requirements.
-
Use the Webhooks feature in PingOne to forward activity logs to your own Security Information and Event Management (SIEM) solution. This will provide greater flexibility, and more options when establishing your own system of monitoring and alerting for anomalous or malicious behavior. For more information see Subscriptions (webhooks).
-
Integrate a Web Application Firewall (WAF) to protect against malicious inbound traffic to your applications, such as injection attacks or bots attempting to compromise the system. WAFs inspect traffic and block requests that match known attack patterns, ensuring that only legitimate traffic is allowed through.
-
Implement an Intrusion Detection and Prevention Systems (IDPS) to monitor traffic to your applications for unusual patterns that may indicate an ongoing attack or data exfiltration attempt.
Machine-in-the-middle
What PingOne does to prevent against machine-in-the-middle attacks
-
Transport Layer Security (TLS) protocols secure all communications between the user’s device, PingOne services, and third-party applications. This ensures data in transit is encrypted. For more information see TLS and cipher suite requirements.
-
Forward Secrecy (FS) is used within TLS connections, ensuring that even if a session key is compromised, past communications remain secure. FS generates a unique session key for each session, protecting data from retrospective decryption.
-
Public Key Infrastructure (PKI) is leveraged to authenticate servers using X.509 certificates. This ensures clients are connecting to legitimate PingOne services, preventing attackers from impersonating PingOne systems and intercepting communications. For more information see Certificate Management.
-
OAuth 2.0 and OpenID Connect are used for API access and identity federation. OAuth tokens are transmitted over encrypted channels (TLS), ensuring that credentials and sensitive data remain protected from machine-in-the-middle attacks. For more information see OpenID Connect/OAuth 2 APIs and OpenID Connect/OAuth 2.
-
API interactions are secured with tokens (such as, access tokens, and refresh tokens), that are signed. Even if a token is intercepted and modified by an attacker, it will be rejected due to the use of signing algorithms. For more information see Access tokens and ID tokens.
-
SameSite and Secure attributes for cookies are used to prevent cross-site request forgery (CSRF) attacks, which can be leveraged in machine-in-the-middle scenarios. These attributes ensure that cookies are only sent over secure connections, and in legitimate contexts. For more information see Token storage.
-
CORS policies are implemented to control which external domains can interact with PingOne resources, preventing attackers from exploiting weaknesses in cross-site communication for machine-in-the-middle attacks. For more information see Cross-origin resource sharing in API requests.
-
Content Security Policy (CSP) headers are used to prevent code injection attacks (such as, cross-site scripting or XSS), which can be used to facilitate machine-in-the-middle attacks. CSP restricts the types of content that can be executed in the browser, protecting users from malicious scripts.
What you can do to prevent against machine-in-the-middle attacks
-
Mandate the use of multi-factor authentication (MFA) by all users. Even if an attacker intercepts login credentials during a machine-in-the-middle attack, MFA adds an additional layer of protection, preventing attackers from gaining unauthorized access if they have managed to steal valid credentials. For more information see PingOne MFA.
-
Advise your users to bookmark the official login pages for your applications. Attackers have been known to manipulate search engines to direct users to spoofed versions of login pages to phish user credentials. You can also look into delisting your official login pages from search engines to avoid the this scenario.
-
Implement adaptive MFA, where PingOne Protect dynamically adjusts the level of security based on risk factors like device fingerprinting, user behavior, or location. If the system detects unusual activity, it can enforce stricter verification requirements. For more information see PingOne Protect.
-
Use Intrusion Detection and Prevention Systems (IDPS) to monitor network traffic to your applications in real time for signs of machine-in-the-middle attacks. This can detect abnormal traffic patterns, such as unexpected re-routing of traffic, and block malicious connections before they cause harm.
OAuth and OIDC attacks
What PingOne does to prevent against OAuth and OIDC attacks
-
Short-lived tokens and refreshed token rotation ensures that even if a token is compromised, it cannot be used for an extended period. See Access tokens and ID tokens for more information.
-
Strict audience (aud) and scope validation binds tokens to a specific session, device, or client. These restrictions ensure that tokens are used only for their intended purpose, and within their intended context. See Sessions for more information.
-
Strict validation of redirect URIs prevents open redirect vulnerabilities that attackers might exploit to intercept OAuth and OIDC tokens. See Redirect and non-redirect authentication flows for more information.
-
Wildcard-based redirect URIs are prohibited, ensuring that only preregistered and trusted URIs are used.
-
Strict rate limits on OAuth endpoints (such as, /token and /authorize) prevents brute-force attacks, excessive login attempts, and DOS attacks. See PingOne Platform Limits for more information.
-
Single-use authorization codes prevent attackers from replaying intercepted codes.
-
HttpOnly and Secure cookies prevent JavaScript-based attacks from stealing OAuth tokens through XSS attacks. See Token storage for more information.
-
All OAuth authentication, token exchanges, and access grants are logged for security auditing.
-
OIDC authentication requests include a nonce that's validated and used to prevent ID token replay attacks.
What you can do to prevent OAuth and OIDC attacks
-
Use PingOne Protect. PingOne Protect continuously monitors OAuth and OIDC authentication events for unusual login behaviors, such as rapid login attempts or geolocation inconsistencies. (PingOne Protect license required.)
-
Ensure that your PingOne environment is configured to issue signed and encrypted access and ID tokens. This practice protects token integrity and confidentiality, preventing tampering or unauthorized access to sensitive claims. See Access tokens and ID tokens for more information.
-
Use PKCE with all OAuth 2.0 and OIDC Authorization Code Flows as a standard security measure. PKCE protects against authorization code interception by ensuring that only the original client that initiated the request can exchange the code for tokens. PKCE adds a critical layer of protection against attacks and misconfigurations, and helps safeguard tokens from being issued to unauthorized or malicious clients. See PKCE parameters for more information.
-
Enable and enforce user consent prompts in PingOne for all third-party and high-risk applications requesting OAuth scopes. Prompts allow end users to clearly see what data and permissions are being requested and helps prevent unauthorized access or privilege escalation due to overbroad scope requests.
-
Implement and configure OIDC session logout (single logout) across all applications integrated with PingOne. Register logout URIs and support front channel or backchannel logout to ensure user sessions are fully terminated across all relying parties, reducing the risk of session hijacking or unintended access after logout. See Sessions for more information.
-
Enable and configure FIDO2 or WebAuthn authentication in PingOne to reduce reliance on passwords and protect users from phishing attacks that target OAuth and OIDC credentials. FIDO2 and WebAuthn provide strong, phishing-resistant authentication methods that enhance both security and user experience. See Multi-factor (MFA) action and FIDO policies for more information.
-
Ensure that the data is accurate and verified when mapping user attributes into tokens (such as email, phone, and roles), especially if relying systems use these attributes for access decisions or communication. For example, include email addresses in tokens only after they have been verified through a trusted process, such as PingOne’s email verification feature. See Toke customization and introspection for more information.
-
Configure PingOne to alert administrators when it detects OAuth anomalies, such as token misuse, repeated access attempts, or suspicious client behavior. See Alerting for more information.
-
Allow administrators to revoke tokens if they detect suspicious activity, such as unauthorized token usage.See Tokens for more information.
-
Ensure that applications using OAuth store client secrets securely and avoid exposing them in mobile apps or JavaScript. Regularly rotate client secrets and use client certificate authentication for added security. See Authorization and authentication by application type for more information.
-
Monitor OAuth and OIDC application registrations and block phishing domains from attempting to impersonate legitimate apps.
-
Display clear warnings to users when OAuth applications request high-risk permissions, such as full account access.
-
Define and enforce OAuth scopes that grant only the minimum necessary permissions to applications.
-
Set up alerts for unusual OAuth and OIDC behavior, such as multiple failed login attempts, rapid token refreshes, or geolocation inconsistencies.
-
Maintain audit logs of all OAuth and OIDC activity, including token issuance, refresh requests, and failed authentications.
-
Protect against automated attacks by implementing non-interactive CAPTCHA for repeated OAuth or OIDC authentication failures.
-
Enforce certificate pinning to block attackers from using rogue certificates in man-in-the-middle (MitM) attacks.
Sensitive data exposure
What PingOne does to prevent against secret or sensitive data exposure:
-
Passwords are securely hashed using industry-standard algorithms, with proper salting. This ensures that even if password hashes are leaked, they cannot be easily reversed or cracked by attackers, as long as you maintain our recommended password policies, particularly when it comes to password length (shorter passwords are less resistant to brute force attacks). For more information see Password encoding.
-
All sensitive data, including credentials, is encrypted using strong cryptographic algorithms when stored at rest. This prevents attackers from accessing such information even if they manage to breach the system’s storage.
-
All data, including credentials, transmitted between the user’s device and PingOne services is encrypted using Transport Layer Security (TLS). This prevents credentials or other sensitive data from being intercepted by attackers during transmission.
What you can do to prevent secret or sensitive data exposure
-
Implement Single Sign-On (SSO) to your applications using PingOne. This enables you to reduce the need for users to manage multiple sets of credentials across various applications. With SSO, users authenticate once, limiting the number of login prompts and reducing the risk of password leakage across different platforms. For more information see Authentication flow states.
-
Use role-based access control (RBAC) within PingOne to restrict access to sensitive data based on the user’s role within the organization. Only authorized users should have access to sensitive information, and permissions should be granted based on the principle of least privilege. For more information see Roles, scopes, and permissions.
-
Use phishing-resistant authentication methods like FIDO2 and WebAuthn (both supported by PingOne), to eliminate the need for passwords by using public-key cryptography and hardware-based authentication tokens. This reduces the risk of credential leakage entirely, as there are no passwords to steal or leak. For more information see Mult-factor (MFA) action and FIDO Policies.
-
Implement detailed logging of access to sensitive data, including who accessed it, when, and from where. This provides an audit trail that can be reviewed in the event of a data exposure incident. For more information see Audit Activities.
Session hijacking
What PingOne does to prevent against session hijacking
-
Session tokens (such as, JSON Web Tokens (JWT)) are used to manage user sessions securely. Each session token is unique to the user and is required to access resources during the session. For more information see Sessions.
-
Session tokens have a limited lifespan, ensuring they expire after a short period. This reduces the risk that a stolen session token can be used for an extended period, limiting the damage an attacker can do if they obtain the token. For more information see Sessions.
-
All session tokens are signed to prevent attackers from being able to modify the token, in case the token is intercepted without PingOne being able to verify that the token has been modified. This ensures that if a token is modified, it will be rejected if its digital signature doesn’t match what is expected. For more information see Sessions.
-
Session tokens are signed with cryptographic keys, ensuring that tokens cannot be forged or altered. The platform validates the token’s signature to confirm its integrity before allowing access to resources. For more information see Sessions.
-
Transport Layer Security (TLS) is used to encrypt all data in transit between users and PingOne. This prevents attackers from intercepting session tokens, credentials, or other sensitive information via man-in-the-middle attacks (commonly used to facilitate session hijacking). For more information see TLS and cipher suite requirements.
-
The Secure flag is set on all cookies, ensuring that they are only transmitted over encrypted HTTPS connections. This prevents session cookies from being intercepted over insecure connections. For more information see Token storage.
-
The HttpOnly attribute is set on cookies, preventing client-side JavaScript from accessing session cookies. This mitigates the risk of cross-site scripting (XSS) attacks, where an attacker could use injected scripts to steal session cookies. For more information see Token storage.
-
Session expiration policies are enforced that automatically terminate user sessions after a specified period of inactivity. This limits the time window during which an attacker can hijack a session, if a user forgets to log out or walks away from their device. For more information see Sessions.
What you can do to prevent session hijacking
-
Implement MFA for all login attempts, especially for high-privilege or sensitive operations. Even if an attacker successfully hijacks a session, MFA will require them to provide an additional authentication factor, such as a one-time passcode or biometric data, before they can gain access. For more information see PingOne MFA.
-
Use PingOne’s adaptive MFA to trigger additional authentication steps based on suspicious activity, such as access from an unfamiliar location or device. This makes it more difficult for attackers to hijack a session undetected. For more information see PingOne Protect.
-
Implement PingOne-supported FIDO2 and WebAuthn as MFA methods. These methods use public-key cryptography and hardware tokens, making it extremely difficult for attackers to steal credentials and hijack sessions, even through phishing attacks. For more information see Mult-factor (MFA) action and FIDO Policies.
Conventions
This topic describes how to call PingOne APIs, how responses are returned by the PingOne resource server, and how collections that support filtering can be fine-tuned using query parameters on the request. The following sections provide information about these conventions:
API requests
Public endpoints
This section discusses making requests to public endpoints using geographic regional domains in your PingOne environment. If you use the Postman environment template retrieved when you Download the PingOne Postman collections, set the value of {{tld}} to the top level domain (TLD) appropriate to your region. See PingOne API domains in the PingOne Platform API Reference for more information. When you set {{tld}}, the {{...Path}} variables are also set to the appropriate region.
PingOne offers separate services that each require all its API requests go to an exclusive domain. Use the tables below to determine the service endpoint and top level domain {{tld}} value of the region appropriate for your environment:
| Region | Code | Top level domain |
|---|---|---|
| North America region (excluding Canada) | NA | com (default) |
| Canada region | CA | ca |
| European Union region | EU | eu |
| Australia region | AU | com.au |
| Singapore region | SG | sg |
| Asia-Pacific region | AP | asia |
| Service | Postman variable | Endpoint | Description |
|---|---|---|---|
| Environments | {{apiPath}} |
https://api.pingone.{{tld}/v1 |
PingOne API services for environments. |
| Authentication | {{authPath}} |
https://auth.pingone.{{tld}} |
PingOne API services for authentication. |
| DaVinci | {{orchestratePath}} |
https://orchestrate-api.pingone.{{tld}}/v1 |
PingOne API services for DaVinci Management. |
| SCIM | {{scimPath}} |
https://scim-api.pingone.{{tld}} |
PingOne API services for Cross-domain Identity Management (SCIM). |
Authorization
To make a call to the PingOne API, you'll need an OAuth 2.0 access token for API authentication. The access token (a JSON Web Token) is accepted per RFC 6750 most commonly through the Authorization HTTP request header. In the code samples in this document, the access token is expressed in the request header as Authorization: Bearer accessToken, where accessToken is a full base64url-encoded JSON web token generated by the authentication service.
HTTP methods
The PingOne API supports the following HTTP methods. Note that a resource may not support all listed methods below. When a method is not supported, the platform returns a 405 METHOD NOT ALLOWED error in the response.
-
POSTCreates a new resource in the collection. If a specific resource is identified, it performs an operation on that resource.
-
PUTUpdates a resource in the collection. If a specific resource is identified, it updates all attribute values of the resource.
-
PATCHUpdates the attributes on an object or a partial update for the specified attributes.
-
GETLists or queries a collection of resources. If a specific resource is identified, it returns the attribute values for the specific resource.
-
DELETEDeletes or unlinks a resource from the collection.
A resource supports updating either by replacing the resource (PUT) or partially updating the resource (PATCH).
Replacing a resource
A PUT request is a replace operation. Requests submitted using PUT will replace attribute values specified in the request and clear any attribute values that aren't specified.
A null value is represented in a resource by omitting the property, although you can specify null to explicitly clear the value.
Partial updates to a resource
A PATCH operation performs partial updates of a resource. The body of a PATCH operation is similar to that of a PUT operation. However, omitting an attribute in a PATCH operation results in the attribute being ignored.
You can use a value of null to explicitly clear the value.
Supported data exchange formats
The PingOne API supports JSON as the data exchange format with UTF-8 character encoding required for request body content. For PUT, POST, and PATCH operations, the Content-type request header identifies the format of the request body. A Content-type request header value of application/json specifies the data exchange format as JSON, which, by default, sets the character encoding to UTF-8. Here is a sample:
curl -vX PUT "https://api.pingone.com/v1/environments/{{envID}}/populations/{{popID}}" \
-H "Content-type: application/json" \
-H "Authorization: Bearer accessToken" \
-d "{
  "name" : "Finance",
  "description" : "Finance and accounting group"
}"
Endpoint example variations
For clarity of request variations, we present the example requests in our documentation as though they're separate endpoints.
For example, the POST Create Application operation has several request variations. Rather than showing multiple examples, we break this down into multiple reference pages.
Data models
PingOne data models list the possible properties in a request or response body for each endpoint at a high level. The data models have five columns, described below.
-
Property
The name of the property.
-
Type
The valid data type for the property value. Possible options include: String, Integer, Boolean, Array.
-
Required?
Whether the property is required for creating, updating, or otherwise modifying or acting upon a resource.
-
Mutable?
Whether the property can be changed after its initial setting. The possible options are:
-
Mutable - Values that can be provided as input when creating, updating, or otherwise modifying or acting upon a resource.
-
Read-only - Values provided in the response resource only and not used/ignored for input.
-
Immutable - Values provided in the input when creating a resource, but otherwise treated as read-only for subsequent operations.
-
-
Description
A more detailed definition of the property. This could include a list of accepted values, the default value when left blank, circumstances in which the property is required or optional, or just an example value.
UUIDs for resource identification
Resources in PingOne are identified by their associated UUID (universally unique identifier). API requests use UUIDs in the request URL to specify the resources involved in the operation. For clarity, the code samples in this API Reference use descriptive variables such as {{envID}}, {{userID}}, {{appID}}, and {{deviceID}} to represent the UUIDs assigned to PingOne resources.
For example, the following sample request URL specifies a unique device associated with a unique user in a unique environment. The resource ID variables represent specific UUIDs for PingOne resources.
curl -X "GET" "https://api.pingone.com/v1/environments/{{envID}}/users/{{userID}}/devices/{{deviceID}}"
The actual request URL with UUIDs looks like this:
curl -X "GET" "https://api.pingone.com/v1/environments/5caa81af-ec05-41ff-a709-c7378007a99c/users/8ce55f02-2077-4493-9a6d-0385df1f0772/devices/4ca9eb79-be29-4a1f-9a23-b29d58606e18"
There are a few exceptions to this convention. Notifications template names in PingOne are identified by the template name {{templateName}} rather than by a UUID. For example, the following request URL returns information about a specific template:
curl -X "GET" "https://api.pingone.com/v1/environments/5caa81af-ec05-41ff-a709-c7378007a99c/templates/{{templateName}}
The {{templateName}} variable is replaced by one of the pre-defined notifications template names in PingOne. The actual request URL that uses a defined notifications template called strong_authentication looks like this:
curl -X "GET" "https://api.pingone.com/v1/environments/5caa81af-ec05-41ff-a709-c7378007a99c/templates/strong_authentication
Placeholder syntax
Some requests use placeholder syntax to reference platform resource entities as variables. When placeholder syntax is required, the PingOne resource used as a variable is expressed in placeholder syntax format as ${attribute}. For example, when mapping a SAML name attribute to the PingOne username attribute, the value of the PingOne attribute in the POST request body is expressed as ${user.username}. In most cases where placeholder syntax is required, the placeholder references attributes in the PingOne user schema. The variable is written as a path to the value: ${user.path.to.value}. For example, to reference the name.family user attribute, the variable is written as ${user.name.family}.
Placeholder syntax is also used to express sign-on policy condition variables. For example, a condition variable to specify the last completed time the password authenticator was used for sign on is expressed as ${session.lastSignOn.withAuthenticator.pwd.at}.
Placeholders in sign-on policy conditions often specify a value or range of values to meet the sign-on condition. For example, the sign-on policy associated with the following condition prevents sign-on from devices that contain the remote IP address value specified by the variable ${flow.request.http.remoteIp} in the specified IP address ranges.
"condition": {
   "not": {
        "ipRange": [
            "10.1.1.1/8",
            "10.0.0.0/8"
        ],
        "contains": "${flow.request.http.remoteIp}"
    }
}
Placeholders are also used to specify external identity provider attributes. For example, to specify a Facebook attribute that is mapped to a PingOne attribute, the Facebook attribute is expressed as ${providerAttributes.<Facebook attribute name>}. For example, the following expression maps the PingOne username attribute to the Facebook email attribute.
{
    "name": "username",
    "value": "${providerAttributes.email}"
    "update": "EMPTY_ONLY",
}
The following table shows the PingOne resources that use Placeholder syntax in POST requests.
| PingOn resource | Placeholder example |
|---|---|
| Sign-on policy actions | ${session.lastSignOn.at}${session.lastSignOn.withAuthenticator.pwd.at}${session.lastSignOn.withAuthenticator.mfa.at}${flow.request.http.remoteIp}${user.*} |
| Identity providers | ${providerAttributes.<IdP attribute name>} |
| Notifications templates | ${user.username}${otp} |
| Resource attributes | ${user.email} |
| SAML attribute mapping | ${user.id} |
Request model and query parameter expandable sections
Request model and query parameters expandable sections are included in our API documentation when applicable.
For an example of each, see the expandable Request model and Query parameters sections in Create Application (OIDC Protocol - Worker App).
Link expansion
You can optimize the information returned by a request through link expansion. Link expansion is helpful when you need the query to return detailed information from an additional resource in the response data. You can identify a resource to expand using the expand query string parameter in the request.
Here is a sample that requests data for a specific user and expands the passwordPolicy attribute to show the password policy's attribute data.
curl -X GET "https://api.pingone.com/v1/environments/{{envID}}/users/{{userID}}/password?expand=passwordPolicy" \
-H "Authorization: Bearer accessToken"
When using the expand parameter in the request, the returned JSON includes an embedded passwordPolicy resource to show the details of the password policy associated with this user:
{
    "_links": {
        "self": {
            "href": "https://api.pingone.com/v1/environments/5caa81af-ec05-41ff-a709-c7378007a99c/users/b94f4977-0d52-4c9d-a5da-e7d42a82f613/password"
        },
        "environment": {
            "href": "https://api.pingone.com/v1/environments/5caa81af-ec05-41ff-a709-c7378007a99c"
        },
        "user": {
            "href": "https://api.pingone.com/v1/environments/5caa81af-ec05-41ff-a709-c7378007a99c/users/b94f4977-0d52-4c9d-a5da-e7d42a82f613"
        },
        "passwordPolicy": {
            "href": "https://api.pingone.com/v1/environments/5caa81af-ec05-41ff-a709-c7378007a99c/passwordPolicies/9ad15e9e-3ac6-43f7-86d3-01018f6ef0ad"
        },
        "password.check": {
            "href": "https://api.pingone.com/v1/environments/5caa81af-ec05-41ff-a709-c7378007a99c/users/b94f4977-0d52-4c9d-a5da-e7d42a82f613/password"
        },
        "password.reset": {
            "href": "https://api.pingone.com/v1/environments/5caa81af-ec05-41ff-a709-c7378007a99c/users/b94f4977-0d52-4c9d-a5da-e7d42a82f613/password"
        },
        "password.set": {
            "href": "https://api.pingone.com/v1/environments/5caa81af-ec05-41ff-a709-c7378007a99c/users/b94f4977-0d52-4c9d-a5da-e7d42a82f613/password"
        },
        "password.recover": {
            "href": "https://api.pingone.com/v1/environments/5caa81af-ec05-41ff-a709-c7378007a99c/users/b94f4977-0d52-4c9d-a5da-e7d42a82f613/password"
        }
    },
    "environment": {
        "id": "5caa81af-ec05-41ff-a709-c7378007a99c"
    },
    "user": {
        "id": "b94f4977-0d52-4c9d-a5da-e7d42a82f613"
    },
    "passwordPolicy": {
        "id": "9ad15e9e-3ac6-43f7-86d3-01018f6ef0ad"
    },
    "status": "NO_PASSWORD",
    "lastChangedAt": "2019-05-21T18:01:07.413Z",
    "_embedded": {
        "passwordPolicy": {
            "_links": {
                "self": {
                    "href": "https://api.pingone.com/v1/environments/5caa81af-ec05-41ff-a709-c7378007a99c/passwordPolicies/9ad15e9e-3ac6-43f7-86d3-01018f6ef0ad"
                },
                "environment": {
                    "href": "https://api.pingone.com/v1/environments/5caa81af-ec05-41ff-a709-c7378007a99c"
                }
            },
            "id": "9ad15e9e-3ac6-43f7-86d3-01018f6ef0ad",
            "environment": {
                "id": "5caa81af-ec05-41ff-a709-c7378007a99c"
            },
            "name": "Standard",
            "description": "A standard policy that incorporates industry best practices",
            "excludesProfileData": true,
            "notSimilarToCurrent": true,
            "excludesCommonlyUsed": true,
            "maxAgeDays": 182,
            "minAgeDays": 1,
            "maxRepeatedCharacters": 2,
            "minUniqueCharacters": 5,
            "history": {
                "count": 6,
                "retentionDays": 365
            },
            "lockout": {
                "failureCount": 5,
                "durationSeconds": 900
            },
            "length": {
                "min": 8,
                "max": 255
            },
            "minCharacters": {
                "1234567890": 1,
                "abcdefghijklmnopqrstuvwxyz": 1,
                "ABCDEFGHIJKLMNOPQRSTUVWXYZ": 1,
                "~!@#$%^&*()-_=+[]{}|;:,.<>/?": 1
            },
            "default": true
        }
    }
}
Try a Request
Our documentation includes an interactive Try a Request feature. The Try a Request feature enables you to configure and send a PingOne API request and get a response from within the documentation. This is a quick way to interactively test a PingOne API request without needing to use either Postman or the command line.
The Try a Request option is shown at the end of each API reference page. For an example, try the Try a Request button in Create User.
Changing example request language
PingOne API documentation includes example requests for each operation. By default, the request is shown in cURL, however, the programming language can be changed by selecting the Language drop-down.
The image below shows the Language drop-down in the example request in Create User.
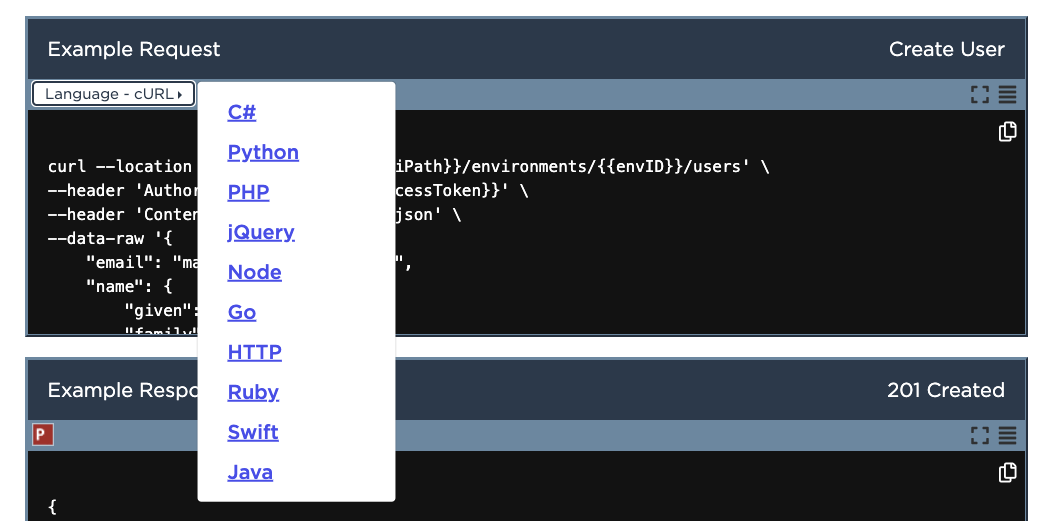
Cross-origin resource sharing
PingOne supports cross-origin resource sharing (CORS), which gives applications running at different domains permission to access resources on PingOne servers. For example, an application at https://myapp.com that uses PingOne to authenticate users needs to request permission to access resources at https://auth.pingone.com before authentication operations are executed. In this case, a request is made to the resource owner (auth.pingone.com) from the requestor (myapp.com) using CORS headers to ask for access privileges. The response from auth.pingone.com returns the CORS Access-Control-Allow-Origin header with a value that confirms the requestor's access rights.
PingOne servers are configured to trust all origins when using access tokens. However, when requesting sensitive resources that use PingOne session cookies for authentication, only specified origins will be trusted. The following endpoints require session cookies for authentication, and only the origins specified in the application's corsSettings property will be trusted when calling these endpoints:
/{envId}/saml20/idp/sso
/{envId}/saml20/idp/startsso
/{envId}/saml20/resume
/{envId}/saml20/idp/slo
/{envId}/as/authorize
/{envId}/as/resume
/{envId}/as/signoff
/{envId}/wsf/sts/{appId}
/{envId}/wsf/mex/{appId}
/{envId}/wsf/prp/{appId}
/{envId}/wsf/prp/resume
When using session cookies for authentication, no origins will be trusted when calling these endpoints:
/{envId}/rp/authenticate/{envId}/rp/callback/{callbackId}
/{envId}/saml20/sp/sso
/{envId}/saml20/sp/acs
/{envId}/saml20/sp/jwtacs
/{envId}/as/txs
Consequently, when defining an application's connection to PingOne, you generally do not need to add your application's domain to a list of trusted origins. Cross-origin requests that use HTTP methods to modify the resource, such as PUT, PATCH, POST, and DELETE, trigger a preflight request to ensure that the initial request can be sent. The browser initiates a preflight HTTP OPTIONS request to verify that the HTTP method used in the actual request is allowed. In these cases, the response from auth.pingone.com to the preflight request returns a response with the CORS Access-Control-Allow-Methods header to specify the allowed methods.
When making CORS requests, only these headers can be used:
AcceptAccept-LanguageContent-LanguageContent-TypeRangeAuthorizationContent-LengthCookieCorrelation-IdOriginOrigin-CookiesRefererorReferrerX-Amz-DateX-Amz-Security-TokenX-Api-KeyX-client-versionX-Content-Type-Options
When accessing CORS responses, you're restricted to reading only the Correlation-Id header (as well as the request body).
Attempting to submit or access headers that are not listed above may prevent you from making CORS requests or reading the responses.
Forced type conversion of floating point numbers in requests
PingOne truncates a float value submitted in the JSON request body to a matching int value for services other than flow orchestration. For example, in the following request body JSON, the minAgeDays value can be submitted with a value of 1.5.
{
  "name": "Standard",
  "description": "A standard policy that incorporates industry best practices",
  "excludesProfileData": true,
  "notSimilarToCurrent": true,
  "excludesCommonlyUsed": true,
  "maxAgeDays": 182,
  "minAgeDays": 1.5,
  "maxRepeatedCharacters": 2,
  "minUniqueCharacters": 5,
  "history": {
    "count": 6,
    "retentionDays": 365
  },
  "lockout": {
    "failureCount": 5,
    "durationSeconds": 900
  },
  "length": {
    "min": 8,
    "max": 255
  },
  "minCharacters": {
    "~!@#$%^&*()-_=+[]{}|;:,.<>/?": 1,
    "0123456789": 1,
    "ABCDEFGHIJKLMNOPQRSTUVWXYZ": 1,
    "abcdefghijklmnopqrstuvwxyz": 1
  },
  "default": true
}
The request will execute. However, the response shows that the minAgeDays value is converted automatically to an int value:
{
  "_links": {
    "self": {
      "href": "https://api.pingone.com/v1/environments/5caa81af-ec05-41ff-a709-c7378007a99c/passwordPolicies/ad53ea0b-28b3-413f-a762-46eaf929ab78"
    },
    "environment": {
      "href": "https://api.pingone.com/v1/environments/5caa81af-ec05-41ff-a709-c7378007a99c"
    }
  },
  "id": "ad53ea0b-28b3-413f-a762-46eaf929ab78",
  "environment": {
    "id": "5caa81af-ec05-41ff-a709-c7378007a99c"
  },
  "name": "Standard",
  "description": "A standard policy that incorporates industry best practices",
  "excludesProfileData": true,
  "notSimilarToCurrent": true,
  "excludesCommonlyUsed": true,
  "maxAgeDays": 182,
  "minAgeDays": 1,
  "maxRepeatedCharacters": 2,
  "minUniqueCharacters": 5,
  "history": {
    "count": 6,
    "retentionDays": 365
  },
  "lockout": {
    "failureCount": 5,
    "durationSeconds": 900
  },
  "length": {
    "min": 8,
    "max": 255
  },
  "minCharacters": {
    "~!@#$%^&*()-_=+[]{}|;:,.<>/?": 1,
    "0123456789": 1,
    "ABCDEFGHIJKLMNOPQRSTUVWXYZ": 1,
    "abcdefghijklmnopqrstuvwxyz": 1
  },
  "default": true
}
Note that the value of the floating point number is not rounded. It is trimmed by removing the decimal portion of the value.
For flow orchestration services such as sign-on policy actions, float values submitted in the JSON request body generate an INVALID_VALUE error. For example, the following request body with a priority attribute value of 1.5 generates an error:
{
    "priority": 1.5,
    "type": "MULTI_FACTOR_AUTHENTICATION",
    "recovery": {
    	"enabled": false
    },
    "sms": {
        "enabled": true
    },
    "voice": {
        "enabled": true
    },
    "email": {
        "enabled": true
    },
    "applications": [
        {
            "id": "5e81bba1-1234-457c-926a-aae0e9876543",
            "autoEnrollment":{"enabled":true}
        }
    ]
}
The response error looks like this:
{
  "id": "15051F81-2500-4BBB-BE4A-0AF31DD50205",
  "code": "INVALID_REQUEST",
  "message": "The request could not be completed. The request was malformed or invalid.",
  "details": [
    {
      "code": "INVALID_VALUE",
      "target": "priority",
      "message": "Invalid value for attribute."
    }
  ]
}
API responses
HTTP response headers
The PingOne API includes information about the result of the operation in the HTTP headers. This enables you to determine the appropriate action to take without having to parse the response body.
The following HTTP Headers are returned by every operation:
-
Access-Control-Allow-HeadersUsed in response to a cross-origin resource sharing (CORS) preflight request to indicate the HTTP headers that can be used when making a request.
-
Access-Control-Allow-Max-AgeSpecifies how long the results of a CORS preflight request can be cached.
-
Access-Control-Allow-MethodsSpecifies the method or methods allowed when accessing the resource in response to a CORS preflight request.
-
Cache-ControlSpecifies directives for caching mechanisms in both requests and responses.
-
Content-TypeSpecifies the data exchange format for the response data.
-
Correlation-IdA custom header.
-
DateShows the date the response was sent.
-
ExpiresShows the date and time when the response expires.
-
PragmaUsed for backwards compatibility with HTTP/1.0 caches in which the Cache-Control HTTP/1.1 header is not yet present.
-
Strict-Transport-SecurityAllows a web site to tell browsers that the site should only be accessed using HTTPS, instead of HTTP.
-
Transfer-EncodingSpecifies the form of encoding used to safely transfer the entity to the user.
-
VaryDetermines how to match future request headers to decide whether a cached response can be used rather than requesting a fresh one from the origin server. It is used by the server to indicate which headers it used when selecting a representation of a resource in a content negotiation algorithm.
-
ViaUsed for tracking message forwards, avoiding request loops, and identifying the protocol capabilities of senders along the request/response chain.
-
X-Content-Type-OptionsA marker used by the server to indicate that the MIME types advertised in the Content-Type headers should not be changed and be followed.
-
X-Frame-OptionsThis denies rendering in a frame where there is a frame mismatch.
-
X-XSS-ProtectionA feature of Internet Explorer, Chrome, and Safari that stops pages from loading when the browsers detect reflected cross-site scripting (XSS) attacks.
HTTP response codes
The PingOne API returns the status of an operation as a registered HTTP response code. The HTTP response codes can be summarized as:
-
200-299Confirms a successful call.
-
300-399Indicates that the call or subsequent calls should be made to another resource.
-
400-499Shows that an exception occurred, generally due to client code, insufficient permissions, or incorrect parameters.
-
500-599Shows that an error occurred, generally due to an issue with the service (for example, a service outage).
Operations can also return additional information about a failed operation in the HTTP response body.
Synchronous responses
Responses for synchronous operations have the following behavior:
-
GEToperationsA request that returns a body also returns the code
200 OKwith the resource in the body of the response. -
POSToperationsA request that creates a new resource returns
201 CREATEDwith aLocationheader containing the location of the created resource. -
PUTorPATCHoperationsA request that updates a resource returns
200 OKand the full resource in the body. -
DELETEoperationsA request that deletes a resource returns
204 NO CONTENT.
Asynchronous responses
The PingOne API can create a long-running or asynchronous operation that can be monitored by a client. An asynchronous operation will have the following behavior:
-
POSToperationsResponses include
202 ACCEPTEDwith aLocationheader containing the location of the newly created operation. The client can poll the provided location to check the status of the operation. The operation may also return a suggested number of seconds for the client to recheck the status using theRetry-AfterHTTP header. -
Canceling long-running operations
Some resources may allow the client to cancel an operation by performing a
DELETErequest on the created resource. -
Clean up
The PingOne API will clean up operation history according to the application requirements (such as, keep the last
nresults, or purge results after the client has verified its success).
Response data structure
HAL (Hypertext Application Language) is a formatting convention that provides hyperlinks to related resources returned by an API request. For example, a GET /environments/{{envID}}/users/{{userID}} request returns data for a specific user resource. The _links object in the JSON response data shows the hyperlinks to related resources associated with this user. You can use the roleAssignments link to get role assignments associated with this user, or the password.reset link to perform password management actions on this user resource.
{
    "_links": {
        "self": {
            "href": "https://api.pingone.com/v1/environments/5caa81af-ec05-41ff-a709-c7378007a99c/users/8376797d-641c-4e7b-8bc1-2fdf71916cab"
        },
        "environment": {
            "href": "https://api.pingone.com/v1/environments/5caa81af-ec05-41ff-a709-c7378007a99c"
        },
        "population": {
            "href": "https://api.pingone.com/v1/environments/5caa81af-ec05-41ff-a709-c7378007a99c/populations/60971d3b-cc5a-4601-9c44-2be541f91bf1"
        },
        "devices": {
            "href": "https://api.pingone.com/v1/environments/5caa81af-ec05-41ff-a709-c7378007a99c/users/8376797d-641c-4e7b-8bc1-2fdf71916cab/devices"
        },
        "roleAssignments": {
            "href": "https://api.pingone.com/v1/environments/5caa81af-ec05-41ff-a709-c7378007a99c/users/8376797d-641c-4e7b-8bc1-2fdf71916cab/roleAssignments"
        },
        "password": {
            "href": "https://api.pingone.com/v1/environments/5caa81af-ec05-41ff-a709-c7378007a99c/users/8376797d-641c-4e7b-8bc1-2fdf71916cab/password"
        },
        "password.reset": {
            "href": "https://api.pingone.com/v1/environments/5caa81af-ec05-41ff-a709-c7378007a99c/users/8376797d-641c-4e7b-8bc1-2fdf71916cab/password"
        },
        "password.set": {
            "href": "https://api.pingone.com/v1/environments/5caa81af-ec05-41ff-a709-c7378007a99c/users/8376797d-641c-4e7b-8bc1-2fdf71916cab/password"
        },
        "password.check": {
            "href": "https://api.pingone.com/v1/environments/5caa81af-ec05-41ff-a709-c7378007a99c/users/8376797d-641c-4e7b-8bc1-2fdf71916cab/password"
        },
        "password.recover": {
            "href": "https://api.pingone.com/v1/environments/5caa81af-ec05-41ff-a709-c7378007a99c/users/8376797d-641c-4e7b-8bc1-2fdf71916cab/password"
        },
        "linkedAccounts": {
            "href": "https://api.pingone.com/v1/environments/5caa81af-ec05-41ff-a709-c7378007a99c/users/8376797d-641c-4e7b-8bc1-2fdf71916cab/linkedAccounts"
        },
        "account.sendVerificationCode": {
            "href": "https://api.pingone.com/v1/environments/5caa81af-ec05-41ff-a709-c7378007a99c/users/8376797d-641c-4e7b-8bc1-2fdf71916cab"
        }
    },
    "_embedded": {
        "password": {
            "status": "PASSWORD_EXPIRED"
        },
        "population": {
            "_links": {
                "self": {
                    "href": "https://api.pingone.com/v1/environments/5caa81af-ec05-41ff-a709-c7378007a99c/populations/60971d3b-cc5a-4601-9c44-2be541f91bf1"
                },
                "environment": {
                    "href": "https://api.pingone.com/v1/environments/5caa81af-ec05-41ff-a709-c7378007a99c"
                }
            },
            "id": "60971d3b-cc5a-4601-9c44-2be541f91bf1"
        }
    },
    "id": "8376797d-641c-4e7b-8bc1-2fdf71916cab",
    "environment": {
        "id": "5caa81af-ec05-41ff-a709-c7378007a99c"
    },
    "createdAt": "2020-02-18T20:50:14.092Z",
    "email": "tomjones@example.com",
    "enabled": true,
    "lifecycle": {
        "status": "ACCOUNT_OK"
    },
    "mfaEnabled": false,
    "name": {
        "given": "Tom",
        "family": "Jones"
    },
    "population": {
        "id": "60971d3b-cc5a-4601-9c44-2be541f91bf1"
    },
    "updatedAt": "2020-02-18T20:50:14.092Z",
    "username": "tomjones"
}
In addition, the _embedded resources returned by the request can be used as a navigation option to explore related resources. For example, population is returned as an _embedded resource in the response, and you can use the embedded resource's self link to initiate a GET /environments/{{envID}}/populations/{{popID}} request to return data about the population associated with this user.
Relationships, links, and references
Relationships between resources or operations can be described as follows:
-
Relationships (one-to-one)
Where a resource is directly related to another resource (such as employee to manager, user to population, logo to brand), the relationship is generally represented by an attribute as a first-class citizen of the resource. For example:
-
_linksobject : Contains an href to the actual resource. -
Payload : Contains the reference as an attribute with the ID. The name of the
_linksattribute and the attribute in the payload must be the same). -
Expandable : Yes.
-
-
Relationships (one-to-many or many-to-one)
Where a resource or resources may be related to a collection or to many resources. For example, a user to group membership:
-
_linksobject : Contains an href to the actual resource or collection. -
Payload : May contain the reference as an attribute with the ID. The name of the
_linksattribute and the attribute in the payload must be the same). -
Expandable : No.
-
-
Informal relationships and links
Provides navigation and self-discovery of the API and its related resources (such as next page of search results, next authentication service to invoke, or with which environment the resource is associated). For example:
-
_linksobject : Contains an href to the actual resource, collection, or URL. -
Payload : Cannot contain the reference as an attribute.
-
Expandable : No.
-
These relationships and references are represented as follows:
-
Links are represented using JSON HAL conventions (such as in a
_linksobject). -
Links are represented as absolute URLs.
-
Links can be expanded using the
expandparameter. The links can also be referenced using the "property-as-resource" pattern. -
References as attributes have an
idvalue and can also have additional attributes (such asdisplayName).
Caching
The PingOne API generally implements HTTP caching of operation responses. When HTTP caching is implemented, the following HTTP response headers are included:
-
ETagAn arbitrary string for the version of a representation. This includes the media type in the hash value. For example:
ETag:"686897696a7c876b7e". -
DateThe date and time the response was returned. For example:
Date:Sun, 06 Nov 1994 08:49:37 GMT. -
Cache-ControlThe maximum number of seconds a response can be cached. If caching is not supported for the response, the value is
no-cache. For example:Cache-Control:360orCache-Control:no-cache. -
ExpiresIf
Cache-Controlis supplied, this header contains the timestamp for when the response expires. If caching is not supported for the response, this header is not present. For example:Expires:Sun, 06 Nov 1994 08:49:37 GMT. -
PragmaWhen the
Cache-Controlvalue isno-cache, this header is also set tono-cache. If caching is not supported for the response, this header is not present. For example:Pragma:no-cache. -
Last-ModifiedThe timestamp for when the resource itself was last modified. For example:
Last-Modified:Sun, 06 Nov 1994 08:49:37 GMT. -
VariesThis header is included for user-specific headers (such as
Authorization) in multi-tenant scenarios.
PingOne products
PingOne services is a set of cloud identity and access management services that supply distinct, advanced capabilities to the PingOne platform. Each service is independent of the other services, and has its own unique APIs. Your organization's licensing can include:
PingOne Authorize
PingOne Authorize provides customers with a fine-grained, attribute-based, dynamic authorization decisioning capability. PingOne Authorize moves per-transaction authorization logic from customer applications to PingOne, enabling centralized control of authorization policy and reuse of policy across applications and contexts.
-
See the PingOne Authorize admin documentation.
-
For information about creating, reading, updating, and deleting policy decision resources, see PingOne Authorize Policy Decision Service and Policy Decision Authorization in the PingOne Platform API Reference.
-
For information about creating, reading, updating, and deleting API access management service resources, see PingOne Authorize API Access Management in the PingOne Platform API Reference.
-
For information about defining custom application resources, roles, and permissions within PingOne, see PingOne Authorize Application Resources and Roles in the PingOne Platform API Reference.
PingOne MFA
PingOne MFA is a cloud-based service that provides multi-factor authentication (MFA) for the customer use case, that protects an organization's network, applications, and data resources.
See Strong Authentication (MFA), which demonstrates a basic flow of practical steps to getting started with PingOne MFA, accompanied with explanations.
The flow depicts typical interaction between admin and developer roles. There are some PingOne MFA tasks which can only be implemented using the admin UI, whereas for other tasks, there is also the option to apply some of these steps using the developer API. At each step that the API option is possible, it is noted together with a link to the relevant section in the developer API documentation.
PingOne Neo
PingOne Neo is a decentralized identity solution that gives control of identity data back to users. PingOne Neo empowers businesses to give their users full control over how they securely store and share verified credentials without unnecessary friction.
PingOne Neo also provides organizations with identity verification capabilities and the capability to issue credentials for users to store in their wallet app and verify user data with access to:
A self-service interface included to customize and issue verifiable digital credentials that users can store in their wallet app with no code required.
Enabled secure user identity verification based on a government-issued document and live face capture (a selfie) using the PingOne Verify Integration Kit. For more information, see PingOne Verify Integration Kit.
Embed identity verification and a digital wallet into your mobile applications. Works with PingOne Verify and PingOne Credentials. Android and iOS are both supported.
For more information about PingOne Neo, see PingOne Neo.
PingOne Credentials
PingOne Credentials service allows issuers to create verifiable credentials that they can issue to a user's compatible wallet app.
The issuer creates a credential template in PingOne Credentials that they can use to produce a visual credential to a user. The issuer can define individual fields on the credential in the form of name-value pairs to provide the appropriate details for the service credential they are offering to their users.
Credential details vary according to the industry and the specific credentials the issuer wants to offer. For example, in addition to name and date of birth, an insurance company might want to provide the type of insurance, policy number, and expiry date. A bank might want to include the bank account number and date of issue, and a university might want to include the type of degree, and the class obtained.
To set up and configure PingOne Credentials, you'll use:
- The PingOne console to configure PingOne Credentials.
The PingOne Credentials service maintains a unique private-key for each service provider within the PingOne environment. To simplify the creation and issuance of credentials, PingOne Credentials provides APIs that allow customers to interact programmatically and with additional customizations.
PingOne Verify
PingOne Verify enables secure user verification based on a government-issued document and live face capture (a selfie). The user ID information is captured on a user's iOS or Android device using the customer-created Verify app, and sent to the PingOne ID Verification service. The PingOne ID Verification service interacts with a service provider or providers that verify the submitted user ID information. When a user's ID information is successfully verified, the PingOne ID Verification service approves the user authentication and sends the ID verification status to the customer Verify app on a user's device.
Only the ID verification status is retained by PingOne. Any personally identifiable information (PII data) passed to PingOne is deleted by the ID Verification service.
To set up and configure PingOne Verify, you'll use:
- The PingFederate admin console for Configuring PingOne Verify.
- The PingOne Verify Native SDKs .
- The PingOne Verify REST APIs.
See PingOne Verify transactions flow and Getting started with PingOne Verify in the PingOne Verify Administration Guide.
PingOne Protect
PingOne Protect is a cloud-based service that provides a single access point for event-based risk evaluations. The Protect service can be used with Ping Identity's SaaS products such as PingOne and PingOne MFA as well as with on-premise software products such as PingFederate.
See Getting Started with PingOne Protect in the PingOne Protect Administration Guide, which demonstrates a basic flow of practical steps to getting started with PingOne Protect, accompanied with explanations. The flow depicts typical interaction between admin and developer operations.
For the PingOne Protect APIs, see PingOne Protect.