PingOne for Developers Getting Started
This guide uses fundamental workflows to walk you through the steps to get an access token, and begin using the PingOne APIs.
You'll need to understand these PingOne terms used in the workflows:
-
Although an environment is automatically created for you when you first sign on to PingOne, for the purposes of these workflows, you'll create an additional, new environment.
-
A Worker app is an admin-level application connection to PingOne that interacts with the PingOne APIs on your behalf. When you obtain an access token from a Worker app, the Worker app has admin-level access to all of the PingOne APIs. A Worker app's authorized access to PingOne API resources is determined by the roles and associated permissions that you assign to the Worker app.
-
An access token is a JSON Web Token (JWT) required to authorize any calls to the PingOne Platform APIs. An access token is valid for 1 hour. You'll then need to request a new access token.
-
A population is a collection of users within a PingOne environment, similar to an organizational unit (OU) in a traditional LDAP implementation. This gives you a way to manage and apply operations to a large set of users.
Refer to PingOne for Developers Foundations for more background and conceptual information.
Authentication and authorization
We're using OpenID Connect or OAuth 2 for the API requests using in the workflows. The authorization requests are identified by an {{authPath}} variable. The PingOne top-level domain is https://auth.pingone.com/ for the U.S. Refer to PingOne API domains for the top-level domains for other regions.
The authorization requests to get an access token use Basic authentication with an authorization code grant type. Requests to the {{authPath}} endpoint are used to obtain a Bearer token. This token is required for use by calls to the {{apiPath}} endpoint, the endpoint for the majority of the PingOne APIs.
What you'll do
There are three inter-related workflows you'll use to:
-
Sign on to the admin console for your PingOne environment, create an admin-level Worker app, and assign roles to the Worker app. This is the only workflow for which you'll use the admin console. The remaining workflows use only the PingOne APIs.
-
Create and initially configure a new test environment.
-
As part of the workflow to create a new environment, you'll get an admin access token (a JSON Web Token) for the Worker app you created. This access token gives the Worker app the necessary permissions to call any of the PingOne APIs.
-
Create a web application for users to sign-on (SSO) to PingOne through a Web application.
How the workflows interact

The Postman choice
We use Postman to create our PingOne API docs, and have done so in this Getting Started guide as well. We highly recommend you use Postman to complete the workflows using the PingOne APIs (Task 2: Create a test environment and Task 3: Create an SSO workflow). We've configured a Postman collection for you to download in each of these workflows, so you can call these requests in your own Postman installation. There's also an accompanying Postman Environment template already populated with the necessary variables.
If you'd rather not install Postman, this guide doesn't limit or constrain you in that respect. Each Postman request in this guide is well-documented, and has a dropdown list to show the coding language to use for the request. (This is also true for our Platform Reference API docs.)
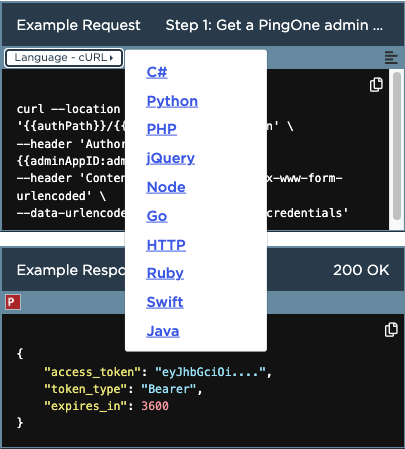
You can use cURL (the default) and call the request from your command line, or select one of the other coding languages in the dropdown list, copy the request into your IDE, and call it from there.
Task 1: Create an admin Worker app connection
In this workflow, you'll sign on to the PingOne environment created when you first signed on to your account, and use the admin console to create an admin Worker app. You'll also assign the Environment Admin role at the Organization level to the Worker app. This is the only role that can be assigned at the Organization level. The Organization-level Environment Admin role gives you permissions to all existing PingOne environments as well as any new environments that are added.
This is the only workflow for which you'll use the PingOne admin console. The remaining workflows use only the PingOne APIs.
The result
You'll have a Worker app with Organization-level admin permissions that you can use to make PingOne API calls on your behalf in any PingOne environment.
Step 1: Sign on to admin console
Sign on to the PingOne admin console. For more information about the PingOne admin console, refer to Accessing the admin console home page.
Step 2: Add a Worker app
In the admin console, add a Worker app connection to PingOne:
-
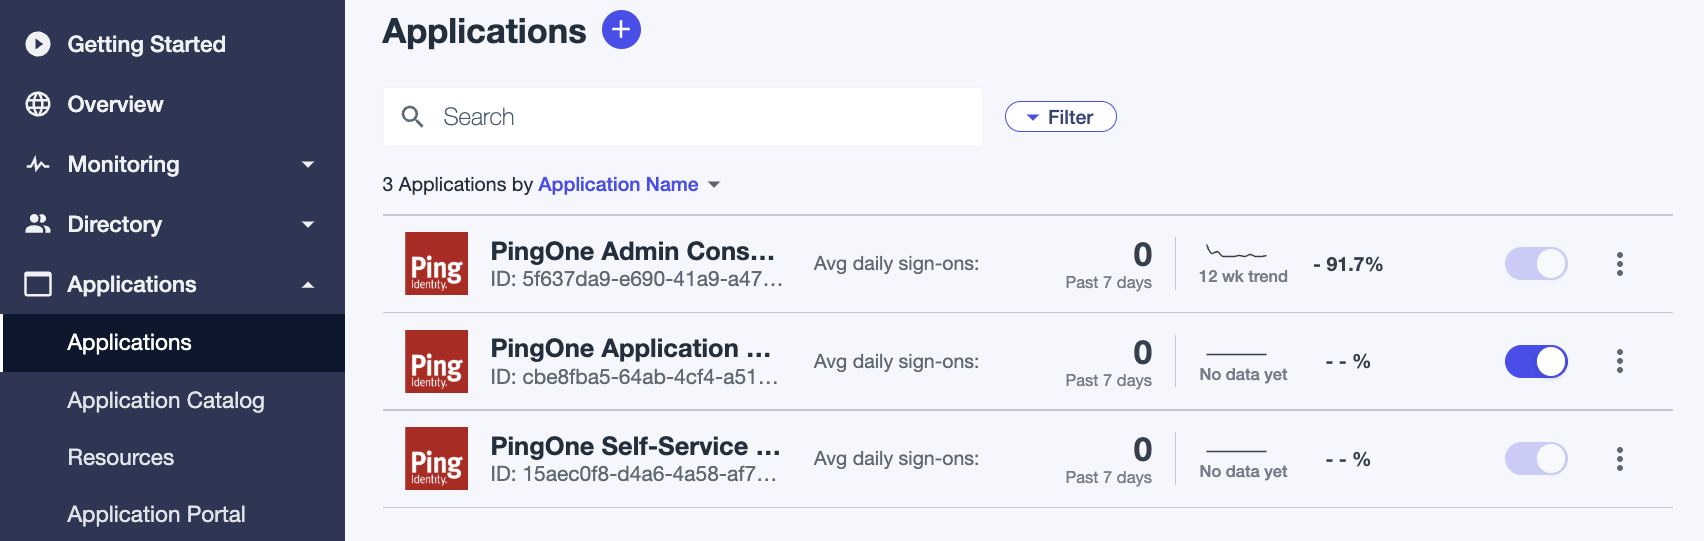
Select Applications --> Applications.
-
Click the + icon next to Applications to add a new app.
-
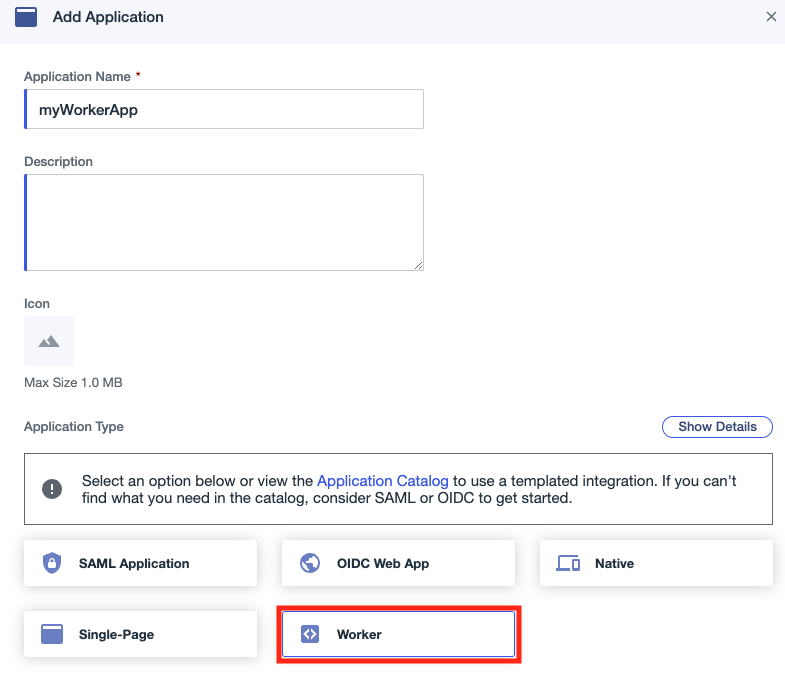
In the Application Name field, enter an application name, and select Worker as the Application Type.
-
Click Save. The Roles tab is then displayed on the application information page.
Step 3: Assign roles to the Worker app
In the application information page for your new Worker app, you'll assign the roles that grant admin-level permissions to the Worker app.
-
In the Roles tab, click Grant Roles. The best practice is to ensure the roles assigned to the Worker app are limited to only those necessary. For this workflow, grant the roles and permissions as shown.
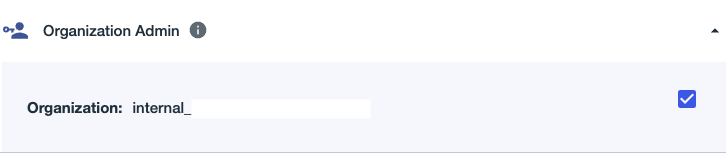
1a. Assign the Organization Admin role as shown. This role is needed to create a new environment:
1b. Expand the Environment Admin role:
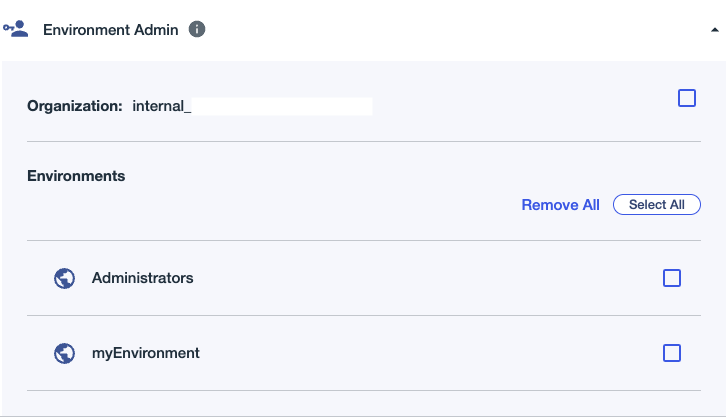
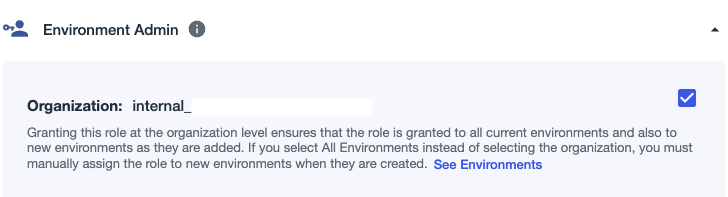
1c. Click the Organization checkbox for the Environment Admin role, and note the information displayed:
-
Click Save.
-
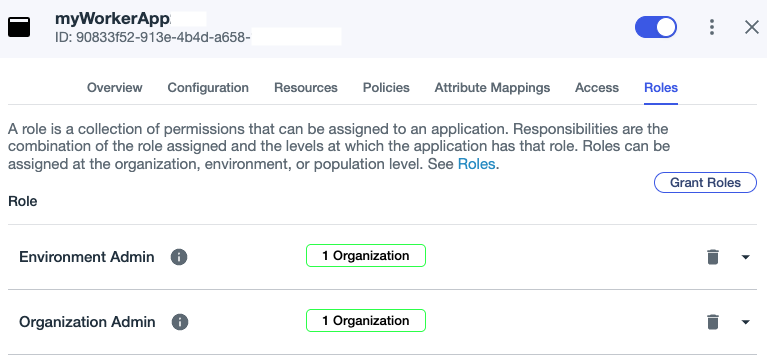
The roles and permissions you've granted are then displayed. They should look like this:
When you subsequently call Management API requests, as you will in steps 2-5 of the next workflow to create a test environment, you'll see one or more of these PingOne role icons beneath the request title:
| Role | Icon | Abbr. | Can Assign |
|---|---|---|---|
| Organization Admin | ORG | Environment Admin | |
| Environment Admin | ENV | All roles except Organization Admin | |
| Identity Data Admin | IDA | Identity Data Admin, Identity Data Read-Only Admin | |
| DaVinci Admin | DVA | DaVinci Admin, DaVinci Read-Only Admin | |
| Custom Role Admin | ROLE | None | |
| Application Owner | APP-O | None | |
| Identity Data Read-Only Admin | IDA-R | None | |
| Configuration Read-Only Admin | CFA-R | None | |
| DaVinci Read-Only Admin | DVA-R | None | |
| Client Application Developer | APP | None |
For example, in the request documentation to GET all applications for an environment, either the Client Application Developer or Environment Admin role is required to call the request:

For some requests, multiple roles have permissions necessary to call the request. As long as your Worker app has at least one of the roles shown for the request, the Worker app can make the call.
Step 4: Copy Worker app credentials
While still in the application information page for your new Worker app, you'll get the Worker app credentials, and enable the Worker app.
-
Select the Overview tab. The general information for your Worker app is displayed. In particular, you'll see the Environment ID, and the credentials for your Worker app: the Client ID, and Client Secret.
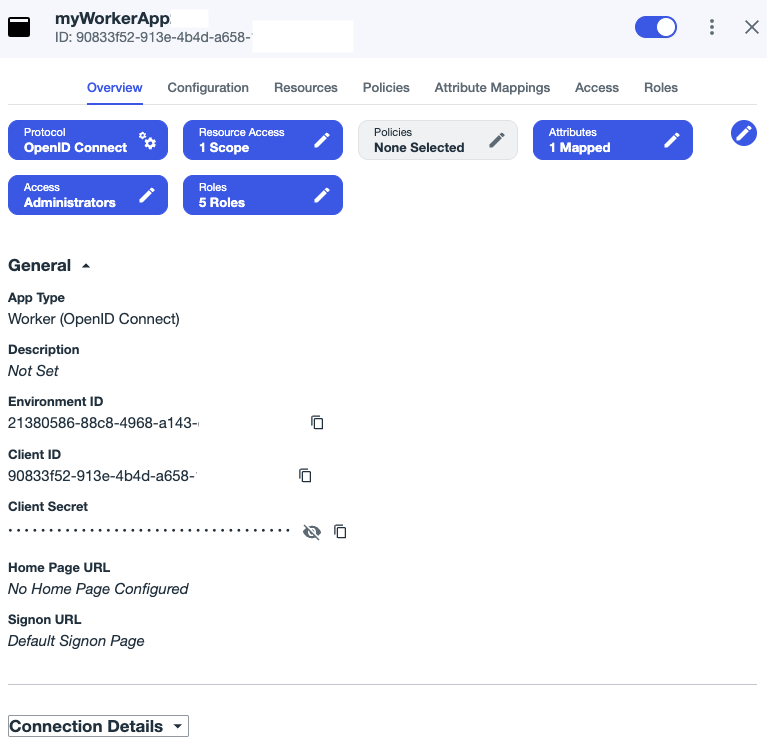
(The Connection Details information isn't shown here for brevity.)
-
Copy the Client ID and Client Secret values for your Worker app. You'll need these credentials when obtaining an admin access token in the subsequent workflow to create your test environment.
-
Also copy the Environment ID. You'll need this because this is the environment in which you created the Worker app. When you need to get an access token for your Worker app, as you will in the next workflows, this is the environment you'll specify for the request.
-
Click the toggle at the upper right to enable the application. The Worker app is saved, and you can now close the application information page.
You're now all set to use the PingOne APIs in the next workflows.
Task 2: Create a test environment
In this workflow, you'll first get an access token. This enables you to call the subsequent requests in this workflow. Although you created an environment when you first signed on to your PingOne account, you'll create an additional, new environment to use here, and for any subsequent testing you might want to do. You'll then create a Population resource, and a new user for this population. Finally, you'll assign the new user a password.
A new environment includes several PingOne resources automatically created for the environment (such as, a default sign-on policy, password policy, a default population, and defined notifications templates). This workflow uses the environment's default sign-on policy and password policy to simplify the workflow.
The result
-
You'll know how to get a PingOne access token for your Worker apps. For security purposes, access tokens have a 1 hour expiry, so you'll use this request often.
-
You'll now have a PingOne environment that you can use for testing, without impacting your initial environment.
-
You'll know how to create populations, users, and assign users to populations, as well as how to assign user passwords. This is useful when you're creating initial admin users. When creating or importing large numbers of users, you'll use different techniques. Refer to Where to go from here for the documentation references.
If you choose to use Postman
If you don't already have a Postman installation, you can install the free version. Refer to Download Postman.
-
Import or fork the Postman collection
Create your test environmentinto your Postman installation by clicking the Run in Postman button below. You'll use this collection for this workflow:
-
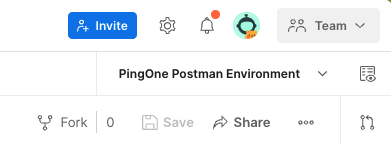
When you open the Postman collection, ensure that you select PingOne Postman Environment Template for use with the collection:
-
Refer to Postman and the PingOne APIs as needed for important information.
If you choose not to use Postman
If you'd rather not install Postman, this guide doesn't limit or constrain you in that respect. Each Postman request is documented, and has a dropdown list to show the coding language to use for the request. (This is also true for our Platform Reference API documentation.)
You can use cURL (the default) and call the request from your command line, or select one of the other coding languages in the dropdown list, copy the request into your IDE, and call it from there.
Step 1: Get a PingOne access token
Step 2: Read All Licenses
Step 3: Create an environment
Step 4: Create a population
Step 5: Create a user
Step 6: Set the user password
Task 3: Create an SSO workflow
In this workflow, you'll test the new environment you created by setting up a Web app for users to perform single sign-on (SSO) to PingOne. You'll do this by creating an OIDC Web app, getting the new Web app's secret, and making an authorization request to the PingOne authorization server. Then, you'll make flow orchestration requests to submit your test user's credentials, get an authorization code, and exchange the auth code for an access token.
The result
-
The sign-on workflow returns an access token, enabling a PingOne user (in this case, the user you've created in the prior workflow to create a test environment) to SSO through a Web application. The PingOne authorization and authentication APIs perform the following actions:
-
Query the PingOne authorization server to initiate the sign-on flow.
-
Start an authentication session and return a flow ID that tracks the user through the sign-on steps.
-
Prompts the user to submit their username and password.
-
Verifies the user's credentials, and issues an authorization code in response.
-
Exchanges the authorization code for an access token that signs on to the user's account through the Web application.
-
-
By completing the sign-on workflow, you've verified that the new environment, the test user, the Web application, and the authentication actions that you've created are functional.
If you choose to use Postman
If you don't already have a Postman installation, you can install the free version. Refer to Download Postman.
-
Import or fork the Postman collection
Simple SSOinto your Postman installation by clicking the Run in Postman button below. You'll use this collection for this workflow: -
When you open the Postman collection, ensure that you select PingOne Postman Environment Template for use with the collection:
-
Refer to Postman and the PingOne APIs as needed for important information.
If you choose not to use Postman
If you'd rather not install Postman, this guide doesn't limit or constrain you in that respect. Each Postman request is documented, and has a dropdown list to show the coding language to use for the request. (This is also true for our Platform Reference API documentation.)
You can use cURL (the default) and call the request from your command line, or select one of the other coding languages in the dropdown list, copy the request into your IDE, and call it from there.
Step 1: Get a new PingOne access token
Step 2: Create a Web application
Step 3: Get the application secret
Step 4: Send an authorization request
Step 5: Get the flow
Step 6: Submit login credentials
Step 7: Call the resume endpoint
Step 8: Get the access token
Where to go from here
Now that you've successfully completed the workflows:
-
You can use the requests in the workflows to:
- Create more users in a population, and get the PingOne prompt using the web app you created for the new users.
- Reset the user's password.
- Change or add the attributes for the Web app.
- Read, add, or remove the user's admin role or roles.
-
You know how to get a PingOne access token, so you might want to choose some use cases to try out from the PingOne Workflow Library.
-
If you're using Postman, or plan to, refer to The Postman Platform collection, and Postman and the PingOne APIs for important information.
-
You'll find more background on PingOne concepts and architecture in the topics in PingOne for Developers Foundations.
-
For similar workflows using the PingOne UI, refer to Getting Started with PingOne in the PingOne admin documentation.
For further information related to the workflows you just completed, refer to these topics:
The create a test environment workflow
Background information related to the create a test environment workflow:
The API requests you used in this workflow:
The SSO workflow
Background information related to the SSO workflow:
The API requests you used in this workflow:
The PingOne Platform Postman collection
The Postman public collection for the PingOne Platform includes the requests for all create, read, update, and delete (CRUD) operations for the PingOne Platform APIs, the PingOne MFA APIs, the PingoOne Neo APIs, and the PingOne Protect APIs. The downloads also include a PingOne Postman environment template to help you assign values to variables in the request URLs.
| Description | Retrieve |
|---|---|
| Postman requests for the PingOne platform API. Includes all environment variables. No example responses to make it easy to get started. | |
| Postman requests for the PingOne platform API. Includes all PingOne documentation and example responses. No environment variables are included. | |
The PingOne Postman environment template
The Postman collection uses variables in the request URLs to specify UUIDs for PingOne resources within your organization. When you click the Run in Postman button, the environment variable template downloads and installs automatically. Using this environment template, you can associate your PingOne resource UUIDs with the common variables used in many of the requests.
POST requests that create a resource and return a resource ID, include a script in the Postman Script tab, that automatically adds a resource variable to your active Postman environment template and uses the newly created ID as the value.