PingOne How-to Guides
The PingOne platform How-to guides describe the workflows used for common PingOne use cases, both for the platform and its services. Each use case is configured as a Postman collection, and includes a Run in Postman button, enabling you to load the use case collection in your Postman workspace.
Configuring and managing Postman
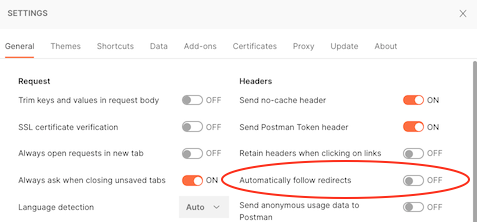
Before you begin using the Postman collections linked to PingOne use cases, you must configure your Postman preferences to not follow redirects automatically. Several PingOne use cases, particularly those that involve an authorize request, an authentication flow, and a redirect back to the authorization server, will not execute the steps in the Postman collection as intended if Postman's Automatically follow redirects setting is turned on.
To disable the Automatically follow redirects setting in Postman:
-
Open your Postman application, and under the Postman menu, click Preferences.
-
On the Settings screen, click the General tab, if it is not already open.
-
Under the Headers column, set the Automatically follow redirects setting to OFF.
For more information about Postman preferences, see Setting up Postman.
Removing session cookies in Postman
When you run use case collections that involve authentication flows, the PingOne API uses session token cookies to establish the user's authentication session and maintain the session throughout the workflow. Postman functions as the calling client saves these cookies, allowing the flow to redirect back to the authorization server to get an access token.
Before you run any use cases, it is recommended that you remove all old session token cookies from Postman. To remove cookies:
-
Open the Step 1 request for the use case you want to run.
-
Click the Cookies link, which is directly under the Send button.
-
On the Manage Cookies screen, delete all session token cookies listed until you see the No Cookies available message.
For more information about Postman and cookie management, see Using cookies.
Using a Postman environment
The PingOne use case collections include test scripts that write variables and their current values to your active Postman environment for the newly created PingOne resources. To save and use these resource IDs, you should specify a Postman environment and have the following Postman environment variables set before you begin:
-
{{tld}}The top level domain for your region:
com,ca,eu,com.au,sg, orasia. This variable is incorporated in each of the following{{...Path}}variables to make changing your region simple. When you set{{tld}}, the{{...Path}}variables are also set to the appropriate region. -
{{apiPath}}The regional domain for the PingOne server. Options are: https://api.pingone.com/v1 for environments the North America region, https://api.pingone.ca/v1 for environments in the Canada region, https://api.pingone.eu/v1 for environments in the European Union region, https://api.pingone.com.au/v1 for environments in the Australia region, https://api.pingone.sg/v1 for environments in the Singapore region, and https://api.pingone.asia/v1 for environments in the Asia-Pacific region.
-
{{authPath}}The domain for the PingOne authentication server. Options are: https://auth.pingone.com/v1 for environments the North America region, https://auth.pingone.ca/v1 for environments in the Canada region, https://auth.pingone.eu/v1 for environments in the European Union region, https://auth.pingone.com.au/v1 for environments in the Australia region, https://auth.pingone.sg/v1 for environments in the Singapore region, and https://auth.pingone.asia/v1 for environments in the Asia-Pacific region.
-
{{orchestratePath}}The regional domain (and part of the path) for the PingOne DaVinci server. Options are: https://orchestrate-api.pingone.com/v1 for environments the North America region, https://orchestrate-api.pingone.ca/v1 for environments in the Canada region, https://orchestrate-api.pingone.eu/v1 for environments in the European Union region, https://orchestrate-api.pingone.com.au/v1 for environments in the Australia region, https://orchestrate-api.pingone.sg/v1 for environments in the Singapore region, and https://orchestrate-api.pingone.asia/v1 for environments in the Asia-Pacific region.
-
{{scimPath}}The regional domain (and part of the path) for the PingOne SCIM server. Options are: https://scim-api.pingone.com/v1 for environments the North America region, https://scim-api.pingone.ca/v1 for environments in the Canada region, https://scim-api.pingone.eu/v1 for environments in the European Union region, https://scim-api.pingone.com.au/v1 for environments in the Australia region, https://scim-api.pingone.sg/v1 for environments in the Singapore region, and https://scim-api.pingone.asia/v1 for environments in the Asia-Pacific region.
-
{{envID}}The UUID of an environment resource. This ID identifies your current working domain within your organization.
-
{{accessToken}}A valid access token returned by the PingOne authorization server from the worker application in your current environment. For information about creating a worker application and getting an access token, see Getting Started with the PingOne APIs.
Downloading the PingOne Postman environment template
If you download and import any of the PingOne master postman collections into Postman (see Download the PingOne Postman collections), the collection import includes a PingOne Postman environment template automatically. You can use this Postman environment with the use case collections, or any Postman environment you have created previously that includes values for the variables listed above.
For more information about the PingOne Postman environment template, see Use the PingOne Postman environment template.
Authorization and Authentication
These tasks show you how to use the platform APIs to perform common actions for authorization and authentication actions. Authorization and authentication use cases often call the following platform API resources:
| Platform API | Description |
|---|---|
| OpenID Connect/OAuth 2 | The PingOne authorization endpoint is used to interact with the resource owner and obtain an authorization grant. |
| Flows | The flow endpoint is used to interact with the user in a sign-on workflow. |
| SAML 2.0 | The SAML endpoints are used by SAML applications to initiate sign-on and signoff operations. |
| Sign-On Policies | Sign-on policies determine the account authentication flow users must complete to access applications secured by PingOne services. |
| Resources | Resources are the protected endpoints that applications request access to using OAuth 2 authorization services. |
Use LOGIN and MFA Actions to Authenticate Users
This activity shows you how to create a sign-on policy with login and mfa actions, initiate an authorization request, and use the flow APIs to complete the authorization.
The following operations are supported by the PingOne APIs:
- Create an application
- Create a sign-on policy
- Create login and MFA sign-on policy actions
- Create a user
- Initiate an authorize request
- Use flow APIs to complete the login and MFA actions
Workflow order of operations
To complete a login and MFA sign on, the following tasks must be completed successfully:
-
Make a
POSTrequest to/environments/{environmentId}/applicationsto add a new application to the specified environment. -
Make a
GETrequest to/environments/{environmentId}/resourcesto return a list of all resource entities associated with the specified environment. -
Make a
GETrequest to/environments/{environmentId}/resources/{resourceId}/scopesto list all scopes associated with a specified resource. -
Make a
POSTrequest to/environments/{environmentId}/applications/{applicationId}/grantsto create a new resource access grant for the application. -
Make a
POSTrequest to/environments/{environmentId}/signOnPoliciesto create a new sign-on policy. -
Make a
POSTrequest to/environments/{environmentId}/signOnPolicies/{signOnPolicyId}/actionsto define the login action associated with this sign-on policy. -
Make a
POSTrequest to/environments/{environmentId}/signOnPolicies/{signOnPolicyId}/actionsto define the MFA action associated with this sign-on policy. -
Make a
POSTrequest to/environments/{environmentId}/applications/{applicationId}/signOnPolicyAssignmentsto associate the sign-on policy with the application. -
Make a
POSTrequest to/environments/{id}/populationsto create a new population resource. -
Make a
POSTrequest to/environments/{id}/usersto create a user who will be assigned to the new population resource. -
Make a
POSTrequest to/environments/{id}/users/{userId}/passwordto set the new user's password. -
Make a
POSTrequest to/environments/{id}/users/{userId}/mfaEnabledto enable MFA actions for this user. -
Make a
POSTrequest to/environments/{id}/users/{userId}/devicesto associate an MFA device with this user. -
Make a
POSTrequest to/{environmentId}/as/authorizeto obtain an authorization grant. This request starts the authorization flow. -
Make a
GETrequest to/{environmentId}/flows/{flowID}to initiate the sign-on flow. -
To complete the login action, make a
POSTrequest toGET /{environmentId}/flows/{flowID}and provide the user's login credentials. -
To complete the MFA action, make a
POSTrequest toGET /{environmentId}/flows/{flowID}and provide the one-time passcode. -
Make a
GETrequest to/{environmentId}/as/resume?flowId={flowID}to call the resume endpoint and return the auth code. -
Make a
GETrequest to/environments/{environmentId}/applications/{applicationId}/secretto return the new application'ssecretattribute, which is needed for the token request. -
Make a
POSTrequest to/{environmentId}/as/tokento exchange the auth code for an access token.
Click the Run in Postman button below to download the Postman collection for this use case.

Step 1: Create a web application
Step 2: Get all resources
Step 3: Get all OIDC Scopes
Step 4: Assign a resource grant to the web application
Step 5: Create a sign-on policy
Step 6: Create the login sign-on policy action
Step 7: Create the MFA sign-on policy action
Step 8: Assign the sign-on policy to the web application
Step 9: Create a population for MFA users
Step 10: Create a user
Step 11: Set user password
Step 12: Enable user MFA
Step 13: Set user device (SMS)
Step 14: Send an authorization request
Step 15: Get the flow
Step 16: Submit login credentials
Step 17: Check OTP
Step 18: Call the resume endpoint
Step 19: Get the application secret
Step 20: Get the access token
Add a user through a registration flow
This activity shows you how to create a sign-on policy with registration enabled, initiate an authorization request, and use the flow APIs to create and verify a new user account.
The following operations are supported by the PingOne APIs:
- Create an application
- Create a sign-on policy
- Initiate an authorize request
- Use flow APIs to create a new user
- Use flow APIs to verify the new user
Workflow order of operations
To create a new user through a registration flow, the following tasks must be completed successfully:
-
Make a
POSTrequest to/environments/{environmentId}/applicationsto add a new application to the specified environment. -
Make a
POSTrequest to/environments/{environmentId}/populationsto create a new population for the reistered user. -
Make a
POSTrequest to/environments/{environmentId}/signOnPoliciesto create a new sign-on policy that enables user registration. -
Make a
POSTrequest to/environments/{environmentId}/signOnPolicies/{signOnPolicyId}/actionsto define the registration action associated with this sign-on policy. -
Make a
POSTrequest to/environments/{environmentId}/applications/{applicationId}/signOnPolicyAssignmentsto create associate the registration sign-on policy with the application. -
Make a
GETrequest to/{environmentId}/as/authorizeto obtain an authorization grant. This request starts the authorization flow. -
Make a
GETrequest to/{environmentId}/flows/{flowId}to get the flow. -
Make a
POSTrequest to/{environmentId}/flows/{flowId}to register the new user. -
Make a
POSTrequest to/{environmentId}/flows/{flowId}to verify the new user account. -
Make a
GETrequest to/environments/{environmentId}/users/to verify that the new user exists in the PingOne directory.
Click the Run in Postman button below to download the Postman collection for this use case.
Step 1: Create an application
Step 2: Create a population for registered users
Step 3: Create the new sign-on policy
Step 4: Create the sign-on policy action with registration enabled
Step 5: Assign the sign-on policy to an application
Step 6: Send the authorization request
Step 7: Get the flow
Step 8: Register a new user
Step 9: Verify user
Step 10: Get users
Configure a PKCE authorization workflow
In some cases, as with native applications on native devices, the use of an authorization code grant can be compromised by authorization code interception attacks. The attacking application gains access to the client secret, intercepts the authorization code, and is able to exchange the intercepted authorization code for an access token.
Proof Key for Code Exchange (PKCE) authorization requests specify additional parameters in the request to prevent malicious apps from intercepting the authorization code. PKCE uses a random key, a code_verifier, that is used to compute a code_challenge parameter, which functions like a temporary application secret (unique to a single token request). PKCE works as follows:
-
The client creates and records a
code_verifiersecret, which is a random value between 43 and 128 characters in length. -
The client uses the
code_verifiervalue to compute thecode_challengevalue. Thecode_challenge_methodis the transformation method that creates thecode_challengevalue. This parameter value is also recorded. -
The authorization request includes the
code_challengeand in some cases thecode_challenge_methodparameter values in the request. Thecode_challenge_methodis an optional parameter. It defaults toplainif not specified (which generates an error when theS256_REQUIREDPKCE enforcement option is specified by the application). -
The authorization server records the
code_challengeand thecode_challenge_methodparameter values, and responds by issuing the authorization code. -
The client sends the authorization code to the
/{environmentId}/as/tokenendpoint. The token request requires thecode_verifiersecret created in step 1. -
The authorization server uses the
code_challenge_methodto transform thecode_verifiervalue and compare it to thecode_challengevalue submitted and recorded in the authorize request. -
If these values are equal, an access token is granted. If they are not equal, access is denied.
Workflow tasks
This scenario illustrates the following operations supported by the PingOne APIs:
-
Create an application and set its
pkceEnforcementproperty. -
Create an authorization request that includes
code_challengeandcode_challenge_methodparameter values. -
Create a token request that includes the
code_verifiersecret.
Workflow order of operations
To enable a PKCE authorization workflow, the following tasks must be completed successfully:
-
Make a
POSTrequest to/environments/{environmentId}/applicationsto define an OpenID Connect native app type that uses an authorization code grant. -
Make a
GETrequest to/{environmentId}/as/authorizeto initiate authorization and submit thecode_challengeandcode_challenge_methodvalues to the authorization server. -
Make a
GETrequest to/{{envID}}/flows/{flowID}to verify the flow initialization. -
Make a
POSTrequest to/{{envID}}/flows/{flowID}with theapplication/vnd.pingidentity.usernamePassword.check+jsoncontent type to submit the username and password. -
Make a
GETrequest to/{{envID}}/as/resume?flowId={{flowID}}to call the authorize resume endpoint. -
Make a
POSTrequest to/{environmentId}/as/tokento exchange the authorization code returned by the resume endpoint for an access token.
Click the Run in Postman button below to download the Postman collection for this use case.
Step 1: Create the application connection
Step 2: Submit the authorize request
Step 3: Verify flow initialization
Step 4: Submit username and password
Step 5: Call the resume endpoint
Step 6: Get the token
Configure a Progressive Profiling Sign-On Action
This activity shows you how to create a sign-on policy with a progressive profiling action, initiate an authorization request, and use the flow APIs to complete the progressive profiling action.
The following operations are supported by the PingOne APIs:
- Create an application
- Create a sign-on policy
- Create login and a progressive profiling sign-on policy actions
- Create a user
- Initiate an authorize request
- Use flow APIs to login the user and add a mobile phone number
- Verify the addition of a mobile phone number to the user record
Workflow order of operations
To complete a progressive profiling flow, the following tasks must be completed successfully:
-
Make a
POSTrequest to/environments/{environmentId}/applicationsto add a new application to the specified environment. -
Make a
GETrequest to/environments/{environmentId}/applications/{applicationId}/secretto return the new application'ssecretattribute. -
Make a
GETrequest to/environments/{environmentId}/resourcesto return a list of all resource entities associated with the specified environment to get the ID for the PingOne platform resource. -
Make a
GETrequest to/environments/{environmentId}/resources/{resourceId}/scopesto list all scopes associated with a specified resource (the PingOne platform resource). -
Make a
POSTrequest to/environments/{environmentId}/applications/{applicationId}/grantsto create a new resource access grant for the application. -
Make a
POSTrequest to/environments/{environmentId}/signOnPoliciesto create a new sign-on policy. -
Make a
POSTrequest to/environments/{environmentId}/signOnPolicies/{signOnPolicyId}/actionsto define the login action associated with this sign-on policy. -
Make a
POSTrequest to/environments/{environmentId}/signOnPolicies/{signOnPolicyId}/actionsto define the progressive profiling action associated with this sign-on policy. -
Make a
POSTrequest to/environments/{environmentId}/applications/{applicationId}/signOnPolicyAssignmentsto associate the sign-on policy with the application. -
Make a
POSTrequest to/environments/{id}/populationsto create a new population resource. -
Make a
POSTrequest to/environments/{id}/usersto create a user who will be assigned to the new population resource. -
Make a
POSTrequest to/environments/{id}/users/{userId}/passwordto set the new user's password. -
Make a
POSTrequest to/{environmentId}/as/authorizeto obtain an authorization grant. This request starts the authorization flow. -
Make a
GETrequest to/{environmentId}/flows/{flowID}to initiate the flow. -
To complete the login action, make a
POSTrequest toGET /{environmentId}/flows/{flowID}and provide the user's login credentials. -
To complete the progressive profiling action, make a
POSTrequest toGET /{environmentId}/flows/{flowID}and provide the user's mobile phone number. -
Make a
GETrequest to/{environmentId}/as/resume?flowId={flowID}to call the resume endpoint and return the auth code. -
After the authorization flow completes, make a
POSTrequest to/{environmentId}/as/tokento exchange the auth code for an access token. -
Make a
GETrequest to/environments/{environmentId}/users/{userId}to view the updated information about the identified user.
Click the Run in Postman button below to download the Postman collection for this use case.
Step 1: Create an (OIDC) application
Step 2: Get the application secret
Step 3: Get the list of resources
Step 4: Get all scopes
Step 5: Create the resource access grant
Step 6: Create the new sign-on policy
Step 7: Create the login sign-on policy action
Step 8: Create the progressive profiling sign-on policy action
Step 9: Assign the sign-on policy to an application
Step 10: Create a population for profile users
Step 11: Create a user
Step 12: Set user password
Step 13: Send an authorization request
Step 14: Get the flow
Step 15: Submit login credentials
Step 16: Update user profile
Step 17: Call the resume endpoint
Step 18: Get the access token
Step 19: Verify updated user information
Configure a Progressive Profiling Form Sign-On Action
This activity shows you how to use the PROGRESSIVE_PROFILING_FORM sign-on policy action to create a sign-on policy with a form-based progressive profiling action, initiate an authorization request, and use the flow APIs to complete the progressive profiling action.
The following operations are supported by the PingOne APIs:
- Create an application
- Create a sign-on policy
- Create login and a progressive profiling form sign-on policy actions
- Create a user
- Initiate an authorize request
- Use flow APIs to login the user and add a nickname
- Verify the addition of a nickname to the user record
Workflow order of operations
To complete a progressive profiling flow, the following tasks must be completed successfully:
-
Make a
POSTrequest to/environments/{environmentId}/applicationsto add a new application to the specified environment. -
Make a
GETrequest to/environments/{environmentId}/applications/{applicationId}/secretto return the new application'ssecretattribute. -
Make a
GETrequest to/environments/{environmentId}/resourcesto return a list of all resource entities associated with the specified environment to get the ID for the PingOne platform resource. -
Make a
GETrequest to/environments/{environmentId}/resources/{resourceId}/scopesto list all scopes associated with a specified resource (the PingOne platform resource). -
Make a
POSTrequest to/environments/{environmentId}/applications/{applicationId}/grantsto create a new resource access grant for the application. -
Make a
POSTrequest to/environments/{environmentId}/signOnPoliciesto create a new sign-on policy. -
Make a
POSTrequest to/environments/{environmentId}/signOnPolicies/{signOnPolicyId}/actionsto define the login action associated with this sign-on policy. -
Make a
POSTrequest to/environments/{environmentId}/formsto define the progressive profiling form to associate with the progressive profiling form sign-on action. -
Make a
POSTrequest to/environments/{environmentId}/signOnPolicies/{signOnPolicyId}/actionsto define the progressive profiling form action to associated with this sign-on policy. -
Make a
POSTrequest to/environments/{environmentId}/applications/{applicationId}/signOnPolicyAssignmentsto associate the sign-on policy with the application. -
Make a
POSTrequest to/environments/{id}/populationsto create a new population resource. -
Make a
POSTrequest to/environments/{id}/usersto create a user who will be associated with the new population resource. -
Make a
POSTrequest to/environments/{id}/users/{userId}/passwordto set the new user's password. -
Make a
POSTrequest to/{environmentId}/as/authorizeto obtain an authorization grant. This request starts the authorization flow. -
Make a
GETrequest to/{environmentId}/flows/{flowID}to initiate the flow. -
To complete the login action, make a
POSTrequest toGET /{environmentId}/flows/{flowID}and provide the user's login credentials. -
To complete the progressive profiling form action, make a
POSTrequest toGET /{environmentId}/flows/{flowID}and provide the user's nickname. -
Make a
GETrequest to/{environmentId}/as/resume?flowId={flowID}to call the resume endpoint and return the auth code. -
After the authorization flow completes, make a
POSTrequest to/{environmentId}/as/tokento exchange the auth code for an access token. -
Make a
GETrequest to/environments/{environmentId}/users/{userId}to view the updated information about the identified user.
Click the Run in Postman button below to download the Postman collection for this use case.
Step 1: Create an (OIDC) application
Step 2: Get the application secret
Step 3: Get the list of resources
Step 4: Get all scopes
Step 5: Create the application’s resource access grant
Step 6: Create the new sign-on policy
Step 7: Create the login sign-on policy action
Step 8: Create a progressive profiling form
Step 9: Create the progressive profile form sign-on policy action
Step 10: Assign the sign-on policy to an application
Step 11: Create a population for profile form users
Step 12: Create the user
Step 13: Set user password
Step 14: Send an authorization request
Step 15: Get the flow
Step 16: Submit login credentials
Step 17: Profile form submit
Step 18: Call the resume endpoint
Step 19: Get the access token
Step 20: Verify updated user information
Add a user through a registration form
This activity shows you how to use the flow manager APIs to create a registration form, a flow definition, and a sign-on policy that references the flow definition to create and verify a new user account.
The following operations are supported by the PingOne APIs:
- Create an application
- Create a registration form
- Create a flow definition for the registration form
- Create a sign-on policy
- Initiate an authorize request
- Use flow execution APIs to create a new user
- Use flow execution APIs to verify the new user
- Get an access token
Workflow order of operations
To create a new user through a registration flow definition, the following tasks must be completed successfully:
-
Make a
POSTrequest to/environments/{environmentId}/applicationsto add a new application to the specified environment. -
Make a
POSTrequest to/environments/{environmentId}/populationsto create a new population for the reistered user. -
Make a
POSTrequest to/environments/{environmentId}/formsto create the registration form. -
Make a
POSTrequest to/environments/{environmentId}/flowDefinitionsto create the flow definitions and flow steps. -
Make a
POSTrequest to/environments/{environmentId}/signOnPoliciesto create a new sign-on policy that references the flow definition resource. -
Make a
POSTrequest to/environments/{environmentId}/signOnPolicies/{signOnPolicyId}/actionsto define the registration form action associated with this sign-on policy. -
Make a
POSTrequest to/environments/{environmentId}/applications/{applicationId}/signOnPolicyAssignmentsto associate the registration form sign-on policy with the application. -
Make a
GETrequest to/{environmentId}/as/authorizeto obtain an authorization grant. This request starts the authorization flow. -
Make a
GETrequest to/{environmentId}/flows/{flowId}to get the flow. -
Make a
POSTrequest to/{environmentId}/experiences/{flowDefinitionID}to trigger flow execution. -
Make a
POSTrequest to/{environmentId}/flowExecutions/{flowExecutionID}to submit the form. -
Make a
POSTrequest to/{environmentId}/flowExecutions/{flowExId}to verify the new user account. -
Make a
GETrequest to/{environmentId}/flows/{flowId}/flowExecutionCallback?flowExecutionId={flowExID}to return to the flow. -
Make a
GETrequest to/{environmentId}/as/resume?flowId={flowID}to call the resume endpoint and return the auth code. -
Make a
GETrequest to/environments/{environmentId}/applications/{appplicationId}/secretto get the application secret. -
Make a
POSTrequest to/{environmentId}/as/tokento exchange the auth token for an access token.
Click the Run in Postman button below to download the Postman collection for this use case.
Step 1: Create an application
Step 2: Create a population for registration form users
Step 3: Create a registration form
Step 4: Create a flow definition for registration
Step 5: Create the new sign-on policy
Step 6: Create the sign-on policy action with registration flow definition
Step 7: Assign the sign-on policy to an application
Step 8: Send the authorization request
Step 9: Get the flow
Step 10: Trigger the flow execution
Step 11: Submit the form
Step 12: Verify the account
Step 13: Call the flow execution callback endpoint
Step 14: Call the resume endpoint
Step 15: Get the application secret
Step 16: Get the access token
Registration from a browser link
This activity shows you how to use a flow definition with an EXPERIENCE trigger type to register a new user. This registration flow does not require a PingOne sign-on policy. It can be initiated from a link on a web application, and after the new user is created, the flow redirects back to the web application.
The following operations are supported by the PingOne APIs:
- Create an application
- Create a registration form
- Create a flow definition for the registration form
- Use flow execution APIs to create a new user
- Use flow execution APIs to verify the new user
Workflow order of operations
To create a new user using a flow definition with an EXPERIENCE trigger, the following tasks must be completed successfully:
-
Make a
POSTrequest to/environments/{environmentId}/applicationsto add a new application to the specified environment. -
Make a
POSTrequest to/environments/{environmentId}/populationsto create a new population for the registered user. -
Make a
POSTrequest to/environments/{environmentId}/formsto create the registration form. -
Make a
POSTrequest to/environments/{environmentId}/flowDefinitionsto create the flow definition and flow steps. -
Make a
POSTrequest to/{environmentId}/experiences/{flowDefinitionID}to trigger flow execution. -
Make a
POSTrequest to/{environmentId}/flowExecutions/{flowExecutionID}to submit the form. -
Make a
POSTrequest to/{environmentId}/flowExecutions/{flowExecutionID}to verify the new user account.
Click the Run in Postman button below to download the Postman collection for this use case.
Step 1: Create an application
Step 2: Create a population for registration form users
Step 3: Create a registration form
Step 4: Create a flow definition for registration
Step 5: Trigger the flow execution
Step 6: Submit the form
Step 7: Verify the account
Login with agreement consent from a browser link
This activity shows you how to use the login and agreement consent steps in a flow definition with an EXPERIENCE trigger type. This flow does not require a PingOne sign-on policy. It can be initiated from a browser link in a web application, and after the user logs in and accepts the consent agreement, the flow redirects back to the web application.
The following operations are supported by the PingOne APIs:
- Create an application
- Create a login form
- Create a flow definition for the login and consent actions
- Use flow execution APIs to submit user login credentials
- Use flow execution APIs to create the consent agreement
Workflow order of operations
To authenticate a user and prompt for consent, the following tasks must be completed successfully:
-
Make a
POSTrequest to/environments/{environmentId}/applicationsto add a new application to the specified environment. -
Make a
GETrequest to/environments/{environmentId}/languagesto find the environment's default language. -
Make a
POSTrequest to/environments/{environmentId}/agreementsto create a new agreement. -
Make a
POSTrequest to/environments/{environmentId}/agreements/{agreementID}/languagesto create the language for the agreement. -
Make a
POSTrequest to/environments/{environmentId}/agreements/{agreementID}/languages/{agreementLanguageID}/revisionsto create the revision for the agreement in the specified language. -
Make a
PUTrequest to/environments/{environmentId}/agreements/{agreementID}/languages/{agreementLanguageID}to enable the agreement language. -
Make a
PUTrequest to/environments/{environmentId}/agreements/{agreementID}to enable the agreement. -
Make a
POSTrequest to/environments/{environmentId}/formsto create the login form. -
Make a
POSTrequest to/environments/{environmentId}/flowDefinitionsto create the flow definition. -
Make a
POSTrequest to/environments/{environmentId}/experiences/{flowDefinitionID}to trigger the flow. -
Make a
POSTrequest to/{environmentId}/flowExecutions/{flowExecutionID}to submit the login form with the user's credentials. -
Make a
POSTrequest to/{environmentId}/flowExecutions/{flowExecutionID}to accept the agreement.
Click the Run in Postman button below to download the Postman collection for this use case.
Step 1: Create an application
Step 2: Get languages
Step 3: Create an agreement
Step 4: Create an agreement language
Step 5: Create an ageement revision
Step 6: Update the agreement language
Step 7: Enable the agreement
Step 8: Create the login form
Step 9: Create the flow definition (EXPERIENCE trigger)
Step 10: Trigger the flow execution
Step 11: Submit the login form
Step 12: Create consent
Identity Providers
These tasks show you how to use the platform APIs to perform common actions for managing external identity providers. External identity provider use cases often call the following platform API resources:
| Platform API | Description |
|---|---|
| Identity Provider Management | The identity provider endpoints manage external identity provider configurations. |
| Gateway Management | The gateways endpoints connect resources in one security domain (for example, an on-premises datacenter or a hosted private cloud) with an environment in the PingOne platform. |
| Identity Propagation | The identity propagation endpoints provide for configurable and audit-capable propagation of identities and their attributes between identity stores owned or managed by a customer. |
Configure Facebook as an identity provider
PingOne supports several external identity providers, including Facebook. A sign-on policy configuration in PingOne for Facebook as an identity provider allows users to authenticate and gain access to a configured application using the Facebook sign-on flow and their Facebook credentials.
This scenario illustrates the following common operations supported by the PingOne APIs:
- Create an identity provider configuration
- Create an optional identity provider attribute mapping
- Create a population for Facebook users
- Create a sign-on policy
- Create a sign-on policy action
- Create an application
- Associate the sign-on policy with the application
Workflow order of operations
To create a sign-on policy that specifies Facebook as a supported external identity provider, the following tasks must be completed successfully:
-
Make a
POSTrequest to/environments/{environmentId}/identityProvidersto create the identity provider configuration for Facebook. -
Make a
POSTrequest to/environments/{environmentId}/identityProviders/{providerId}/attributesto map the Facebookemailattributes to PingOneemailattributes. This step is optional. -
Make a
POSTrequest to/environments/{environmentId}/populationsto create a population for users who will use their Facebook credentials to sign on. -
Make a
POSTrequest to/environments/{environmentId}/signOnPoliciesto create a new sign-on policy. -
Make a
POSTrequest to/environments/{environmentId}/signOnPolicies/{policyId}/actionsto create a new LOGIN sign-on policy action, which is associated with the new sign-on policy. -
Make a
POSTrequest to/environments/{environmentId}/applicationsto add a new application to the specified environment. -
Make a
GETrequest to/environments/{environmentId}/resourcesto return a list of all resource entities associated with the specified environment to get the ID for the PingOne platform resource. -
Make a
GETrequest to/environments/{environmentId}/resources/{resourceId}/scopesto list all scopes associated with a specified resource (the PingOne platform resource). -
Make a
POSTrequest to/environments/{environmentId}/applications/{applicationId}/grantsto create a new resource access grant for the application. -
Make a
POSTrequest to/environments/{environmentId}/applications/{applicationId}/signOnPolicyAssignmentsto associate the sign-on policy with the application. -
Make a
POSTrequest to/{environmentId}/as/authorizeto obtain an authorization grant. This request starts the authorization flow.
Click the Run in Postman button below to download the Postman collection for this use case.
Step 1: Create the new identity provider resource
Step 2: Create an optional attribute mapping
Step 3: Create a population for Facebook users
Step 4: Create the new sign-on policy
Step 5: Create the sign-on policy action
Step 6: Create an application
Step 7: Get the list of resources
Step 8: Get all scopes
Step 9: Create the application’s resource access grant
Step 10: Assign the sign-on policy to an application
Step 11: Send an authorization request
Configure a SAML identity provider
An external identity provider configuration in PingOne to support a SAML identity provider allows users to authenticate and gain access to application resources using a SAML sign-on flow and credentials.
The SAML identity provider's verification certificate and the signing key can be imported using the PingOne certificate management service. For information about importing certificates, see Certificate management.
This scenario illustrates the following operations supported by the PingOne APIs:
- Create an identity provider configuration
- Create a sign-on policy
- Create a sign-on policy action
- Assign the sign-on policy to an application
Workflow order of operations
To create a sign-on policy that supports a SAML external identity provider, the following tasks must be completed successfully:
-
Make a
POSTrequest to/environments/{environmentId}/certificatesto upload the SAML external identity provider's verification certificate and (optionally) to/environments/{environmentId}/keysto upload the signing key. -
Make a
POSTrequest to/environments/{environmentId}/identityProvidersto create the SAML identity provider configuration. -
Make a
POSTrequest to/environments/{environmentId}/populationsto create a population for users who will use their SAML credentials to sign on. -
Make a
POSTrequest to/environments/{environmentId}/signOnPoliciesto create a new sign-on policy. -
Make a
POSTrequest to/environments/{environmentId}/signOnPolicies/{policyId}/actionsto create a new LOGIN sign-on policy action, which is associated with the new sign-on policy.
Click the Run in Postman button below to download the Postman collection for this use case.
Step 1a: Upload the SAML application's verification certificate
Step 1b: Upload the SAML application's signing key (Optional)
Step 2: Create the new identity provider resource
Step 3: Create a population for SAML users
Step 4: Create the new sign-on policy
Step 5: Create the sign-on policy action
Application Management
These tasks show you how to use the platform APIs to perform common actions for managing applications. Application use cases often call the following platform API resources:
| Platform API | Description |
|---|---|
| Applications | Application resources define the connection between PingOne and the actual application, commonly referred to as a client connection. |
Configure an application with an authorization code grant
This activity shows you how to create an application, configure its connection settings, create a resource access grant, and initiate an authorization request. After an access token is generated, it is used by a user to update a user attribute.
The following operations are supported by the PingOne APIs:
- Create an application
- Create a resource access grant
- Initiate an
authorization_codeauthorization flow - Update a user attribute
Workflow order of operations
To configure an application and initiate an authorization code flow, the following tasks must be completed successfully:
-
Make a
POSTrequest to/environments/{environmentId}/applicationsto add a new application to the specified environment. -
Make a
GETrequest to/environments/{environmentId}/applications/{applicationId}/secretto return the new application'ssecretattribute. -
Make a
GETrequest to/environments/{environmentId}/resourcesto return a list of all resource entities associated with the specified environment to get the ID for the PingOne platform resource. -
Make a
GETrequest to/environments/{environmentId}/resources/{resourceId}/scopesto list all scopes associated with a specified resource (the PingOne platform resource). -
Make a
POSTrequest to/environments/{environmentId}/applications/{applicationId}/grantsto create a new resource access grant for the application. -
Make a
POSTrequest to/{environmentId}/as/authorizeto obtain an authorization grant. This request starts the authorization flow. -
To initiate the authentication flow, make a
GETrequest toGET /{environmentId}/flows/{flowID}. -
To complete the authentication flow, make a
POSTrequest toGET /{environmentId}/flows/{flowID}and provide the user's login credentials. -
After the authorization flow completes and returns an auth code, make a
POSTrequest to/{environmentId}/as/tokento exchange the auth code for an access token. -
Use the access token to make a
GETrequest to/environments/{environmentId}/users/{userId}to view return information about the identified user.
Click the Run in Postman button below to download the Postman collection for this use case.
Step 1: Create an OpenID Connect (OIDC) application
Step 2: Get the application secret
Step 3: Get the list of resources
Step 4: Get all scopes
Step 5: Create the application’s resource access grant
Step 6: Obtain an authorization grant
Step 7: Get the flow
Step 8: Submit login credentials
Step 9: Generate the access token
Step 10: Get user information
Configure a single-page application with an implicit grant
This activity shows you how to create an single-page application, configure its connection settings, create a resource access grant, and initiate an authorization request.
The following operations are supported by the PingOne APIs:
- Create an application
- Create a resource access grant
- Initiate an
implicitauthorization and authentication flow
Workflow order of operations
To configure a single-page application and initiate an authentication flow, the following tasks must be completed successfully:
-
Make a
POSTrequest to/environments/{environmentId}/applicationsto add a new application to the specified environment. -
Make a
GETrequest to/environments/{environmentId}/resourcesto return a list of all resource entities associated with the specified environment to get the ID for the PingOne platform resource. -
Make a
GETrequest to/environments/{environmentId}/resources/{resourceId}/scopesto list all scopes associated with a specified resource (the PingOne platform resource). -
Make a
POSTrequest to/environments/{environmentId}/applications/{applicationId}/grantsto create a new resource access grant for the application. -
Make a
POSTrequest to/environments/{id}/populationsto create a new population resource. -
Make a
POSTrequest to/environments/{id}/usersto create a user who will be assigned to the new population resource. -
Make a
POSTrequest to/environments/{id}/users/{userId}/passwordto set the new user's password. -
Make a
POSTrequest to/{environmentId}/as/authorizeto obtain an authorization grant. This request starts the authorization flow. -
To initiate the authentication flow, make a
GETrequest toGET /{environmentId}/flows/{flowID}. -
To complete the authentication flow, make a
POSTrequest toGET /{environmentId}/flows/{flowID}and provide the user's login credentials. -
Make a
GETrequest to/{environmentId}/as/resume?flowId={flowID}to call the resume endpoint and return the token.
Click the Run in Postman button below to download the Postman collection for this use case.
Step 1: Create a single-page application
Step 2: Get the list of resources
Step 3: Get all scopes
Step 4: Create the application’s resource access grant
Step 5: Create a population
Step 6: Create user
Step 7: Set user password
Step 8: Send the authorize request
Step 9: Get the Flow
Step 10: Submit Login Credentials
Step 11: Call the resume endpoint
Test a SAML application connection
To test the execution of a SAML identity provider connection for an application configured in your PingOne environment, there needs to be a working SAML identity provider somewhere for your environment to communicate with.
The easiest way to do this is by using two PingOne environments. You can then execute an authentication flow for an application existing in one PingOne environment, by using external authentication as a user in a second PingOne environment acting as the SAML identity provider.
Prerequisites
-
A destination PingOne environment to act as the service provider for the SAML application. This is the environment you'll use to configure the SAML identity provider connection. Authentication flows in this environment can be configured to allow external authentication.
-
A source PingOne environment that will act as the SAML identity provider. Users here will be able to complete authentication flows in the destination environment.
-
Cross-environment admin permissions for the destination and source environments.
-
A PingOne access token for each environment.
This scenario illustrates the following operations supported by the PingOne APIs:
- Get the certificate for the source environment.
- Create a SAML application in the source environment.
- Create a SAML identity provider in the destination environment.
- Create a sign-on policy in the destination environment.
- Create a sign-on policy action to enable the sign-on policy for the SAML identity provider connection.
- Set the sign-on policy as the default for the destination environment.
Workflow order of operations
To test the SAML application connection, the following tasks must be completed successfully:
-
Make a
GETrequest to/environments/{{sourceEnvID}}/keysto get the signing key for the source environment.a. Download the PEM or PKCS7 file for the signing key.
-
Make a
GETrequest to/environmentsto get the environment IDs. -
Make a
POSTrequest to/environments/{{sourceEnvID}}/applicationsto create a SAML application. -
(Optional) Make a
POSTrequest to/environments/{{sourceEnvID}}/applications/{{appID}}/attributesto any attribute mappings needed for the source environment application. -
Make a
POSTrequest to/environments/{{destinationEnvID}}/certificatesto create a certificate in the destination environment using the PEM or PKCS7 file you downloaded in the intial step. -
Make a
GETrequest to/environments/{{destinationEnvID}}/certificatesto get a certificate for the destination environment to assign to the identity provider you'll create. -
Make a
POSTrequest to/environments/{{destinationEnvID}}/identityProvidersto create the SAML identity provider configuration in the destination environment. -
(Optional) Make a
POSTrequest to/environments/{{destinationEnvID}}/identityProviders/{{providerID}}/attributesto add any needed attribute mappings for the identity provider in the destination environment. -
Make a
POSTrequest to/environments/{{destinationEnvID}}/signOnPoliciesto create a sign-on policy for the new identity provider in the destination environment. -
Make a
POSTrequest to/environments/{{destinationEnvID}}/signOnPolicies/{policyId}/actionsto create a new IDENTIFIER_FIRST sign-on policy action associated with the new sign-on policy. -
Make a
PUTrequest to/environments/{{destinationEnvID}}/applications/{applicationId}/signOnPolicyAssignmentsto associate this sign-on policy with the specified SAML application.
Execute the authentication flow
-
Copy the Self-Service URL for the destination environment. The Self-Service URL is found on the Settings → Environment → Properties page.
-
Open a private browser window, and enter the Self-Service URL you copied.
-
Click the button that matches your SAML IdP connection.
-
Authenticate as a user in the source environment. Depending on your configuration, you may need to perform account linking or user verification.
Click the Run in Postman button below to download the Postman collection for this use case.
Step 1: Get the signing key for the source environment
Step 2: Get all environment IDs
Step 3: Create a SAML application in the source environment
Step 4: (Optional) Create attribute mappings for the application
Step 5: Create a certificate in the destination environment
Step 6: Create the new identity provider in the destination environment
Step 7: (Optional) Create attribute mappings for the identity provider
Step 8: Create a sign-on policy for the new identity provider
Step 9: Create a sign-on policy action
Step 10: Set the sign-on policy as the default
Integration Catalog
Providing a seamless integration with cloud, mobile, and on-premise applications, the rich ecosystem of available PingOne integrations provides a highly customizable platform. These integrations extend authentication, access, and directory processes of Ping solutions to support single sign-on, multi-factor authentication, native device management, risk intelligence, external identity providers, provisioning, and more.
Of course, with so many integration options available, the need for management of these assets becomes apparent. The Integration Catalog service of the PingOne API acts as a central hub for these features, providing programmatic access to the software binaries and related metadata for each integration, as well as its relevant versions. Access to this data will help administrators map and maintain their Ping integration landscape, regardless of scale.
Download an integration binary
Integration kits include .jar files, configuration files, templates, documentation, and other content packaged with an integration. In this use case, you will search your environment for a specific integration. Once found, you will download the integration kit as a zip file.
The purpose of this use case is to provide a simplified view of the interaction with the PingOne Integration Catalog service. In a real world environment, an administrator would expand upon this example to ensure specific integrations were available. For instance, a PingCloud administrator could establish a connection to the PingOne Integration Catalog to retrieve integration kits and include them in the automated startup of containers.
This scenario illustrates the following common operations:
- Get the environment ID.
- Get a list of integrations and their versions.
- Download the integration binary.
Workflow order of operations
To download a specific integration binary, you will need to complete the following tasks:
- Make a
GETrequest to the/environmentsendpoint to get the environment resource ID. - Make a
GETrequest to/environments/{id}/integrationsto retrieve a list of available integrations, using thefilterparameter to provide a targeted result set. - Make a
GETrequest to/environments/{id}/integrations/{integrationID}/versions/{integrationVersionID}/asset
Click the Run in Postman button below to download the Postman collection for this use case.
Step 1: Get the environment ID
Step 2: Get a list of integrations
Step 3: Download the integration zip file
Multi-factor Authentication
These tasks show you how to use the platform APIs to perform common MFA actions for non-native applications. MFA use cases often call the following platform API resources:
| Platform API | Description |
|---|---|
| Sign-On Policies | Sign-on policies determine the account authentication flow users must complete to access applications secured by PingOne services. |
| Resources | Resources are the protected endpoints that applications request access to using OAuth 2 authorization services. |
| Applications | Application resources define the connection between PingOne and the actual application. |
Assign an MFA sign-on policy to a web application
This activity shows you how to define a Web application, create an MFA sign-on policy, and assign the sign-on policy to the application.
This scenario illustrates the following common operations supported by the PingOne APIs:
- Create an application
- Assign a resource grant to the application
- Create a sign-on policy
- Create a sign-on policy MFA action
- Assign a sign-on policy to an application
Workflow order of operations
To create the application specify its sign-on policy:
-
Make a
POSTrequest to the/environments/{envID}/applicationsendpoint to define a new Web application. -
Make a
GETrequest to/environments/{envID}/resourcesto get the list of available resource server IDs. -
Make a get request to
/environments/{envID}/resources/{resourceID}/scopesto get the OIDC scopes for the resource grant. -
Make a
POSTrequest to/environments/{envID}/applications/{appID}/grantsto assign a resource grant to the application. -
Make a
POSTrequest to the/environments/{envID}/signOnPoliciesendpoint to create a new sign-on policy. -
Make a
POSTrequest to/environments/{envID}/signOnPolicies/{signOnPolicyID}to create an MFA sign-on policy action for the new sign-on policy. -
Make a
POSTrequest to/environments/{envID}/applications/{appID}/signOnPolicyAssignmentsto assign the MFA sign-on policy with the new Web application.
Click the Run in Postman button below to download the Postman collection for this use case.
Step 1: Create a web application
Step 2: Get all resources
Step 3: Get all OIDC scopes
Step 4: Assign a resource grant to the web application
Step 5: Create an MFA sign-on policy
Step 6: Create a sign-on policy MFA action
Step 7: Assign the MFA sign-on policy to the web application
Configure a passwordless sign-on policy
PingOne supports a sign-on flow that uses only a username and a multi-factor authentication (MFA) sign-on action to authenticate the user. This activity shows you how to create a sign-on policy that does not require a password at sign on.
This scenario illustrates the following common operations supported by the PingOne APIs:
- Create an application connection
- Create a sign-on policy
- Create a sign-on policy action
- Assign the sign-on policy to an application
Workflow order of operations
To create a sign-on policy that does not prompt for a password at login, the following tasks must be completed successfully:
-
Make a
POSTrequest to/environments/{environmentId}/applicationsto create a new application connection. -
Make a
POSTrequest to/environments/{environmentId}/signOnPoliciesto create a new sign-on policy. -
Make a
POSTrequest to/environments/{environmentId}/signOnPolicies/{policyId}/actionsto create a new MFA sign-on policy action, which is associated with the new (no password) sign-on policy. -
Make a
POSTrequest to/environments/{environmentId}/applications/{applicationId}/signOnPolicyAssignmentsto associate this sign-on policy with the specified application. -
Make a
GETrequest to the authorization server to retrieve the URL for the sign-on screen, which is returned in the response's HTTPLocationheader.
Click the Run in Postman button below to download the Postman collection for this use case.
Step 1: Create an application
Step 2: Create the new sign-on policy
Step 3: Create the sign-on policy action
Step 4: Assign the sign-on policy to an application
Step 5: Test authentication
Configure an MFA Only Flow Using a Login Hint Token
This activity shows you how to create an MFA only authentication flow using a login_hint_token to identify and authenticate the end-user without needing to encode the entire authentication request in a signed JWT.
The following operations are supported by the PingOne APIs:
- Create an application
- Create a sign-on policy
- Create an SMS sign-on policy action
- Create a user
- Initiate an authorize request using a
login_hint_token - Use the OTP check API to complete the MFA action
Workflow order of operations
To complete an MFA only authentication flow, the following tasks must be completed successfully:
-
Make a
POSTrequest to/environments/{environmentId}/applicationsto add a new application to the specified environment. -
Make a
GETrequest to/environments/{environmentId}/applications/{applicationId}/secretto return the new application'ssecretattribute, which is needed for the token request. -
Make a
GETrequest to/environments/{environmentId}/resourcesto return a list of all resource entities associated with the specified environment. -
Make a
GETrequest to/environments/{environmentId}/resources/{resourceId}/scopesto list all scopes associated with a specified resource. -
Make a
POSTrequest to/environments/{environmentId}/applications/{applicationId}/grantsto create a new resource access grant for the application. -
Make a
POSTrequest to/environments/{environmentId}/signOnPoliciesto create a new sign-on policy. -
Make a
POSTrequest to/environments/{environmentId}/signOnPolicies/{signOnPolicyId}/actionsto define the SMS MFA action associated with this sign-on policy. -
Make a
POSTrequest to/environments/{environmentId}/applications/{applicationId}/signOnPolicyAssignmentsto associate the sign-on policy with the application. -
Make a
POSTrequest to/environments/{id}/populationsto create a new population resource. -
Make a
POSTrequest to/environments/{id}/usersto create a user who will be assigned to the new population resource. -
Make a
POSTrequest to/environments/{id}/users/{userId}/passwordto set the new user's password. -
Make a
POSTrequest to/environments/{id}/users/{userId}/mfaEnabledto enable MFA actions for this user. -
Make a
POSTrequest to/environments/{id}/users/{userId}/devicesto associate an SMS MFA device with this user. -
Make a
POSTrequest to/{environmentId}/as/authorizeto obtain an authorization grant. This request starts the authorization flow. -
To complete the SMS MFA action, make a
POSTrequest toGET /{environmentId}/flows/{flowID}and provide the one-time passcode. -
Make a
GETrequest to/{environmentId}/as/resume?flowId={flowID}to call the resume endpoint and return the auth code.
Click the Run in Postman button below to download the Postman collection for this use case.
Step 1: Create a web application
Step 2: Get the application secret
Step 3: Get all resources
Step 4: Get all OIDC Scopes
Step 5: Assign a resource grant to the web application
Step 6: Create a sign-on policy
Step 7: Create an SMS MFA sign-on policy action
Step 8: Assign the sign-on policy to the web application
Step 9: Create a population for MFA users
Step 10: Create user
Step 11: Set user password
Step 12: Enable user MFA
Step 13: Set user device (SMS)
Step 14: Send authorize request
Step 15: Check OTP
Step 16: Call the resume endpoint
Create an MFA Transaction Approval using SMS
This activity shows you how to create a transaction approval MFA authentication flow using a request token to encode the request parameters in a signed JWT.
The following operations are supported by the PingOne APIs:
- Create an application
- Create a sign-on policy
- Create an SMS sign-on policy action
- Create a user
- Initiate an authorize request using a
requesttoken and alogin_hint_token - Use the OTP check API to complete the MFA action
Workflow order of operations
To complete a transaction approval MFA authentication flow, the following tasks must be completed successfully:
-
Make a
POSTrequest to/environments/{environmentId}/applicationsto add a new application to the specified environment. -
Make a
GETrequest to/environments/{environmentId}/applications/{applicationId}/secretto return the new application'ssecretattribute, which is needed for the token request. -
Make a
GETrequest to/environments/{environmentId}/resourcesto return a list of all resource entities associated with the specified environment. -
Make a
GETrequest to/environments/{environmentId}/resources/{resourceId}/scopesto list all scopes associated with a specified resource. -
Make a
POSTrequest to/environments/{environmentId}/applications/{applicationId}/grantsto create a new resource access grant for the application. -
Make a
POSTrequest to/environments/{environmentId}/signOnPoliciesto create a new sign-on policy. -
Make a
POSTrequest to/environments/{environmentId}/signOnPolicies/{signOnPolicyId}/actionsto define the SMS MFA action associated with this sign-on policy. -
Make a
POSTrequest to/environments/{environmentId}/applications/{applicationId}/signOnPolicyAssignmentsto associate the sign-on policy with the application. -
Make a
POSTrequest to/environments/{{envID}}/templates/transaction/contentsto create a transaction notification template. -
Make a
POSTrequest to/environments/{id}/populationsto create a new population resource. -
Make a
POSTrequest to/environments/{id}/usersto create a user who will be assigned to the new population resource. -
Make a
POSTrequest to/environments/{id}/users/{userId}/passwordto set the new user's password. -
Make a
POSTrequest to/environments/{id}/users/{userId}/mfaEnabledto enable MFA actions for this user. -
Make a
POSTrequest to/environments/{id}/users/{userId}/devicesto associate an SMS MFA device with this user. -
Make a
POSTrequest to/{environmentId}/as/authorizeto obtain an authorization grant. This request starts the authorization flow. -
To complete the SMS MFA action, make a
POSTrequest toGET /{environmentId}/flows/{flowID}and provide the one-time passcode. -
Make a
GETrequest to/{environmentId}/as/resume?flowId={flowID}to call the resume endpoint and return the auth code. -
Make a
POSTrequest to/{environmentId}/as/tokento exchange the auth code for an access token.
Click the Run in Postman button below to download the Postman collection for this use case.
Step 1: Create a web application
Step 2: Get the application secret
Step 3: Get all resources
Step 4: Get all OIDC Scopes
Step 5: Assign a resource grant to the web application
Step 6: Create a sign-on policy
Step 7: Create an SMS MFA sign-on policy action
Step 8: Assign the sign-on policy to the web application
Step 9: Create a transaction SMS template
Step 10: Create a population for MFA users
Step 11: Create user
Step 12: Set user password
Step 13: Enable user MFA
Step 14: Set user device (SMS)
Step 15: Send authorize request for transaction approval
Step 16: Check OTP
Step 17: Call the resume endpoint
Step 18: Get the access token
Use Two MFA Actions to Authenticate Users
This activity shows you how to create a sign-on policy with and SMS and Email MFA actions, initiate an authorization request, and use the flow APIs to complete the authorization.
The following operations are supported by the PingOne APIs:
- Create an application
- Create a sign-on policy
- Create SMS and Email MFA sign-on policy actions
- Create a user
- Initiate an authorize request
- Use flow APIs to complete the MFA actions
Workflow order of operations
To complete a MFA sign on, the following tasks must be completed successfully:
-
Make a
POSTrequest to/environments/{environmentId}/applicationsto add a new application to the specified environment. -
Make a
GETrequest to/environments/{environmentId}/resourcesto return a list of all resource entities associated with the specified environment. -
Make a
GETrequest to/environments/{environmentId}/resources/{resourceId}/scopesto list all scopes associated with a specified resource. -
Make a
POSTrequest to/environments/{environmentId}/applications/{applicationId}/grantsto create a new resource access grant for the application. -
Make a
POSTrequest to/environments/{environmentId}/signOnPoliciesto create a new sign-on policy. -
Make a
POSTrequest to/environments/{environmentId}/signOnPolicies/{signOnPolicyId}/actionsto define the SMS MFA action associated with this sign-on policy. -
Make a
POSTrequest to/environments/{environmentId}/signOnPolicies/{signOnPolicyId}/actionsto define the Email MFA action associated with this sign-on policy. -
Make a
POSTrequest to/environments/{environmentId}/applications/{applicationId}/signOnPolicyAssignmentsto associate the sign-on policy with the application. -
Make a
POSTrequest to/environments/{id}/populationsto create a new population resource. -
Make a
POSTrequest to/environments/{id}/usersto create a user who will be assigned to the new population resource. -
Make a
POSTrequest to/environments/{id}/users/{userId}/passwordto set the new user's password. -
Make a
POSTrequest to/environments/{id}/users/{userId}/mfaEnabledto enable MFA actions for this user. -
Make a
POSTrequest to/environments/{id}/users/{userId}/devicesto associate an SMS MFA device with this user. -
Make a
POSTrequest to/environments/{id}/users/{userId}/devicesto associate an Email MFA device with this user. -
Make a
POSTrequest to/{environmentId}/as/authorizeto obtain an authorization grant. This request starts the authorization flow. -
Make a
GETrequest to/{environmentId}/flows/{flowID}to initiate the sign-on flow. -
To complete the sign-on action, make a
POSTrequest toGET /{environmentId}/flows/{flowID}and provide the user's username for a user lookup action. -
To complete the SMS MFA action, make a
POSTrequest toGET /{environmentId}/flows/{flowID}and provide the one-time passcode. -
To complete the Eamil MFA action, make a
POSTrequest toGET /{environmentId}/flows/{flowID}and provide the one-time passcode. -
Make a
GETrequest to/{environmentId}/as/resume?flowId={flowID}to call the resume endpoint and return the auth code. -
Make a
GETrequest to/environments/{environmentId}/applications/{applicationId}/secretto return the new application'ssecretattribute, which is needed for the token request. -
Make a
POSTrequest to/{environmentId}/as/tokento exchange the auth code for an access token.
Click the Run in Postman button below to download the Postman collection for this use case.
Step 1: Create a web application
Step 2: Get all resources
Step 3: Get all OIDC Scopes
Step 4: Assign a resource grant to the web application
Step 5: Create a sign-on policy
Step 6: Create an SMS MFA sign-on policy action
Step 7: Create an Email MFA sign-on policy action
Step 8: Assign the sign-on policy to the web application
Step 9: Create a population for MFA users
Step 10: Create a user
Step 11: Set user password
Step 12: Enable user MFA
Step 13: Set user device (SMS)
Step 14: Set user device (Email)
Step 15: Send an authorization request
Step 16: Get the flow
Step 17: Sign on with a username
Step 18: Check OTP for SMS
Step 19: Check OTP for Email
Step 20: Call the resume endpoint
Step 21: Get the application secret
Step 22: Get the access token
Configure an MFA Sign-on-Policy with an Authenticator App
This activity shows you how to define a native application, create an MFA sign-on policy that enables MFA using an authenticator application, and assign the sign-on policy to the application.
This scenario illustrates the following common operations supported by the PingOne APIs:
- Create an application
- Assign a resource grant to the application
- Create a sign-on policy
- Create a sign-on policy MFA action
- Assign a sign-on policy to an application
Workflow order of operations
To create the application and specify its sign-on policy:
-
Make a
POSTrequest to the/environments/{envID}/applicationsendpoint to define a native application. -
Make a
GETrequest to/environments/{envID}/resourcesto get the list of available resource server IDs. -
Make a get request to
/environments/{envID}/resources/{resourceID}/scopesto get the OIDC scopes for the resource grant. -
Make a
POSTrequest to/environments/{envID}/applications/{appID}/grantsto assign a resource grant to the application. -
Make a
POSTrequest to the/environments/{envID}/signOnPoliciesendpoint to create a new sign-on policy. -
Make a
POSTrequest to/environments/{envID}/signOnPolicies/{signOnPolicyID}to create an MFA sign-on policy action for the new sign-on policy. -
Make a
POSTrequest to/environments/{envID}/applications/{appID}/signOnPolicyAssignmentsto assign the MFA sign-on policy with the new application.
Step 1: Create a native application
Step 2: Get all resources
Step 3: Get all OIDC Scopes
Step 4: Assign a resource grant to the application
Step 5: Create an MFA sign-on policy
Step 6: Create a sign-on policy MFA action
Step 7: Assign the MFA sign-on policy to the application
Risk Management
These tasks show you how to use the platform APIs to perform common actions for managing risk policies. Risk policy use cases often call the following platform API resources:
| Platform API | Description |
|---|---|
| Risk Policies | The risk policies service implements directory functions to manage risk policy resources. |
| Risk Evaluations | Risk evaluations provides operations to retrieve risk evaluations from internal and external risk providers based on a specified risk policy. |
Create a risk policy set
This activity shows you how to create a new risk policy. This scenario illustrates the following common operations supported by the PingOne APIs:
- Get the environment ID
- Create a risk policy set by defining one or more risk policies
Workflow order of operations
To create the new risk policy set, the following tasks must be completed successfully:
-
Make a
GETrequest to the/environmentsendpoint to get the environment resource ID. -
Make a
POSTrequest to/environments/{{envID}}/riskPoliciesto create a new risk policy set resource.
Click the Run in Postman button below to download the Postman collection for this use case.
Policy set logic
A risk policy set must have at least one defined risk policy, which includes the following components:
-
Condition. The policy logic to define when the policy is evaluated to
trueand when it is evaluated tofalse. -
Result. The policy logic to define what should be returned in case the condition is evaluated to
true. -
Priority. (Optional) A priority ranking to define the execution order of the different risk policies contained in the policy set.
For this use case, you will define a simple risk policy set that includes two risk policies: A whitelist that evaluates risk based on the user's IP address, and an anonymous network detection check.
The following JSON shows the elements defined in the whitelist risk policy. The condition.contains expression uses the ${transaction.ip} condition variable to get the user's IP address and compare it to a range of IP addresses that are considered safe. If the user's IP address is within the range set in condition.ipRange, the condition evaluates to true, and the result.level is set to LOW, indicating low risk for this policy condition.
"riskPolicies": [
{
"name": "WHITELIST",
"priority": 1,
"result": {
"level": "LOW"
},
"condition": {
"contains": "${transaction.ip}",
"ipRange": [
"1.1.1.1/16",
"2.2.2.2/24"
]
}
}
]
The following JSON shows the elements defined in the anonymous network detection risk policy. The condition.contains expression uses the ${details.anonymousNetworkDetected} condition variable to to determine whether the user is attempting to authenticate from an anonymous network. If the condition.value evaluates to true, then the result.level is set to HIGH, indicating that this is a high-risk transaction.
...
"name": "ANONYMOUS_NETWORK_DETECTION",
"priority": 2,
"result": {
"level": "HIGH",
"type": "VALUE"
},
"condition": {
"equals": true,
"value": "${details.anonymousNetworkDetected}"
},
For more information about risk policies, see Risk Policies.
Step 1: Get the environment ID
Step 2: Create a risk policy set
Create a risk evaluation
This activity shows you how to create a new risk evaluation. This scenario illustrates the following common operations supported by the PingOne APIs:
- Get a list of risk policy set resources
- Create a risk evaluation resource that uses a specific risk policy set
Workflow order of operations
To create the new user, the following tasks must be completed successfully:
-
Make a
GETrequest to/environments/{{envID}}/riskPoliciesto return the list of risk policy set resources associated with the environment. -
Make a
POSTrequest to/environments/{{envID}}/riskEvaluationsto create a new risk evaluation resource that references a risk policy set resource.
Click the Run in Postman button below to download the Postman collection for this use case.
Defining the risk evaluation resource
For the POST request to /environments/{{envID}}/riskEvaluations, the risk evaluation resource definition lets you specify the risk policy set to apply to the evaluation. If a particular risk policy set is not specified, the risk evaluation uses the environment's default risk policy set to determine the risk levels for the event. In this use case, the risk evaluation sets theriskPolicySet.id property to the {{riskPolicySetID}} Postman variable, which should contain the ID of the risk policy set that you created in the USE CASE: Create a risk policy set activity.
The risk evaluation definition must include an event object that specifies details about the authentication action to evaluate against the risk policies defined in the risk policy set. In its most basic form, the event object defines a user (user.id and user.type) and an IP address (ip). From this information, the risk evaluation can provide a meaningful risk response for all supported risk predictors (anonymousNetwork, ipRisk, geoVelocity, userRiskBehavior) except the user risk behavior predictor, which requires the targetResource and UserAgent properties. For more information about the risk evaluation event data model, see Risk Evaluations in the PingOne API Reference.
The risk evaluation process follows these steps:
-
The risk service receives an event that it is configured to monitor and evaluate.
-
A risk calculation is made for the event based on the configured risk policies.
-
The risk service returns the risk result to the client.
Step 1: Get risk policy set IDs
Step 2: Create a risk evaluation
External Services
This activity shows you how to create an external service resource and how to define specific HTTP requests in the requests property of the external service resource. The following workflow illustrates the steps required to create four HTTP requests, ranging from a basic request that uses static values (which are applicable only to one request) to more complex requests that use variables and secrets, which are properties that can be applied to any request defined in the external services resource. It also shows you how to create a request that uses inputs, which are values that are expected to be given at request invocation time.
In this use case, the following operations are supported by the PingOne APIs:
- Create an external services resource
- Update the external services resource to configure HTTP requests to an external resource server
- Invoke the requests to return a response from the external resource server
Workflow order of operations
This workflow defines HTTP requests to an external service and shows you how to invoke them. The following API call order creates the external service resource first. Next, it steps through four updates to add the HTTP requests. After each PUT operation to add a request, the next step is a POST to invoke the request.
-
Make a
POSTrequest to/environments/{{envID}}/externalServicesto add a new external service resource to the specified environment. -
Make a
PUTrequest to/environments/{{envID}}/externalServices/{{externalServiceID}}to update therequestsproperty in the external service resource with a an HTTP request that uses static values. The name of this request isYour_First_Request. -
Make a
POSTrequest to/environments/{{envID}}/externalServices/{{externalServiceID}}/requests/Your_First_Requestto invoke the request. -
Make a
PUTrequest to/environments/{{envID}}/externalServices/{{externalServiceID}}to update therequestsproperty in the external service resource to add a second HTTP request. This request defines a variable and uses it in the request. The name of this request isYour_Request_Using_A_Variable. -
Make a
POSTrequest to/environments/{{envID}}/externalServices/{{externalServiceID}}/requests/Your_Request_Using_A_Variableto invoke the request. -
Make a
PUTrequest to/environments/{{envID}}/externalServices/{{externalServiceID}}/secretsto create a secret. -
Make a
PUTrequest to/environments/{{envID}}/externalServices/{{externalServiceID}}to update therequestsproperty in the external service resource to add a third HTTP request. This request uses the variable and the secret in the request. The name of this request isYour_Request_Using_A_Secret. -
Make a
POSTrequest to/environments/{{envID}}/externalServices/{{externalServiceID}}/requests/Your_Request_Using_A_Secretto invoke the request. -
Make a
PUTrequest to/environments/{{envID}}/externalServices/{{externalServiceID}}to update therequestsproperty in the external service resource to add a fourth HTTP request. This request uses inputs to assign values at invocation. The name of this request isYour_Request_Using_An_Input. -
Make a
POSTrequest to/environments/{{envID}}/externalServices/{{externalServiceID}}/requests/Your_Request_Using_An_Inputto invoke the request.
Click the Run in Postman button below to download a Postman collection that includes the requests described in this section.