PingOne Native SDKs
The PingOne Native SDKs are iOS and Android client SDKs for PingOne services built to interact with the PingOne Platform API. Currently, native PingOne SDKs are available for these services:
To integrate your mobile and web apps with PingOne DaVinci, or for OIDC redirect login, refer to the Ping SDKs.
PingOne MFA Native SDKs
The PingOne Native SDK provides the ability to integrate PingOne MFA functionality into your native applications. Topics include:
PingOne MFA Native SDK flows
Pairing - automatic enrollment
The automatic enrollment flow requires as little as one extra step from the user. The first time the user logs into an application which has an embedded PingOne Native SDK component, they are asked if they wish to trust that device. Once they approve, PingOne works behind the scenes, without requiring anything else from the user.
During user authentication, a native app communicates with the PingOne platform to generate a token. The token allows pairing the device to the user in the context of a customer application. The user is not required to type or scan anything.
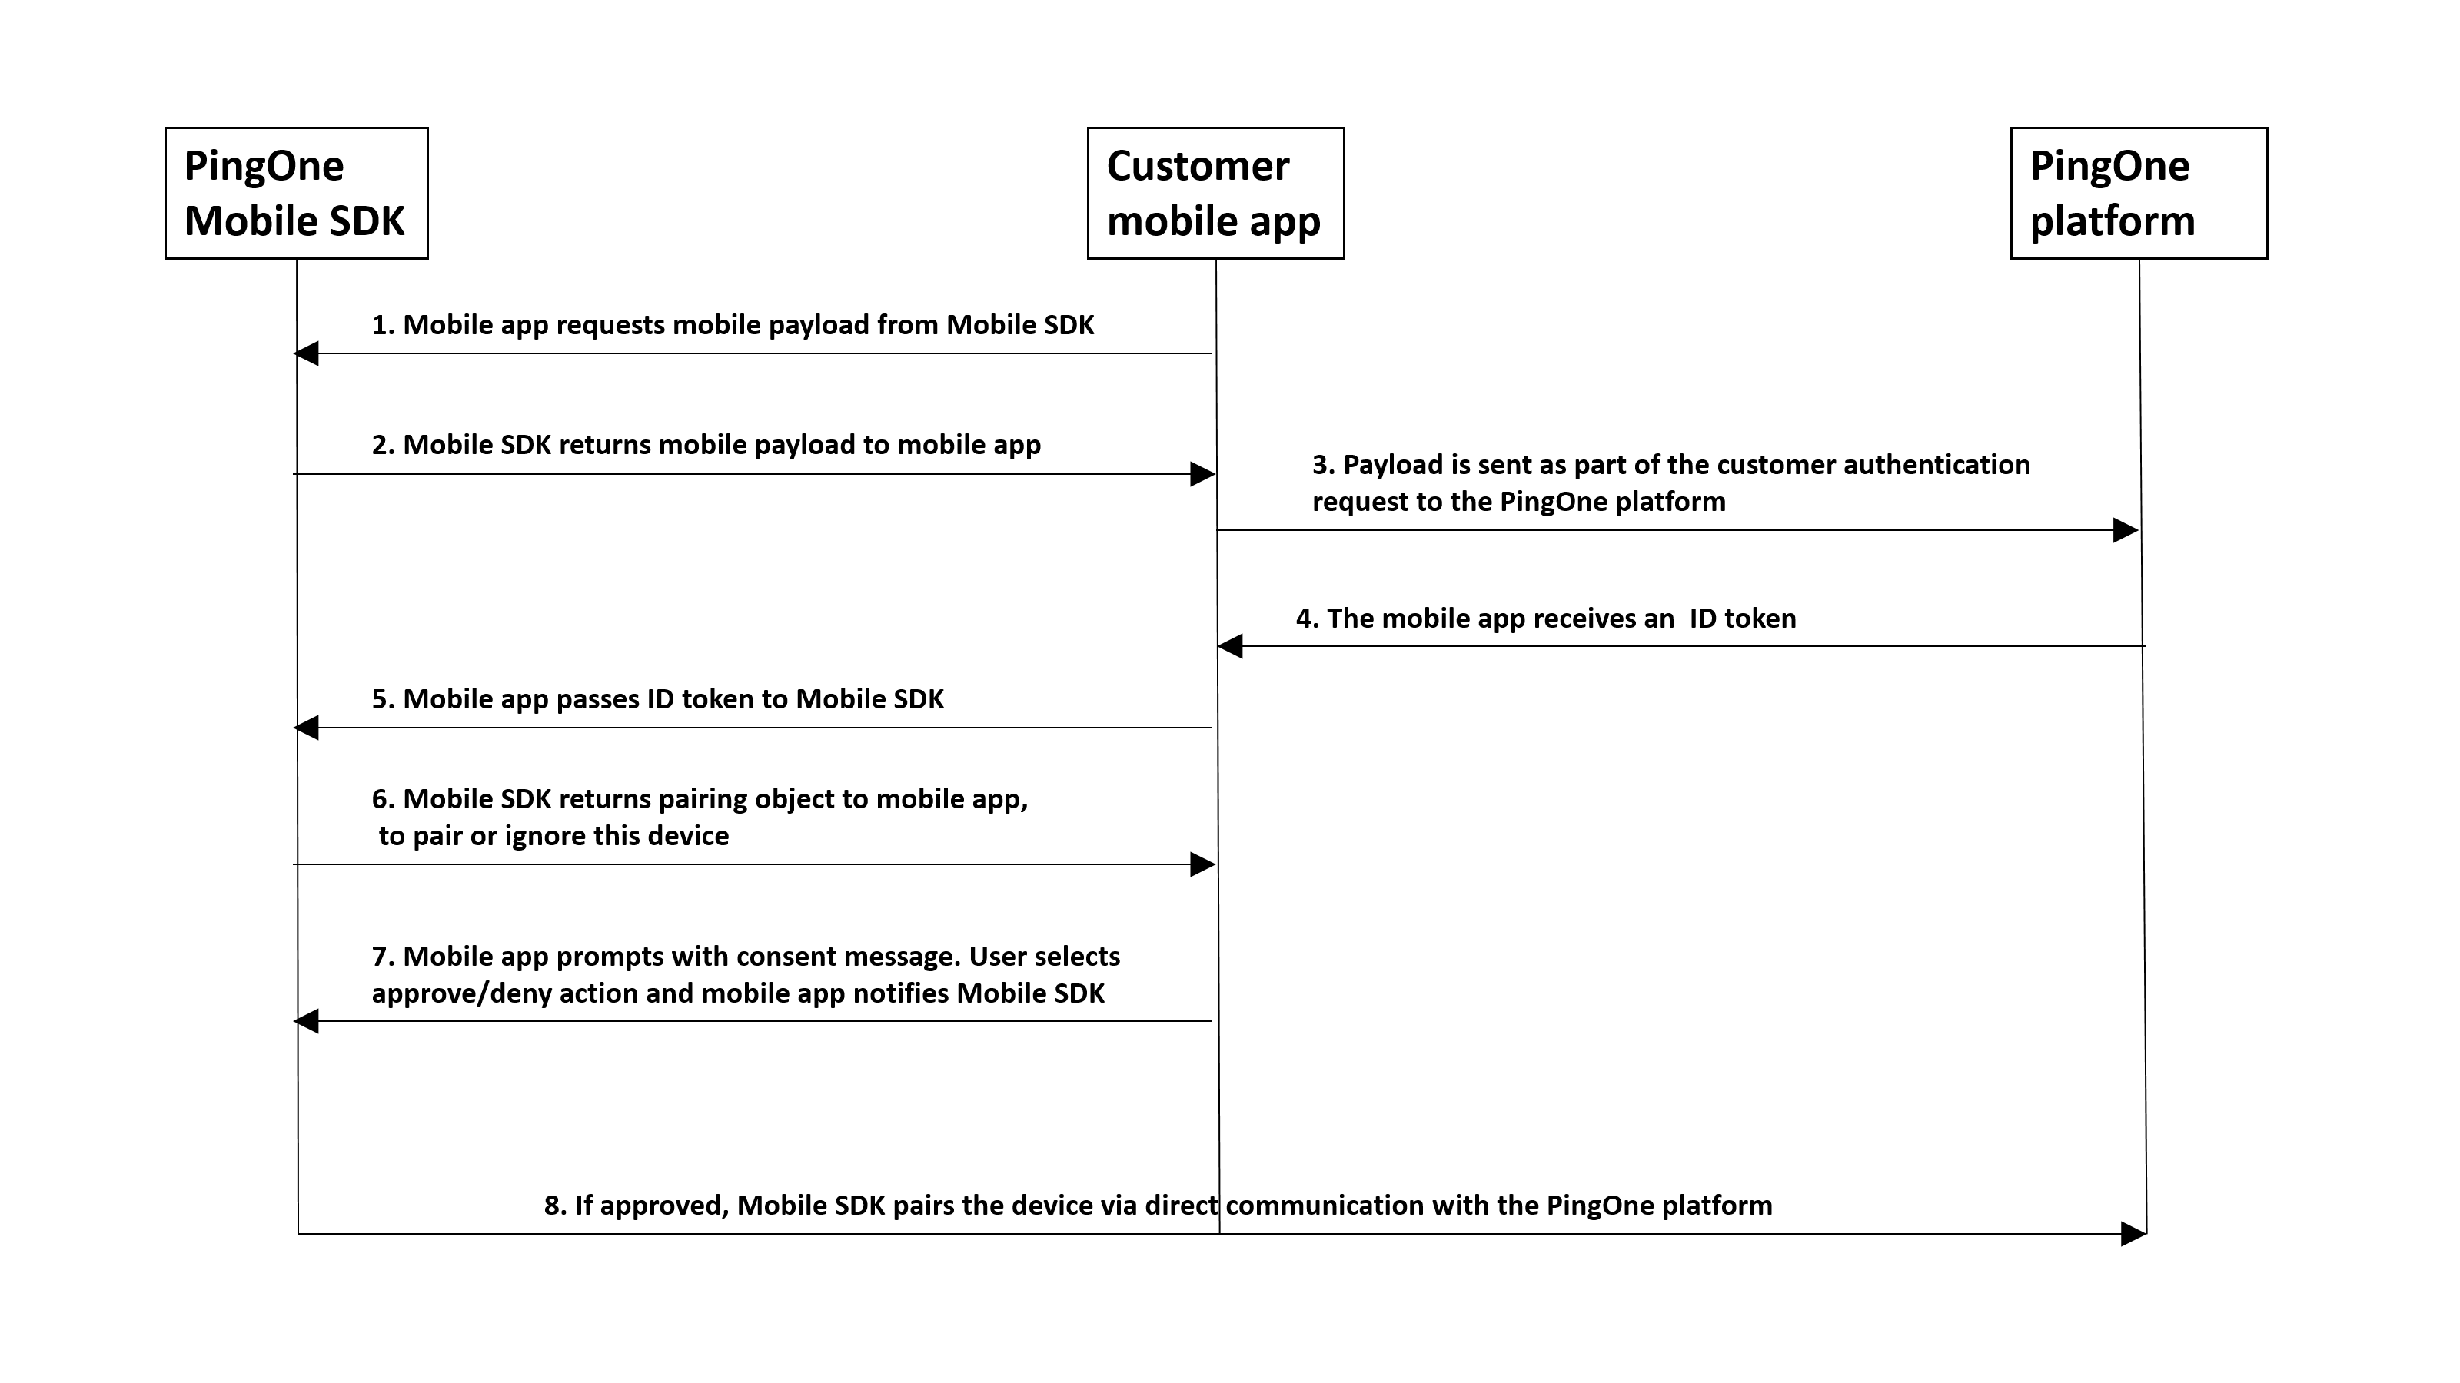
- The user is identified on the customer native application, usually with a unique user identifier, for example, a username.
- The PingOne Native SDK returns a native payload to the customer native application. The payload is a small data package created by the PingOne Native SDK component, which is used as part of the device's authorization.
- The customer native application sends an authentication request to the PingOne Platform, including the native payload.
- The customer native application receives an ID token.
- The customer native application passes the ID token to the PingOne Native SDK.
- The PingOne Native SDK returns a pairing object to the customer native application, to pair or ignore the device.
- The customer native application prompts the user for the approve or deny action via a dialog. Based on the user's choice, the customer native application notifies PingOne Native SDK.
- The PingOne Native SDK completes the transaction accordingly, by communicating directly with PingOne Platform.
Implement automatic pairing of native app as MFA authenticator app
In order to enable automatic pairing of a native app as an MFA authenticator app, there are several tasks that must be coordinated between admin and developers.
In brief, you will do the following:
- Create a native application with Authenticator configuration.
- Configure a sign-on policy containing an MFA step that references an MFA policy where the native application is configured as an authenticator.
- Assign the sign-on policy to the native app.
- Write code in the application to support automatic app enrollment.
Follow the detailed steps below:
Supply the relevant details for the admin to do the following in the PingOne admin console:
Admin tasks
- Create a native app. Refer to Add an application - Native.
- In Edit an application, on the Mobile tab:
- Add the Package name (Android) and Bundle ID (iOS) of your native application.
- Configure the push credentials per platform.
- Create a new MFA policy.
- In the MFA policy, use the Add Application option to select the name of your mobile app. In the settings for the app you added, select the Auto Enrollment option.
- Create a sign-on policy, and add an MFA step. Refer to Add an authentication policy.
- In the MFA step, select the MFA policy that you configured. Also, if you want to allow automatic enrollment even if the user does not have any existing paired devices, set the "NONE OR INCOMPATIBLE METHODS" setting to Bypass.
- Return to the Applications page and edit your mobile application. On the Policies tab, choose the sign-on policy that you created. This is necessary so that the authenticator element of your application will be launched when users try to access the application.
Developer tasks
In your native application code (also described in the iOS and Android README.md files, refer to PingOne Native SDK for iOS or PingOne Native SDK for Android):
- Get the native payload from the SDK (
PingOne.generateMobilePayload()) - Pass the received payload of the OIDC request to the authorization service, as the
mobilePayloadquery parameter. - Call
processIdToken()with the token you received from PingOne platform. - If automatic pairing is triggered (i.e. the user was not already paired with the device),
processIdToken()will return a pairing object withapprove()anddeny()functions. Callingapprove()will pair the user with the device.
Automatic device authorization
During automatic device authorization, a native app communicates with the PingOne platform to generate a token. The token allows authenticating the user device in the context of a customer application. The user is not aware of this, and is not required to type or scan anything.
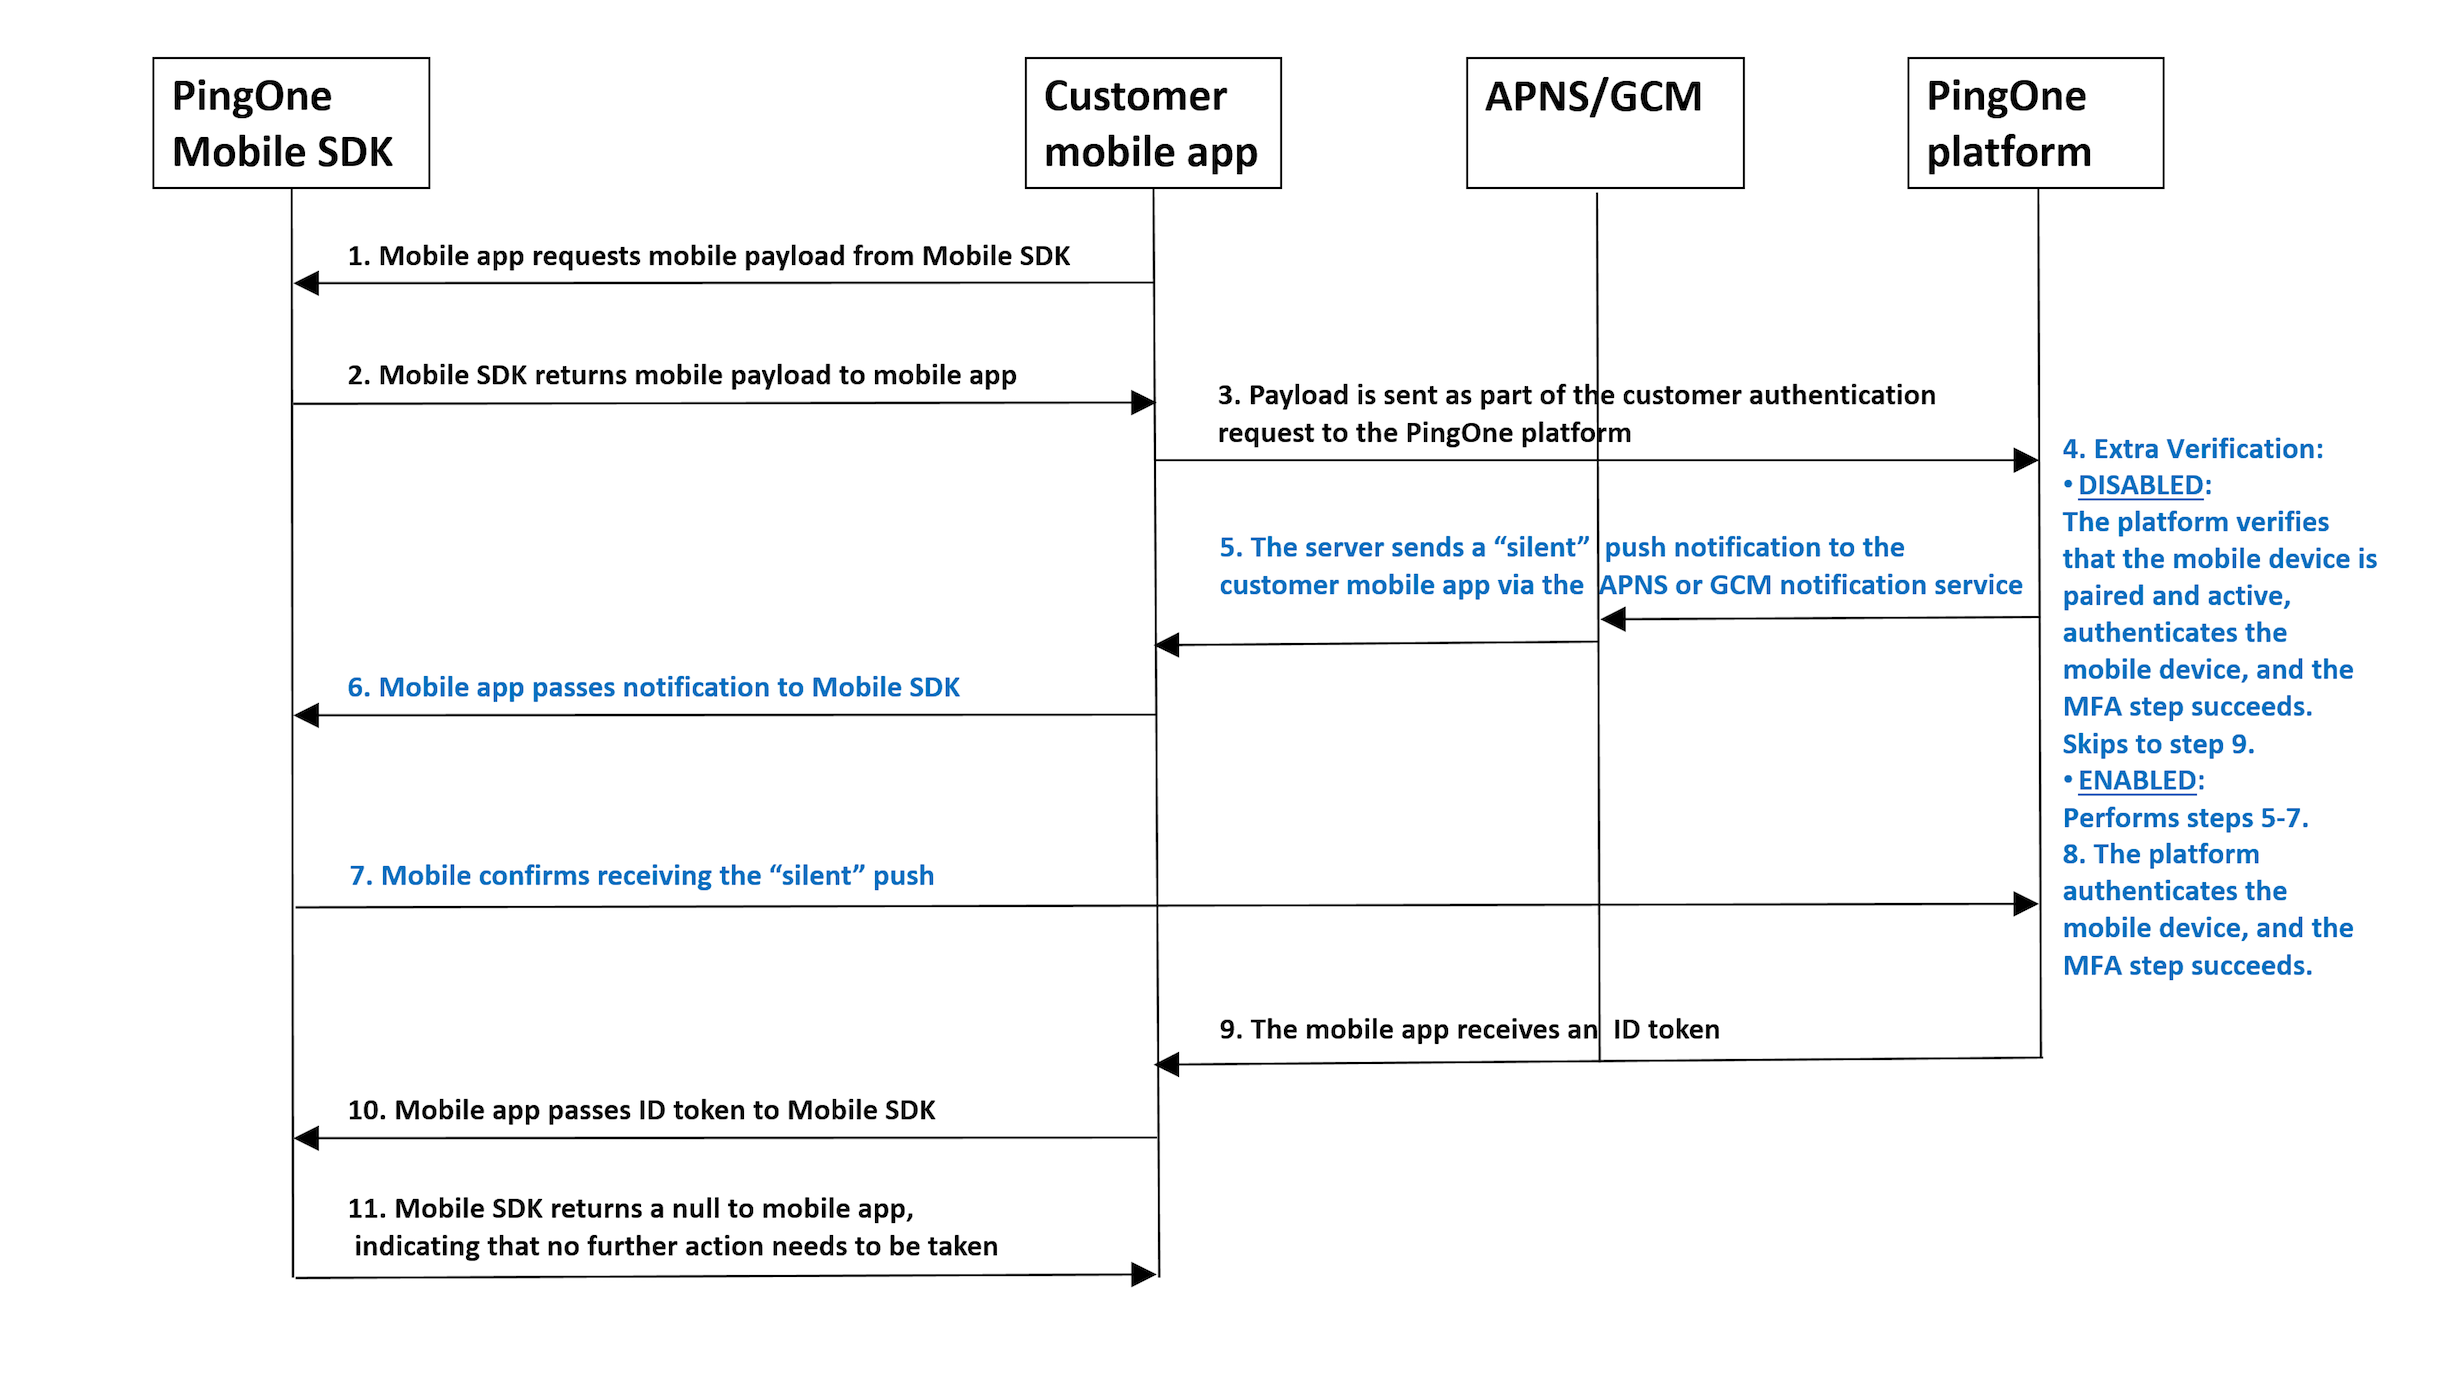
- The customer native app requests a native payload from the PingOne Native SDK.
- The PingOne Native SDK returns a native payload to the customer native application.
- The customer native application sends an authentication request to the PingOne Platform, including the native payload.
- If the platform's authentication flow (sign-on policy) contains an MFA step, and extra verification is disabled, the platform verifies that the native device is paired and active, authenticates the native device, and the MFA step succeeds. The flow skips to step 9.
- The platform verifies that the native device is paired and active and sends a "silent" push notification to the native application via the APNS/GCM notification service.
- The native application passes the "silent" notification to the PingOne Native SDK.
- The PingOne Native SDK acknowledges receiving the "silent" push by sending a confirmation directly to the PingOne platform.
- The platform authenticates the native device, and the MFA step succeeds.
- The customer native application receives an ID token from the PingOne Platform.
- The customer native application passes the ID token to the PingOne Native SDK.
- The PingOne Native SDK returns null to the customer native application, indicating that authorization has completed and no further action needs to be taken.
Implement automatic device authorization
Admin tasks
The admin configuration that was implemented for automatic enrollment, is applied to automatic device authorization.
- Create a native app, or edit an existing app. Refer to Add an application - Native.
- In Edit an application, on the Mobile tab:
- Add the Package name (Android) and Bundle ID (iOS) of your native application.
- Configure the push credentials per platform.
- Create a new MFA policy.
- In the MFA policy, use the Add Application option to select the name of your mobile app. In the settings for the app you added, enable Device Authorization. In the Extra Verification drop-down list, you can optionally select Permissive or Restrictive. For details on these two options, refer to Adding an MFA policy.
- Create a sign-on policy, and add an MFA step. Refer to Add an authentication policy.
- In the MFA step, select the MFA policy that you configured.
- Return to the Applications page and edit your mobile application. On the Policies tab, choose the sign-on policy that you created. This is necessary so that the MFA policy you configured and included in the sign-on policy will be applied when users try to access the application.
Developer tasks
In your native application code (also described in the iOS and Android README.md files, refer to PingOne Native SDK for iOS or PingOne Native SDK for Android):
- Get the native payload from the SDK (
PingOne.generateMobilePayload()) - Pass the received payload of the OIDC request to the authorization service, as the
mobilePayloadquery parameter. - Call
processIdToken()with the token you received from PingOne platform. - If device authorization is triggered (i.e. verification that the user's device is already paired and active),
processIdToken()will return null, indicating that authorization has completed and no further action needs to be taken.
Authentication code flow
The authentication code flow enables users to sign on without any data entry, such as providing a username, password, or entering a one-time passcode. The user scans the code, and if successful, gains access to an application's services.
During an authentication code flow, a native app communicates with the PingOne platform to initiate authentication with an authentication code, which can be a QR code. The flow starts with a call to the Create Authentication Code endpoint. The Mobile SDK validates the code value and returns an AuthenticationObject to the mobile app.
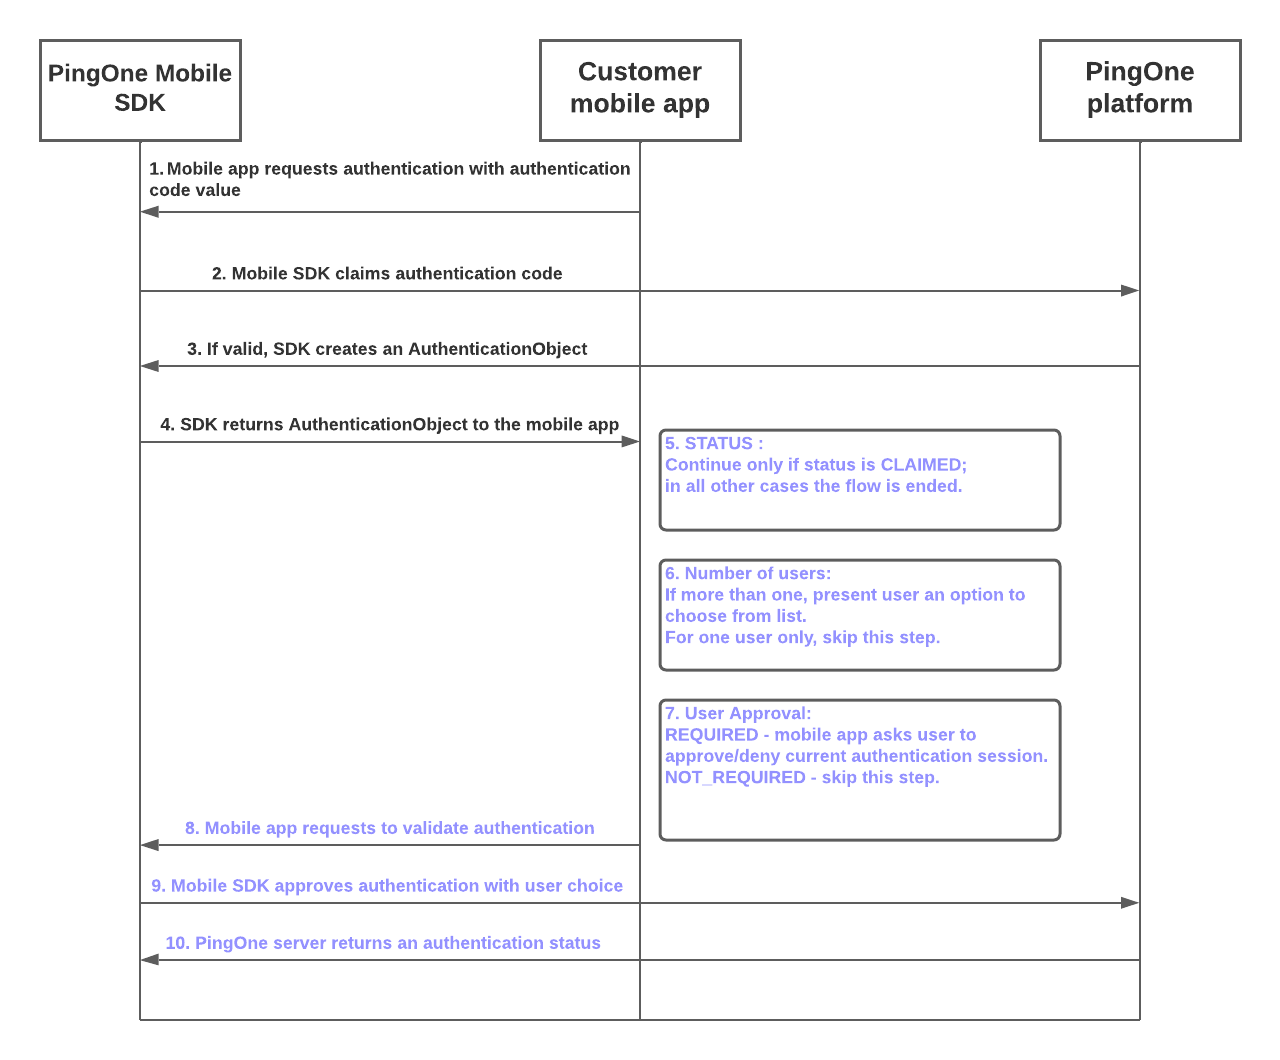
- The customer mobile app requests an authentication code flow from the PingOne Mobile SDK.
- The Mobile SDK requests validation of the authentication code value from the PingOne platform.
- If the authentication code value is validated by the PingOne platform, the Mobile SDK creates an
AuthenticationObject. - The Mobile SDK returns the
AuthenticationObjectto the customer mobile app. - If the
statusproperty value of theAuthenticationObjectisCLAIMED, the flow continues. For all otherstatusvalues, the flow ends. - If the number of users is two or more, the flow presents the user with an option to choose a specific user from the list. If the
AuthenticationObjectspecifies only one user, the flow continues without requiring this step. - If the user approval setting has a value of
REQUIRED, the mobile app prompts the user to approve or deny the current authentication session. If user approval is set toNOT_REQUIRED, the authentication flow skips this step. - The customer mobile app makes a validation request to the Mobile SDK.
- The Mobile SDK claims authentication with the selected user and queries the PingOne server.
- The PingOne server returns an authentication status.
Implement an authentication code flow
Admin tasks
To configure direct triggering of the mobile application in an authentication code flow:
- Create a native app, or edit an existing app. Refer to Add an application - Native.
- Use the Authenticator tab to allow mobile authentication for the app. If your organization uses the PingOne MFA SDK to allow authentication with a QR code in certain flows, the admin can optionally configure a universal link or schema app link to enable direct triggering of the mobile application when scanning a QR code with a QR scanner. Refer to Editing an application - Native.
Developer tasks
In your native application code (also described in the iOS and Android README.md files, refer to PingOne Native SDK for iOS or PingOne Native SDK for Android):
- Pass the retrieved authentication code to the mobile SDK by calling
PingOne.authenticate(). - Parse the retrieved
AuthenticationObject. If the status field equalsCLAIMED, proceed to the next step. - If the number of users is more than one and/or the value of the field
needsApprovalequalsREQUIRED, theAuthenticationObjectwill containapprove()anddeny()options. - Call the
approve()method of theAuthenticationObjectwith the correspondinguserIdto complete the authentication.
Automatic unpairing of device if mobile app uninstalled
If a user who has already paired a device uninstalls the mobile app, PingOne responds to the unanswered push by automatically unpairing the device and removing it from the user's device list.
This mechanism uses the response received from the Google and Apple notification servers.
Note that Apple does not guarantee a specific response to push notifications after an application is uninstalled, so this feature may not always work on iOS devices.
In situations where an unregistered response is not received from the Google or Apple notification server, MFA flows will continue to prompt for push confirmation, and this may result in a status of PUSH_CONFIRMATION_TIMED_OUT.
PingOne MFA SDK for Android
Overview
The PingOne MFA Native SDK provides the ability to integrate PingOne MFA functionality into your native applications.
The PingOne MFA Native SDK API for Android is included in the SDK package. The functions, parameters and error codes are listed below.
The PingOne MFA Native SDK package is available for download at https://github.com/pingidentity/pingone-mobile-sdk-android. Further details for setup and integrating PingOne MFA Native SDK into your native apps are available in the README file in the Android folder of the downloadable package.
The PingOne MFA SDK for Android supports the following software versions:
- Android 9 (API 28) and above
Refer to Edit an application in the admin guide for the server-side configuration steps.
PingOne MFA Native SDK sample app
The PingOne MFA Native SDK bundle provides a sample app that includes all the basic flows in order to help you get started.
The sample app package for Android is available for download at https://github.com/pingidentity/pingone-mobile-sdk-android. Further details are available in the README file in the Android folder of the downloadable package.
Authenticator sample app
The Authenticator sample app is a native app that has the sole function of performing strong authentication. It provides a simple example for developers and solution architects, to enable easy and rapid deployment of an authenticator app with minimal effort.
For scenarios which solely require creation of a native authenticator rather than a full native app, the Authenticator sample app offers a passwordless and secured solution, that only requires compilation of the sample with customer's branding and credentials, and uploading it to the app store.
The Authenticator sample app package for Android is available for download at https://github.com/pingidentity/pingone-authenticator-sample-app-android/.
Mobile device integrity check
PingOne has an integrated mobile device integrity check in its MFA flows, which allows mobile applications to deny access when a mobile device is suspected to be compromised.
Mobile device integrity check - admin UI configuration
Each application must be set up and configured in the organization's PingOne environment, either in the admin UI, or using the MFA devices API. The development team provides the admin with the application name and details.
The admin's configuration of device integrity detection is detailed in the PingOne admin guide. Refer to Editing an application - Native.
Mobile device integrity check - Android implementation
PingOne uses Google's Play Integrity API to check the integrity of the mobile device. For details on the capabilities of the Play Integrity API, refer to the Play Integrity API documentation.
Mobile app developers are responsible for enabling and monitoring usage of the Play Integrity API.
The following steps are required:
-
Create a Google Cloud project or use an existing one
For details on working with Google Cloud projects, refer to Creating and managing projects. The PingOne mobile SDK component requires the number of your Google Cloud project. -
Enable the Google Play Integration API
Go to APIs and Services and select Enable APIs and Services. Search for the Play Integrity API, select it, and then select Enable. -
Link your application to the Google Cloud project
Applications distributed on Google Play must be linked to the Google Cloud project so that they can call the Play Integrity API. In the developer console of the Google Play Store, choose your application. Go to Setup > App integrity > Google Cloud Project, and link your application to the Google Cloud project where you've enabled the Play Integrity API. -
Configure how your responses are encrypted and decrypted (optional)
For applications distributed on Google Play, you can choose between Google-managed response encryption (the default and recommended option) and self-managed response encryption. For both of these options, you'll need to provide the relevant keys in the PingOne console when you define the application. Refer to Configure how your responses are encrypted and decrypted for more information on managing and downloading response encryption keys. -
Monitor Play Integrity API usage
If your quota for Play Integrity API usage is reached, users could end up getting blocked. So it's important to monitor Play Integrity usage. For more information on usage tiers and requesting a higher quota, refer to API usage tiers. -
Request a higher quota if needed
The form for requesting a move to a higher usage tier includes questions that are application-dependent. For the question How are you calling the Play Integrity API?, select the A third party I'm using in the app is calling the API option, and specify PingOne Mobile SDK Android. -
Estimate the number of queries per day to request a specific tier
The quota request should take into account both your application's expected traffic and the mobile SDK component's caching and retry policy. If there was a successful response from the Play Integrity API that passed the integrity test, no additional Play Integration requests will be made until after the integrity check cache duration that you defined for the application.
PingOne MFA Native SDK API - Android
Refer to the API documentation.
PingOne MFA SDK for iOS
Overview
The PingOne MFA Native SDK provides the ability to integrate PingOne MFA functionality into your native applications.
The PingOne MFA Native SDK API for iOS is declared in the PingOne.h header file included in the SDK package. This header file (replicated below) includes descriptions for all functions, parameters and error codes.
The PingOne MFA Native SDK package is available for download at https://github.com/pingidentity/pingone-mobile-sdk-ios. Further details for setup and integrating PingOne MFA Native SDK into your native apps are available in the README file.
The PingOne SDK for iOS supports the following software versions:
- Xcode 14 or later
- iOS 15.0 or later
Refer to Edit an application in the admin guide for the server-side configuration steps.
PingOne MFA Native SDK sample app
The PingOne MFA Native SDK bundle provides a sample app that includes all the basic flows in order to help you get started.
The sample app package for iOS is available for download at https://github.com/pingidentity/pingone-mobile-sdk-ios. Further details are available in the README file.
Authenticator sample app
The Authenticator sample app is a native app that has the sole function of performing strong authentication. It provides a simple example for developers and solution architects, to enable easy and rapid deployment of an authenticator app with minimal effort.
For scenarios which solely require creation of a native authenticator rather than a full native app, the Authenticator sample app offers a passwordless and secured solution, that only requires compilation of the sample with customer's branding and credentials, and uploading it to the app store.
The Authenticator sample app package for iOS is available for download at https://github.com/pingidentity/pingone-authenticator-sample-app-ios. Further details are available in the README file.
Mobile device integrity check
PingOne has an integrated mobile device integrity check in its MFA flows, that allows mobile applications to deny access when a mobile device is suspected to be compromised.
Mobile device integrity check - admin UI configuration
Each application must be set up and configured in the organization's PingOne environment, either in the admin UI, or using the MFA devices API. The development team provides the admin with the application name and details.
The admin's configuration of device integrity detection is detailed in the PingOne admin guide. Refer to Editing an application - Native.
PingOne MFA Native SDK API - iOS
Refer to the API documentation.
PingOne MFA SDK error codes
Pairing object error codes
The pairing object always returns both a push authenticator status and an OTP status. If the status is FAILED, a Push authenticator error code and message or an OTP error code and message is returned with the status.
Push authenticator error codes
| Error code | Description |
|---|---|
Any error string returned from APNS, for example Unregistered |
Refer to more error codes and descriptions in Handling notification responses from APNs in the Apple developer portal. |
Any error string returned from FCM, for example Unregistered |
Refer to more error codes and descriptions in Error codes for FCM failure conditions in the Firebase portal. |
MissingPushCredentials |
There are no push credentials on the PingOne server. |
MissingDeviceToken |
There is no device token on the PingOne server. |
PushDisabled |
The push was disabled via the native SDK API. |
OTP error codes
| Error code | Description |
|---|---|
OneTimePasscodeRetriesExceeded |
On device pairing, the OTP can be verified within 3 attempts. On checkOTP, the OTP can be verified within 3 attempts in every 15 minutes. |
InvalidOneTimePasscode |
The user entered an invalid OTP. |
OneTimePasscodeExpired |
On device pairing, the OTP can be verified within 15 minutes. On checkOTP, there are no limitations except for OneTimePasscodeRetriesExceeded. |
UnSynchronizedClock |
The native clock not synchronized with the generated secret. |
PingOne Neo Native SDKs
PingOne Neo is a decentralized identity solution that gives control of identity data back to users. PingOne Neo empowers businesses to give their users full control over how they securely store and share verified credentials without unnecessary friction.
PingOne Neo provides enterprises with identity verification capabilities and the capability to issue identity claims for users to store in their wallet app and verify user data. Embed personal identity using these SDKs into a service to issue digital cards to users and let them store verifiable, shareable data in their wallet app.
PingOne Neo has two components:
PingOne Verify Native SDKs
PingOne Verify Native SDKs collect information required for verifying a user's identity and share the collected information with the PingOne Verify service. PingOne Verify Native SDKs are available in for two operating systems:
PingOne Verify SDK for iOS
The PingOne Verify SDK enables you to integrate PingOne Verify functionality into your native applications.
The PingOne Verify Native SDK package is available for download at https://github.com/pingidentity/pingone-verify-mobile-sdk-ios. Further details for setup and integrating PingOne Verify Native SDK into your native apps are available in the README file in the top level folder of the downloadable package.
PingOne Verify SDK for Android
The PingOne Verify SDK enables you to integrate PingOne Verify functionality into your native applications.
The PingOne Veridy Native SDK package is available for download at https://github.com/pingidentity/pingone-verify-mobile-sdk-android. Further details for setup and integrating PingOne Verify Native SDK into your native apps are available in the README file in the top level folder of the downloadable package.
PingOne Wallet Native SDKs
This defines the usage and interfaces of the PingOne Wallet Native SDKs to interact with PingOne credentialing services. The SDK provides for a user to receive, save, and share credentials for identification and verification purposes. PingOne Wallet Native SDKs are available in for two operating systems:
PingOne Wallet Native SDK flows
Wallet initialization
When the wallet SDK initializes for the first time, it creates a new application instance for the default region supplied in the PingOneWalletClient.Builder, registers with the credentials service, and saves the application identifier with cryptographic keys locally. When the SDK receives a request for another region, it registers the same set of keys with the credential service running in the region where the request originated before processing the request.

Credential presentation
Upon scanning a QR, receiving a notification, or clicking a deep link the application passes the information to the SDK. The SDK then uses this information to fetch and parse the Presentation Request, and find the credentials in storage that match. These pass back to the Wallet Application that decides and approves which credentials to share. The SDK identifies the protocol in the presentation request (Native vs OPENID4VP) and prepares a Presentation Response accordingly. If the request is for presenting credentials for a session on the same device, the SDK asks the app to redirect the user to the corresponding URL in the browser after submitting the presentation response.

PingOne Wallet Native SDK for iOS
The PingOne Wallet SDK enables you to integrate PingOne Wallet functionality into your native applications.
The PingOne Wallet Native SDK package is available for download at https://github.com/pingidentity/pingone-wallet-mobile-sdk-ios. Further details for setup and integrating PingOne Wallet Native SDK into your native apps are available in the README file in the top level folder of the downloadable package.
PingOne Wallet Native SDK for Android
The PingOne Wallet SDK enables you to integrate PingOne Wallet functionality into your native applications.
The PingOne Wallet Native SDK package is available for download at https://github.com/pingidentity/pingone-wallet-mobile-sdk-android. Further details for setup and integrating PingOne Wallet Native SDK into your native apps are available in the README file in the top level folder of the downloadable package.
PingOne Protect Native SDKs
You can use the PingOne Signals (Protect) SDK to obtain information for additional risk-related variables and then pass this information on to the risk evaluation.
The data provided by the Signals SDK can be used with the PingOne Protect Integration Kit for PingFederate or PingOne Risk Integration Kit for PingFederate, with the PingOne Protect API, or as part of a flow designed with DaVinci.
- If you are using the Signals SDK with the PingOne Protect Integration Kit for PingFederate, refer to Integrating device profiling.
- If you are using the Signals SDK with the PingOne Risk Integration Kit for PingFederate (versions 1.3.1 or 1.3), refer to Adding device profiling to a web application.
- If you are using the Signals SDK with the PingOne Protect API, refer to Creating risk evaluations.
- If you are using the Signals SDK as part of a flow designed with DaVinci, refer to PingOne Protect Connector.
SDK Changelog
Signals (Protect) SDK for iOS
| Release Date | Description |
|---|---|
| Mar 23, 2025 | Version 5.3.0
|
| Nov 6, 2024 | Version 5.2.8
|
Signals (Protect) SDK for Android
| Release Date | Description |
|---|---|
| Mar 23, 2025 | Version 5.2.0
|
| Nov 6, 2024 | Version 5.1.6
|
Signals (Protect) SDK for Web
| Release Date | Description |
|---|---|
| Oct 23, 2025 | Version 5.6.3
|
| Jun 4, 2025 | Version 5.6.0
|
| Mar 4, 2025 | Version 5.5.0
|
| Oct 10, 2024 | Version 5.4.0
|
PingOne Protect SDK for iOS
PingOne Signals (Protect) SDK for iOS (version 5.3.0)
Using the iOS version of the SDK involves the following steps:
- Adding the SDK to your app using CocoaPods or Swift Package Manager
- Importing the SDK module
- Initializing the SDK
- Getting the data for risk assessment
Adding the SDK to your app
Adding the SDK to your app using CocoaPods
If you're new to CocoaPods, refer to the official documentation for information on how to create and use Podfiles.
Open your project's Podfile and add the following to your app's target:
pod 'PingOneSignals', '~> 5.3.0'
Run pod install from the command line:
pod install
Adding the SDK to your app using Swift Package Manager
- Select File > Add Packages… in Xcode's menu bar.
- Search for the PingOne Signals SDK using the repo's URL: https://github.com/pingidentity/pingone-signals-sdk-ios
- Set the Dependency Rule to Branch with the value 'main' or select an exact version, and make sure that
Add to Projectis set to your project. - Select
Add Package. - Verify that the package was downloaded in your project.
SDK initialization
Initialize the SDK. You'll typically do this in your app's application:didFinishLaunchingWithOptions: method, or any other entry point during your application launch. For example:
import PingOneSignals

let initParams = POInitParams()
initParams.envId = <envId> // optional
// If you are using the PingFed authentication API and version 1.3 of the Integration Kit, uncomment the following line to turn off the collection of behavioral data
// initParams.behavioralDataCollection = false
let pingOneSignals = PingOneSignals.initSDK(initParams: initParams)

pingOneSignals.setInitCallback { error in
    if let error = error {
        print("Init failed - \(error.localizedDescription)")
    } else {
        print("SDK Initialized")
    }
}
Optionally, set an event listener to get calls on successful or failed SDK initialization.
Getting the data for risk assessment
Get the data for risk assessment by adding a call to the SDK's getData method, for example:
import PingOneSignals

let pingOneSignals = PingOneSignals.sharedInstance()
pingOneSignals?.getData { data, error in
    if let data = data {
        print("data: \(data)")
    } else if let error = error {
        print("error getting data: \(error)")
    }
}
PingOne Protect SDK for Android
PingOne Signals (Protect) SDK for Android (version 5.2.0)
Using the Android version of the SDK involves the following steps:
- Adding Maven Central repository
- Adding the SDK to your app dependencies
- Initializing the SDK
- Getting the data for risk assessment
Adding the SDK to your app dependencies
Add the following to your application-level build.gradle file:
implementation "com.pingidentity.signals:android-sdk:5.2.0"
SDK initialization
Extend the Application class and add the following in the onCreate method:
public class MyApplication extends Application {

    @Override
    public void onCreate() {
        super.onCreate();

        // optional
        PingOneSignals.setInitCallback(new InitCallback() {
            @Override
            public void onError(@NonNull String message, @NonNull String code, @NonNull String id) {
                Log.i("PingOneSignals", "onError " + message + " code: " + code + " id: " + id);
            }

            @Override
            public void onInitialized() {
                Log.i("PingOneSignals ", "SDK Initialized");
            }
        });

      POInitParams initParams = new POInitParams();
      initParams.setEnvId(<envId>); // optional
      // If you are using the PingFed authentication API and version 1.3 of the Integration Kit, uncomment the following line to turn off the collection of behavioral data
      // initParams.setBehavioralDataCollection(false);
      PingOneSignals.init(this, initParams);
    }
}
Optionally, set an event listener to get calls on successful or failed SDK initialization.
Getting the data for risk assessment
Get the data for risk assessment by adding a call to the SDK's getData method, and pass as a parameter a class that implements the GetDataCallback interface, for example:
import com.pingidentity.signalssdk.sdk.GetDataCallback;
import com.pingidentity.signalssdk.sdk.SignalsCollection;

public class MyClass {

    public void callGetData() {
          PingOneSignals.getData(new GetDataCallback() {
                   @Override
                     public void onSuccess(@NonNull String data) {
                              Log.i("PingOneSignals ", "data:  " + data);
                      }

                    @Override
                    public void onFailure(@NonNull String reason) {
                             Log.i("PingOneSignals ", "onFailure reason: " + reason);
                    }
           });
    }
}
PingOne Protect SDK for Web
PingOne Signals (Protect) SDK for Web
Version of the Signals SDK to use
When using the PingFederate Authentication API, use the version of the Signals SDK that supports the Risk/Protect Integration Kit that you installed in PingFederate:
- For all versions of the PingOne Protect Integration Kit, use version 5.2.10 or later of the PingOne Signals SDK.
- For PingOne Risk Integration Kit 1.3.1, use version 5.2.10 or later of the PingOne Signals SDK.
- For PingOne Risk Integration Kit 1.3, use version 5.0.3 of the PingOne Signals SDK.
When integrating through the PingOne API, always use the latest version of the PingOne Signals SDK
Main steps
Using the web SDK involves the following steps:
- Importing the necessary script
- Initializing the SDK
- Getting the data for risk assessment
Importing the script
Import the required script by including the following code segment in each relevant page.
<script
        src="https://apps.pingone.com/signals/web-sdk/5.6.0/signals-sdk.js"
        defer>
</script>
Initializing the SDK
Initialize the SDK by adding a listener for the PingOneSignalsReadyEvent event:
function onPingOneSignalsReady(callback) {
    if (window['_pingOneSignalsReady']) {
        callback();
    } else {
        document.addEventListener('PingOneSignalsReadyEvent', callback);
    }
}
Then, if you are using version 5.0.3 or earlier of the Signals SDK, use this code:
onPingOneSignalsReady(function () {
    _pingOneSignals.initSilent({
        envId : <envId>
    }).then(function () {
        console.log("PingOne Signals initialized successfully");
    }).catch(function (e) {
        console.error("SDK Init failed", e);
    });
});
If you are using version 5.2.1 or later of the Signals SDK, use this code:
onPingOneSignalsReady(function () {
    _pingOneSignals.init({
        // If you are using the PingFed authentication API and version 1.3 of the Integration Kit, uncomment the following line to turn off the collection of behavioral data
        // behavioralDataCollection: false
    }).then(function () {
        console.log("PingOne Signals initialized successfully");
    }).catch(function (e) {
        console.error("SDK Init failed", e);
    });
});
If you are using version 5.3.7 or later of the Signals SDK, use this code:
onPingOneSignalsReady(function () {
    _pingOneSignals.init({
        // If you are using the PingFed authentication API and version 1.3 of the PingOne Risk Integration Kit, uncomment the following line to turn off the collection of behavioral data
        // behavioralDataCollection: false,
        // By default, the SDK creates a "tags" array containing the URLs visited and the time of the visit. Uncomment the following line to disable the collection of this data
        // disableTags: true,
        // Set universalDeviceIdentification to true if you want the device data in the SDK payload to be provided as a signed JWT
        // universalDeviceIdentification: true,
        // Set htmlGeoLocation to true if you want the SDK payload to include browser-based user location data if the user has provided their consent
        // htmlGeoLocation: true,
        // Set agentIdentification to true if you are using risk policies that contain the PingID Device Trust predictor
        // agentIdentification: true,
        // If you have set agentIdentification to true, use agentTimeout to specify the timeout the trust agent should use if you don't want to use the default timeout setting. Can be between 200 and 10,000 milliseconds.
        // agentTimeout: 5000,
        // If you have set agentIdentification to true, use agentPort to specify the port to use when connecting to the trust agent if you don't want to use the default port (9400)
        // agentPort: 8800
        //
    }).then(function () {
        console.log("PingOne Signals initialized successfully");
    }).catch(function (e) {
        console.error("SDK Init failed", e);
    });
});
Getting the data for risk assessment
Get the data for risk assessment by adding a call to the SDK's getData method, for example:
_pingOneSignals.getData()
   .then(function (result) {
       console.log("get data completed: " + result)
   }).catch(function (e) {
       console.error('getData Error!', e);
});