The PingID API
PingID® is a cloud-based strong authentication solution that enables software applications to authenticate users according to multiple factors. This means that in addition to entering a user name and password, the user must perform another authentication step using a mobile device. This could be swiping a button on the device, or entering a one-time password that the PingID mobile app generates. Since in addition to supplying the (potentially hackable) user credentials, users must perform a physical action on their own mobile device, which is registered on the PingID platform, a much higher level of security is enforced than the user credentials alone can provide.
PingID API is mainly intended for enterprise workforce and partner employees authentication, with use cases such as email and CRM systems.
For customer use cases such as users logging in to online banking, one is best advised to use the PingID SDK. Refer to Introduction to PingID SDK.
The PingID API set consists of two web API’s that enable you to access the PingID service, in order to perform the following types of functions:
- Authentication API - Functions for performing online and offline user authentication. The type of authentication applied depends on the user’s device type, the PingID configuration settings, and whether or not the user’s mobile device is able to receive push notifications at the time of authentication.
- User Administration API - Functions for managing users. These perform actions such as adding and deleting users, editing user details, pairing a user with a specific mobile device, temporarily blocking a user from the system, and so on.
This document is intended for software developers who want to integrate PingID into their own application.
PingID Functional Overview
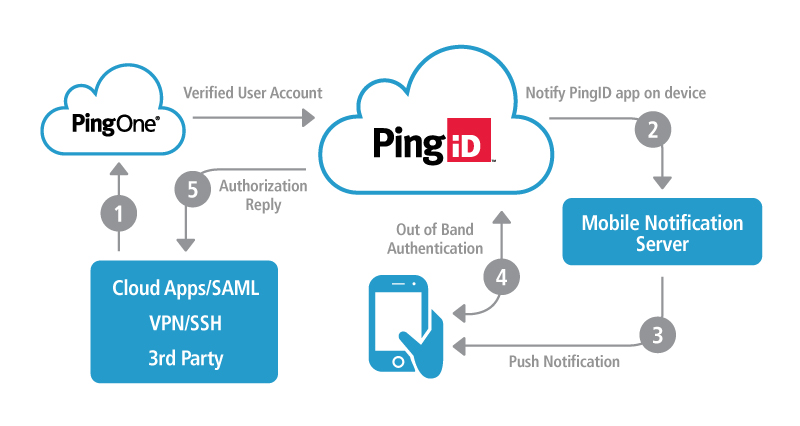
These are the entities involved in the PingID authentication workflow:
- Organization: A company or other type of organization using the PingID platform to protect its software services. Examples of organizations are: banks offering online services, call centers, companies that want to protect the online service their employees access, and so on.
- Service Provider: A web service, whether cloud-based or installed on-site, proprietary to the organization or offered by a 3rd-party, which the organization allows its users (employees or customers) to access.
- User: A consumer of the service provided by the service provider. The user may be either an employee or a customer of the organization.
The following diagram shows the entities involved in the PingID authentication workflow and the interactions between them:
PingID API Security Features
To ensure the security of your users’ data, PingID enforces the following security features to protect its API calls, in addition to the high security standards applied throughout the entire system:
- Message signature: Each message sent to the PingID API is signed by the calling application, using a secret key that is specific to the client. This key is validated when the message arrives, and the request is rejected if the signature is not valid.
- Secure connection: The PingID API can be accessed only through an SSL connection, using 256bit encryption.
- Strict data validation: Any external connection to a system is a potential security risk, including the PingID API. PingID protects itself by performing strict checks on the types and values passed through the API (according to OWASP requirements). By doing so, PingID adheres to the best practices for protection against any known vulnerabilities that might harm the system or expose the data stored on it.
Setup your PingID Account
PingID is part of Ping Identity’s PingOne product suite. Before you integrate PingID into your application, your company will need to set up a PingOne account. Please visit the Ping Identity contact page to submit your contact details. A Ping Identity security expert will get in touch with you to discuss the best solution for your company’s needs.
You can also register for a PingOne developer account at https://www.pingidentity.com/en/try-ping.html.
Each PingID account must have at least one user with administrator rights. In addition to managing PingID users, the administrator can edit company account details, configure PingID account settings and view statistical reports about PingID usage.
Prerequisites
The following list contains the subdomains used for API requests. Verify with your admins that the subdomain for your organization’s region is not blocked. To determine which subdomain you have to use in your requests, check the value of the idp_url setting in the properties file for your organization - see The PingID Properties file.
- idpxnyl3m.pingidentity.com
- idpxnyl3m.pingidentity.eu
- idpxnyl3m.pingidentity.com.au
Note that all the sample requests in the PingID API documentation use the subdomain for North America. If you copy/paste request URLs from the documentation, make sure you update the URLs to use the relevant subdomain for your region.
The PingID Properties File
The PingID account administrator will need to download the account’s properties file. This file contains several account-specific settings, including these values that you’ll need to use when creating a PingID API request message:
| Setting | Description |
|---|---|
| token | A unique identifier of the PingID client. |
| org_alias | The name of the PingID client organization. |
| use_base64_key | A key that you’ll use to create a signature value for each message. |
For security purposes, all PingID requests are validated using the token and use_base64_key values, and rejected if these values are invalid.
Here is an example of the contents of a properties file:
#Auto-Generated from PingOne, downloaded by id=[12345] email=[joe@pingdevelopers.com]
#Tue Sep 04 16:09:48 MDT 2018
use_base64_key= JWC41crr322aUfabc98xyzvGKNIPyAPGL7rMsTbzHlA\=
use_signature=true
token=61fda4f3121abc98xyz57c57c9fd9930
idp_url=https://idpxnyl3m.pingidentity.com/pingid
org_alias=12345-aaaa-bbbb-1234-87654321abcd
admin_url=https://bodxr5jgf.pingidentity.com/ConsoleAdmin
authenticator_url=https://authenticator.pingone.com/pingid/ppm
To download the account properties file, the PingID account administrator must:
- Login to the PingOne administration console
- Click the Setup tab in the main menu, then click the PingID Configuration tab in the sub-menu.
- In the Client Integration section, click the “Download” link under “Integrate With PingFederate and Other Clients”. The administrator is prompted to save the properties file to a local folder.
How to Use the PingID API
Create the Request
To make a call to the PingID API, you must construct an API request token. The request token is a JSON Web Token (JWT) signed with a JSON Web Signature (JWS) which is sent to the PingID API endpoint.
A JWS consists of three components:
- Header
- Request payload
- Digital signature
These three components are base64url-encoded and concatenated, with a period (’.’) character between each, to form the token. This API request token is sent via an HTTP POST command to the appropriate API endpoint. The response is another JWS token that the calling application must validate and process.
Request Token Header
The header consists of three parameters in a JSON structure:
| Parameter | Description |
|---|---|
| alg | The signing algorithm (must be “HS256”) |
| org_alias | A unique identifier of the organization, found in the org_alias value in the properties file |
| token | A unique ID of the calling client (there can be several per organization), also found in the properties file as the token value |
An example of an API token header is below:
{
"alg": "HS256",
"org_alias": "aaaaaaaa-a1b2-123a-b456-1234abcd5678",
"token": "1a2b3c4d5e6f"
}Request Token Payload
The request token payload is a JSON object containing two child objects: a request header object (reqHeader) and a request body object (reqBody). The reqHeader object is constructed with the following parameters in the JSON:
| Parameter | Description |
|---|---|
| locale | A code indicating the caller’s preferred language. Error and status messages are returned in this language. |
| orgAlias | A unique identifier of the organization, found in the org_alias value in the properties file. |
| secretKey | A unique ID of the calling client (can be several per organization). Found in the token value in the properties file. |
| timestamp | The date and time the request was sent. The datetime format is: “yyyy-MM-dd HH:mm:ss.SSS” (SSS = 3-digit millisecond value), using the UTC timezone. |
| version | The version of the PingID API package. |
The reqBody object will vary for each API operation (see the specific request documentation for details).
The example below describes a request token payload that is used to add the new user “Meredith Archer” to the PingID user list:
{
 "reqHeader": {
  "locale":"en",
  "orgAlias":"aaaaaaaa-a1b2-123a-b456-1234abcd5678",
  "secretKey":"1a2b3c4d5e6f",
  "timestamp":"2015-09-03 11:57:25.229",
  "version":"4.9"
 },
 "reqBody": {
  "activateUser":false,
  "clientData":null,
  "email":"marcher@pingdevelopers.com",
  "fName":"Meredith",
  "lname":"Archer",
  "picUrl":null,
  "role":"REGULAR",
  "username":"marcher"
 }
}
Request Token Signature
Before sending the request token to the API endpoint, the contents must be signed using the use_base64_key retrieved from the PingID account properties file.
To create the signed token:
Create the signed data by concatenating the base64-encoded header and payload.
<signed data> = base64UrlEncode(<header>) + "." + base64UrlEncode(<payload>)Generate a HMAC with SHA-256 hash of the <signed data> using the use_base64_key.
The use_base64_key needs to be decoded first, otherwise signature validation will fail.
<signature> = base64UrlEncode( HMACSHA256( <signed data> ,<use_base64_key> ) )Append the signature to the signed data, with a period character (’.’) between the two values.
API request JWS = <signed data> + "." + <signature>Send the API Request
After creating the API request token, send it to the appropriate API endpoint via HTTP POST with a content type of application/json. For this example, the JWT described above will be sent to the AddUser endpoint, as follows:
POST https://idpxnyl3m.pingidentity.com/pingid/rest/4/adduser/do HTTP/1.1
Content-Type: application/json

eyJhbGciOiJIUzI1NiIsIm9yZ19hbGlhcyI6ImFhYWFhYWFhLWExYjItMTIzYS1iNDU2LTEyMzRhYmNkNTY3OCIsInRva2VuIjoiMWEyYjNjNGQ1ZTZmIn0.eyJyZXFIZWFkZXIiOnsibG9jYWxlIjoiZW4iLCJvcmdBbGlhcyI6ImFhYWFhYWFhLWExYjItMTIzYS1iNDU2LTEyMzRhYmNkNTY3OCIsInNlY3JldEtleSI6IjFhMmIzYzRkNWU2ZiIsInRpbWVzdGFtcCI6IjIwMTUtMDktMDMgMTE6NTc6MjUuMjI5IiwidmVyc2lvbiI6IjQuNiJ9LCJyZXFCb2R5Ijp7ImFjdGl2YXRlVXNlciI6ZmFsc2UsImNsaWVudERhdGEiOm51bGwsImVtYWlsIjoibWFyY2hlckBwaW5nZGV2ZWxvcGVycy5jb20iLCJmTmFtZSI6Ik1lcmVkaXRoIiwibG5hbWUiOiJBcmNoZXIiLCJwaWNVcmwiOm51bGwsInJvbGUiOiJSRUdVTEFSIiwidXNlcm5hbWUiOiJtYXJjaGVyIn19.j_CDmoCgDGRVqYoGyMaT5k6MTtW8Q1E9Xu6GHUHeNfA
Process the API Response
The response from the API request is a similarly signed JWT as the API request token. The response token contains a header, a payload (consisting of a responseBody object) and the digital signature.
The API request and response are sent over a secure HTTPS channel, therefore validation of the digital signature in the response token is not mandatory. However the token may be validated by checking the digital signature using the use_base64_key value found in the PingID account properties file.
Response Token Header
The response token header has the same format as the request token header. The token value and the org_alias value will match the values from your PingID account properties file.
The header also includes the algorithm used to sign the token, which is HS256.
Response Token Payload
The response payload contains a JSON structure with the results of the API operation. Although the response payload varies for each API operation, the following attributes will be returned in every response:
| Parameter | Description |
|---|---|
| clientData | The value sent in the request’s clientData field. |
| errorId | A numeric error code (see PingID API Error Codes for more information) |
| errorMsg | A textual description of the error, if there was one. |
| uniqueMsgId | A unique ID for the response message. This is logged and used to track the specific transaction for troubleshooting purposes. |
An example of a successful response to the AddUser operation is included below:
{
 "activationCode": "",
 "userDetails": {
  "userName": "marcher",
  "userId": 17139,
  "email": "marcher@pingdevelopers.com",
  "lname": "Archer",
  "userInBypass": false,
  "fname": "Meredith",
  "picURL": "YAGZECHU7WL4H4HDLZEMTGMM5KE55ZOCTXCECF7PKCPDDXLHNTE4TPQ=",
  "spList": [],
  "lastLogin": null,
  "bypassExpiration": null,
  "deviceDetails": null,
  "lastTransactions": [],
  "userEnabled": false,
  "status": "NOT_ACTIVE",
  "role": "REGULAR"
 },
 "errorId": 200,
 "errorMsg": "ok",
 "uniqueMsgId": "webs_P5-Z1SD-eA1M2vzOAryPaKL-xJ_-Y8t5ddNJpZKm8mw",
 "clientData": null
}